App for IBM QRadar - Installation & User Guide v2.0.0, v2.1.0 and v2.1.1
Requirements
- Access to Carbon Black Cloud
- IBM QRadar version 7.3.3 patch level 6 or later
Quick Links
Getting Started
This guide describes:
- How to choose and set up the appropriate log source(s) for your Carbon Black Cloud app for IBM QRadar
- Steps to install and configure different settings in the app
- Various pages and actions you can use once it is configured
Log Source
The app offers two log source input options or methods of data ingestion. Each method supports different types of data. To access all types of data, you need to use a combination of Built-in input and Data Forwarder input. To use additional features such as Device information and Right-click actions, you need to configure the app as described below.
Built-in API Input
This method of data ingestion uses Carbon Black Cloud REST APIs to pull data into QRadar.
Supported data and features:
Requirements:
For customers with Identity managed in Carbon Black Cloud:
- “API” Type Key and ID (for audit logs)
- “Custom” Type Key and ID (for all other data inputs and right-click Actions)
Pros:
- Available out of the box without the need to configure an AWS S3 bucket
Cons:
- Container Memory Limit - A combination of high bursts of Alerts for extended periods and low physical memory on the app container can cause memory overload. As discussed in this thread, the memory is limited to 10% of the system’s physical memory. This can cause delays in Alert and general data processing. If you experience such symptoms, consider using the Data Forwarder input.
Setup Built-in Input
Follow the steps below to create API Keys with the appropriate permissions and configure the Log Source Type to start pulling in Carbon Black Cloud data.
"API" Type Credentials
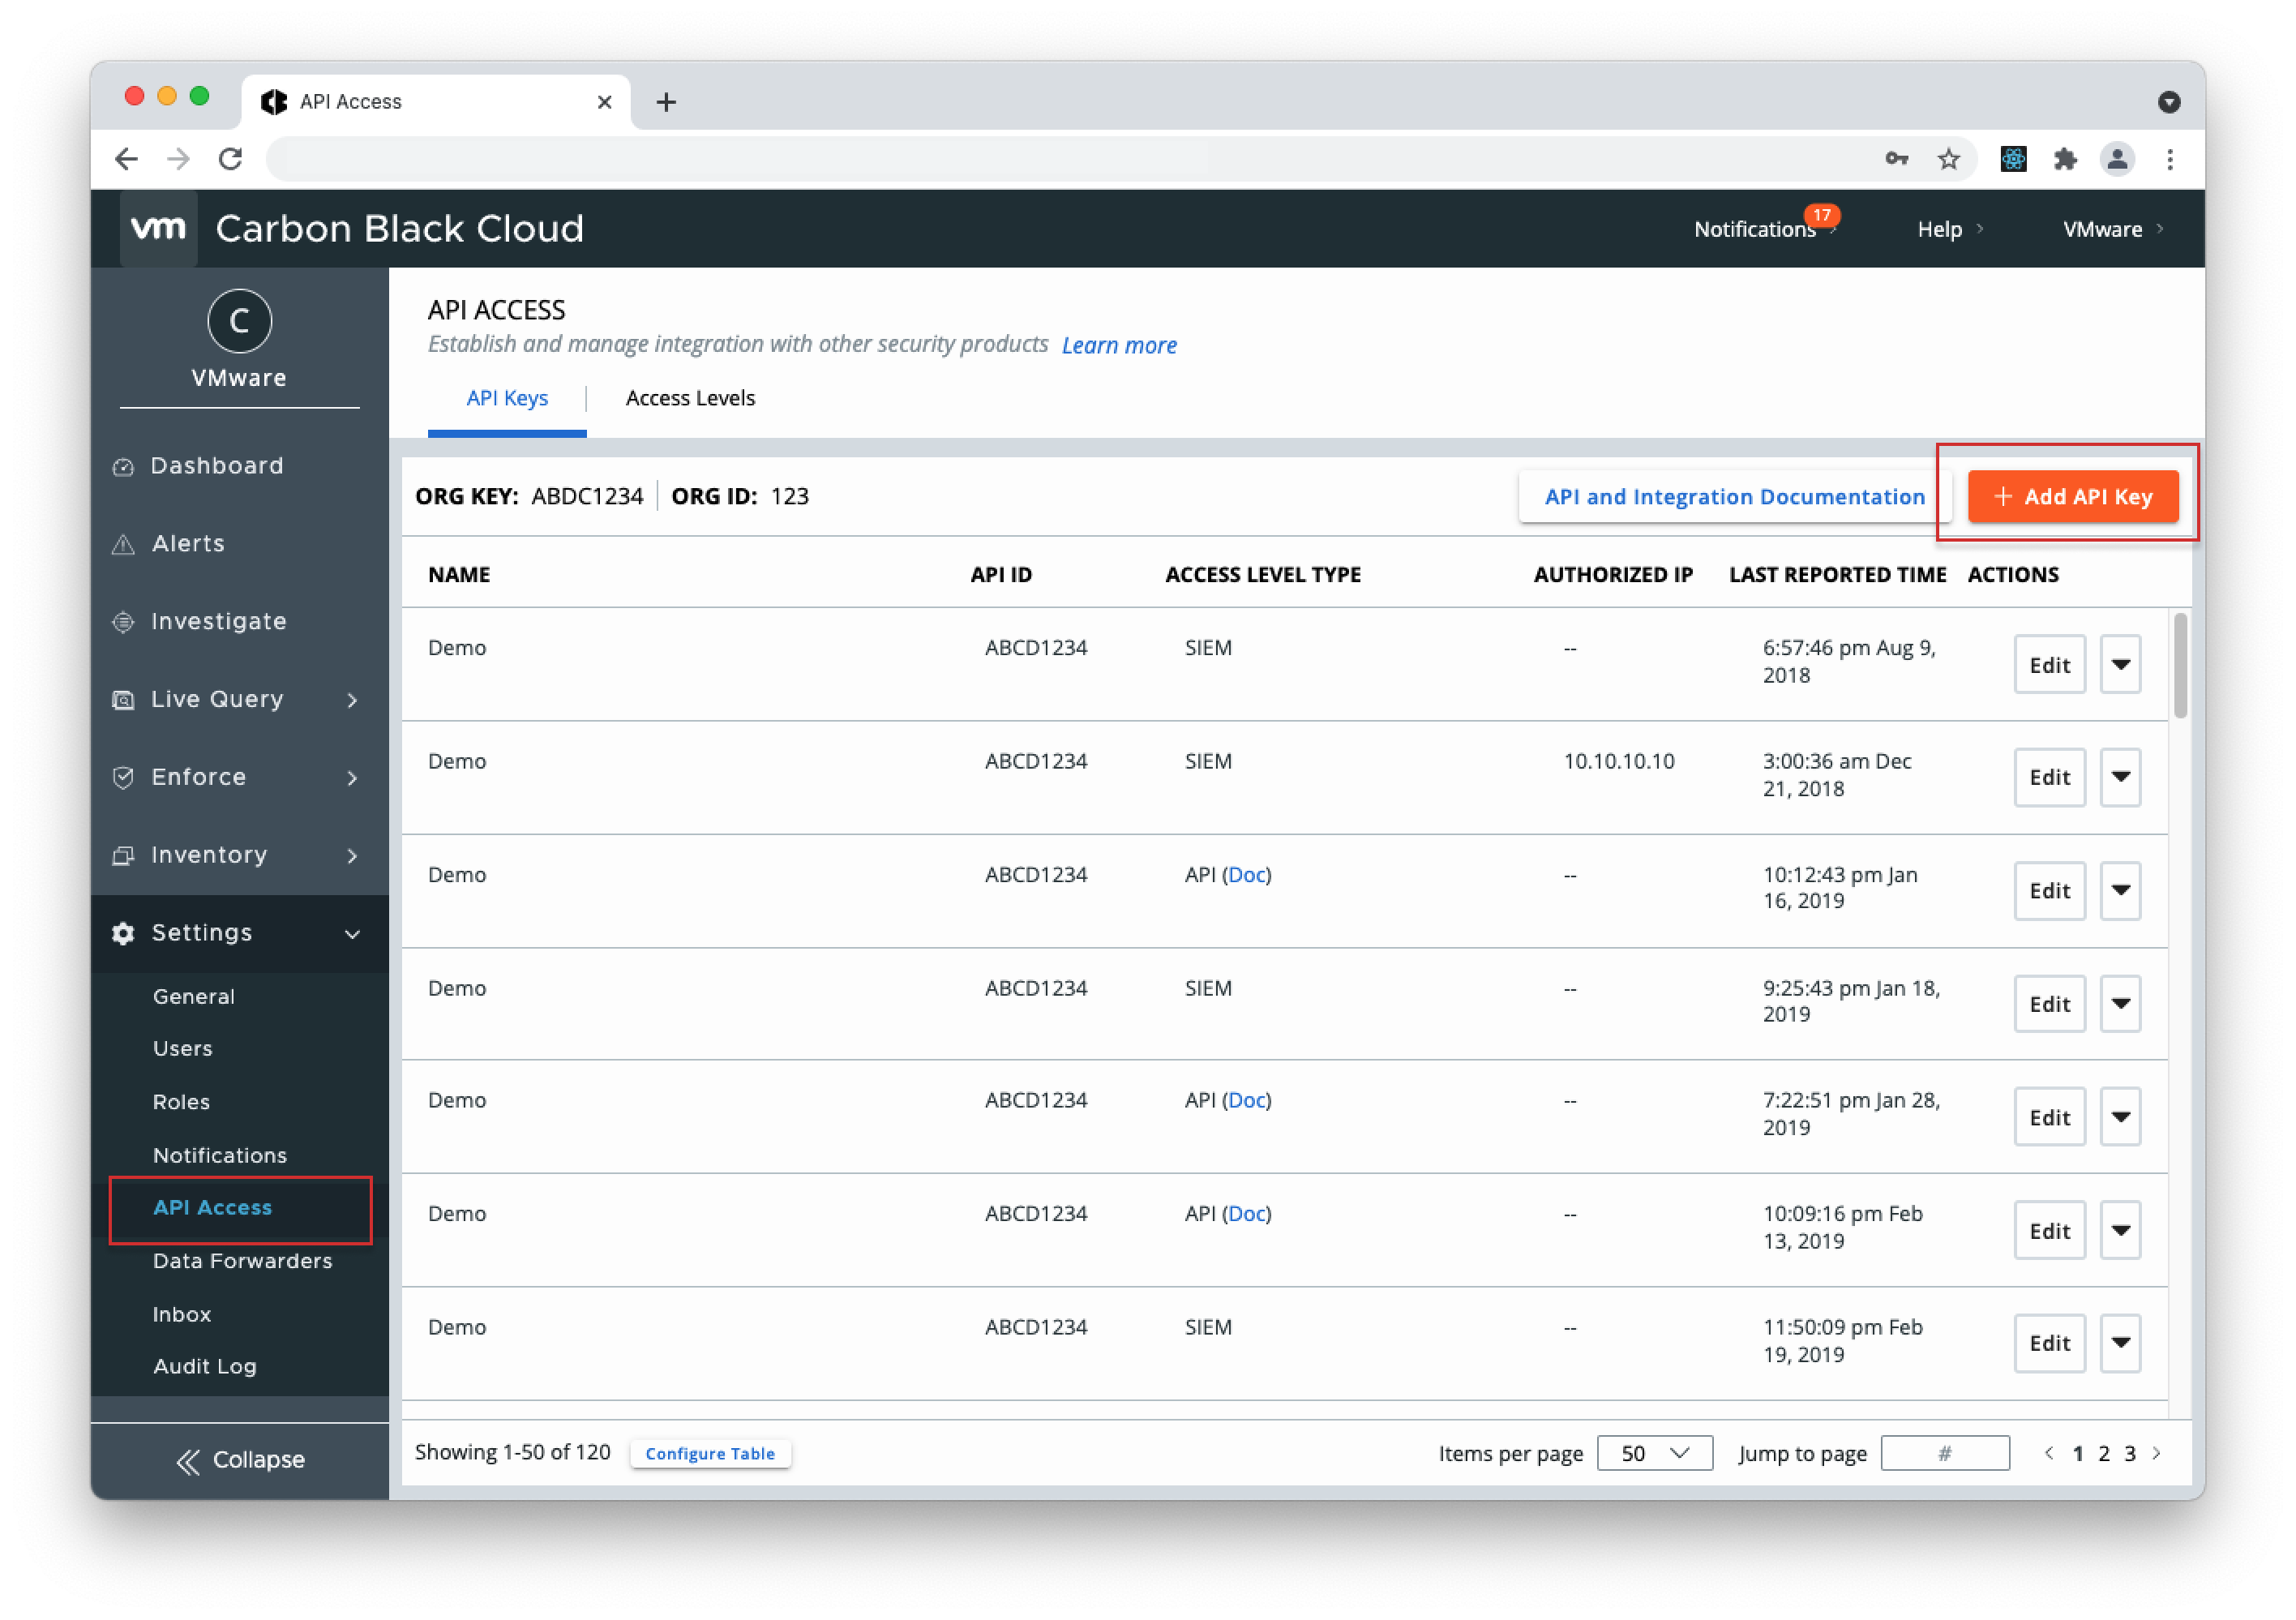
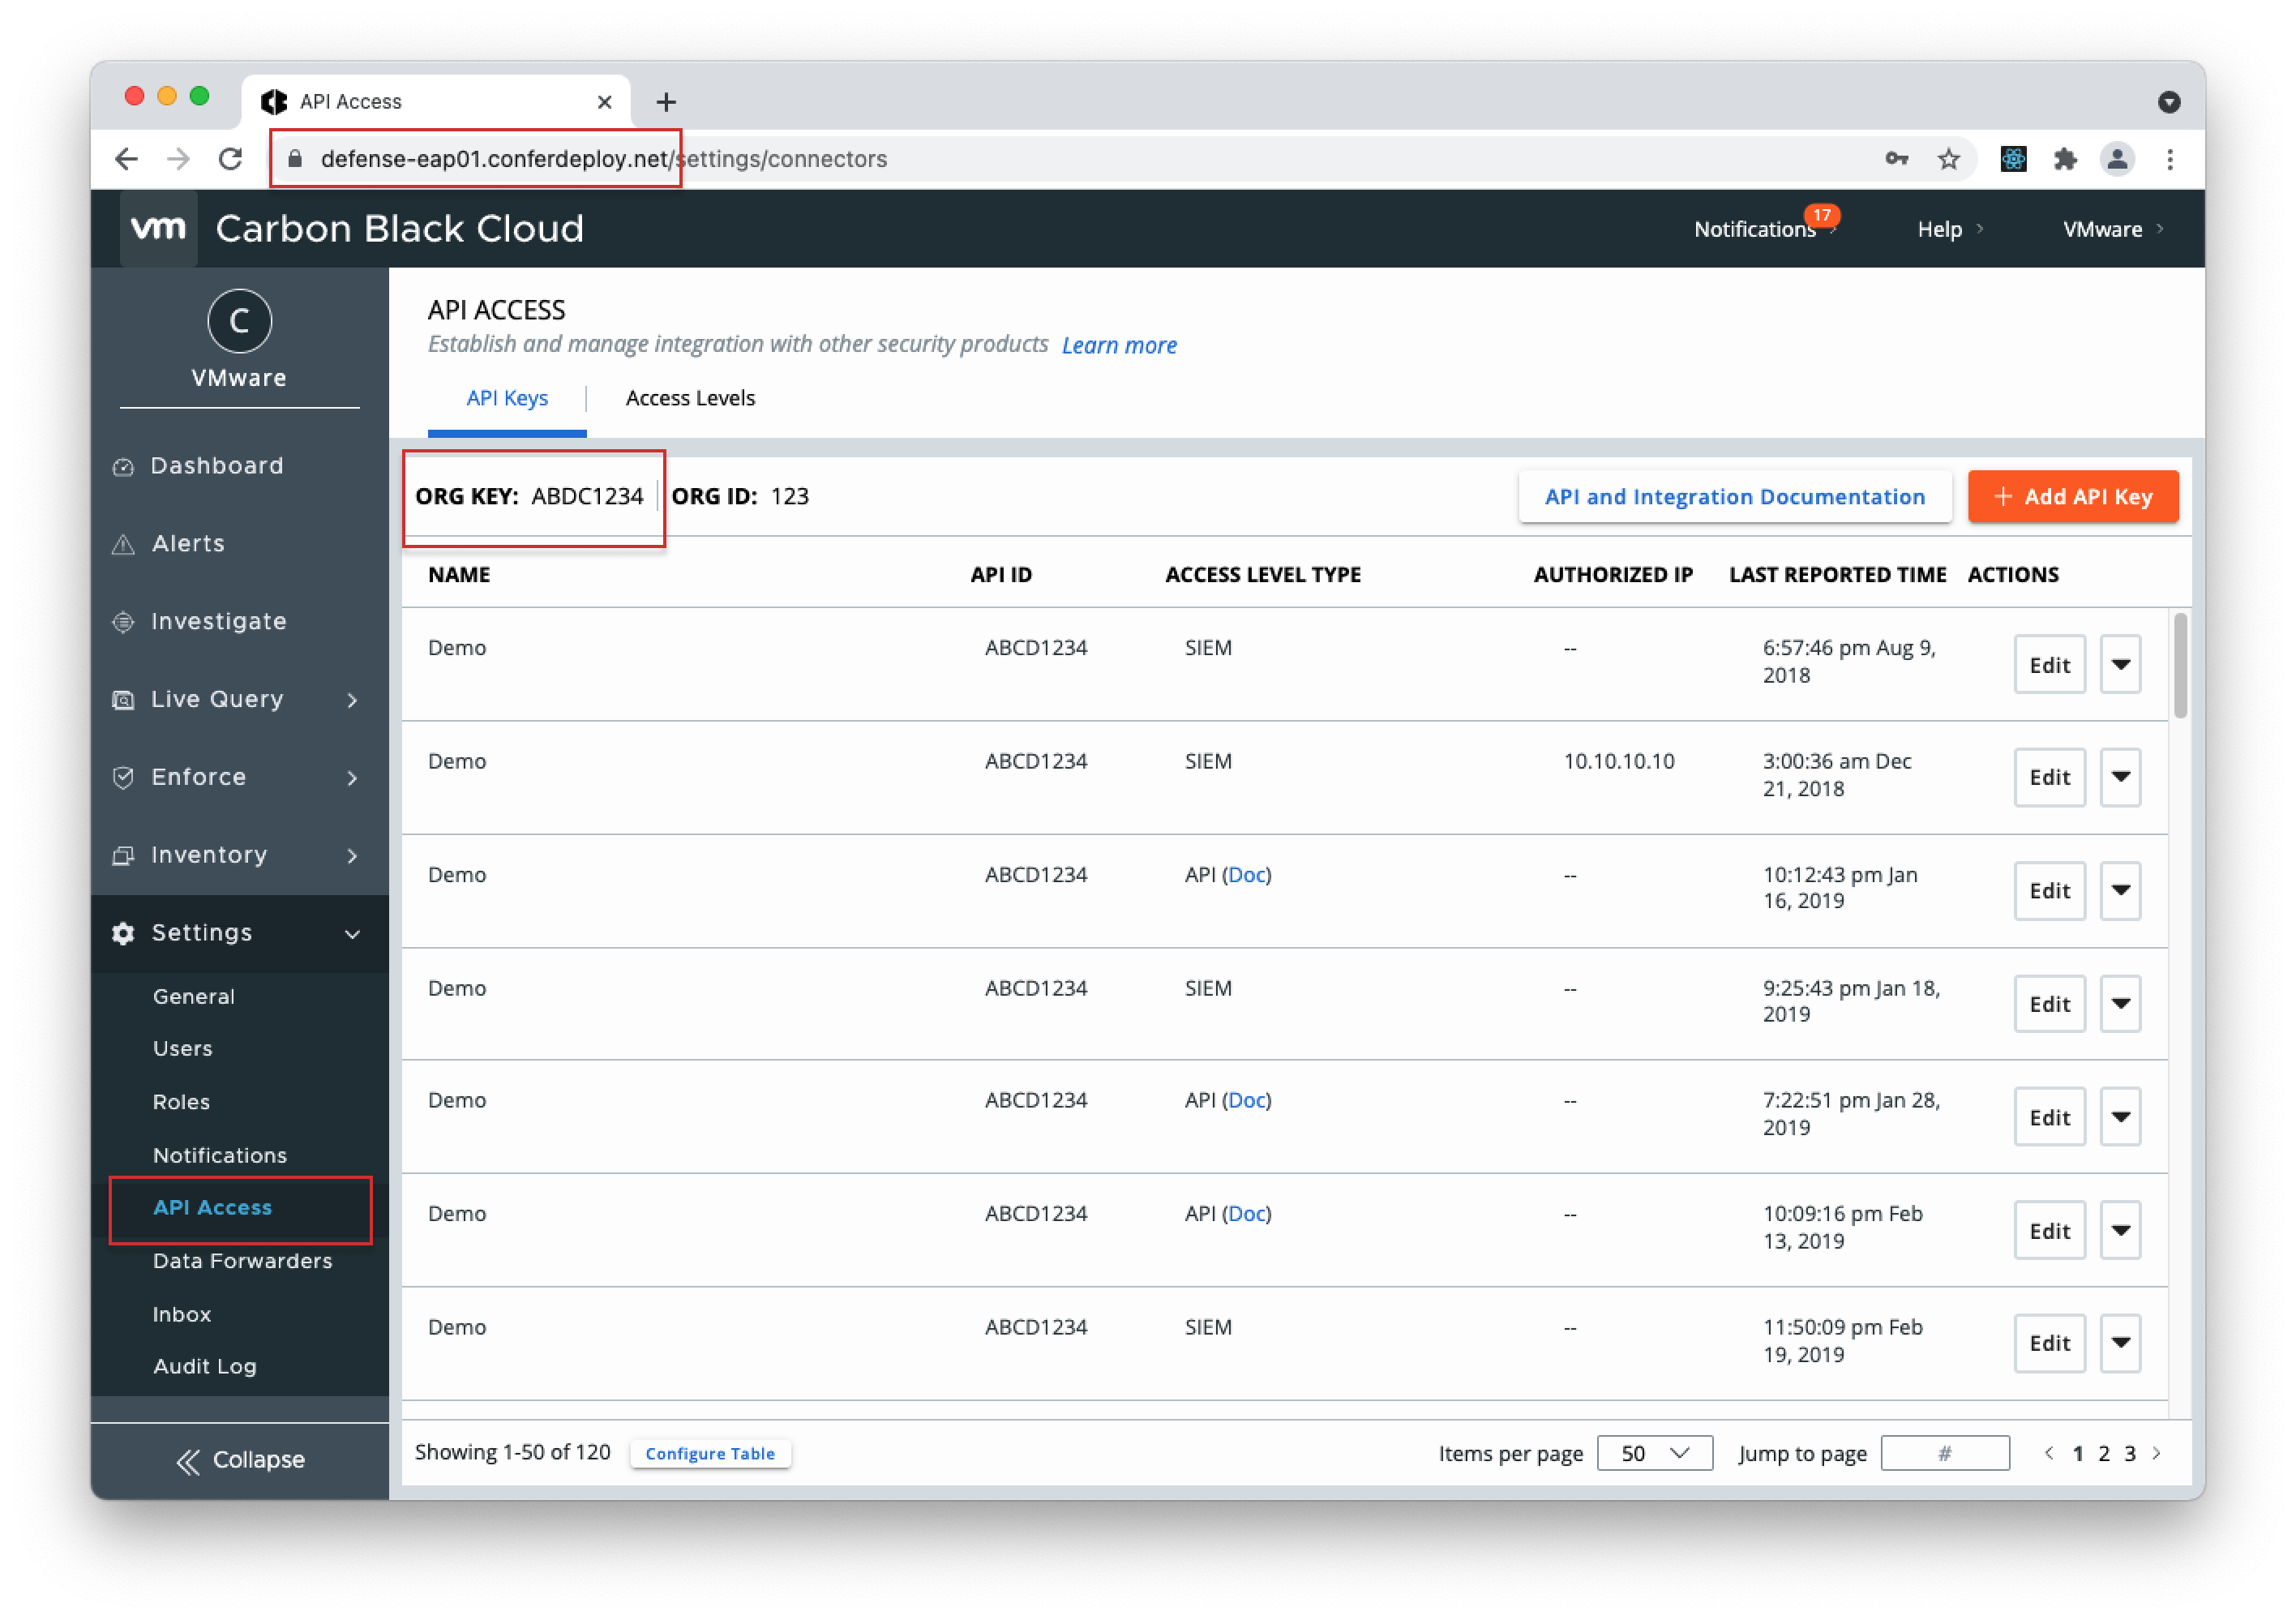
- 1. Open your Carbon Black Cloud console, go to Settings > API Access page, and select "Add API Key".
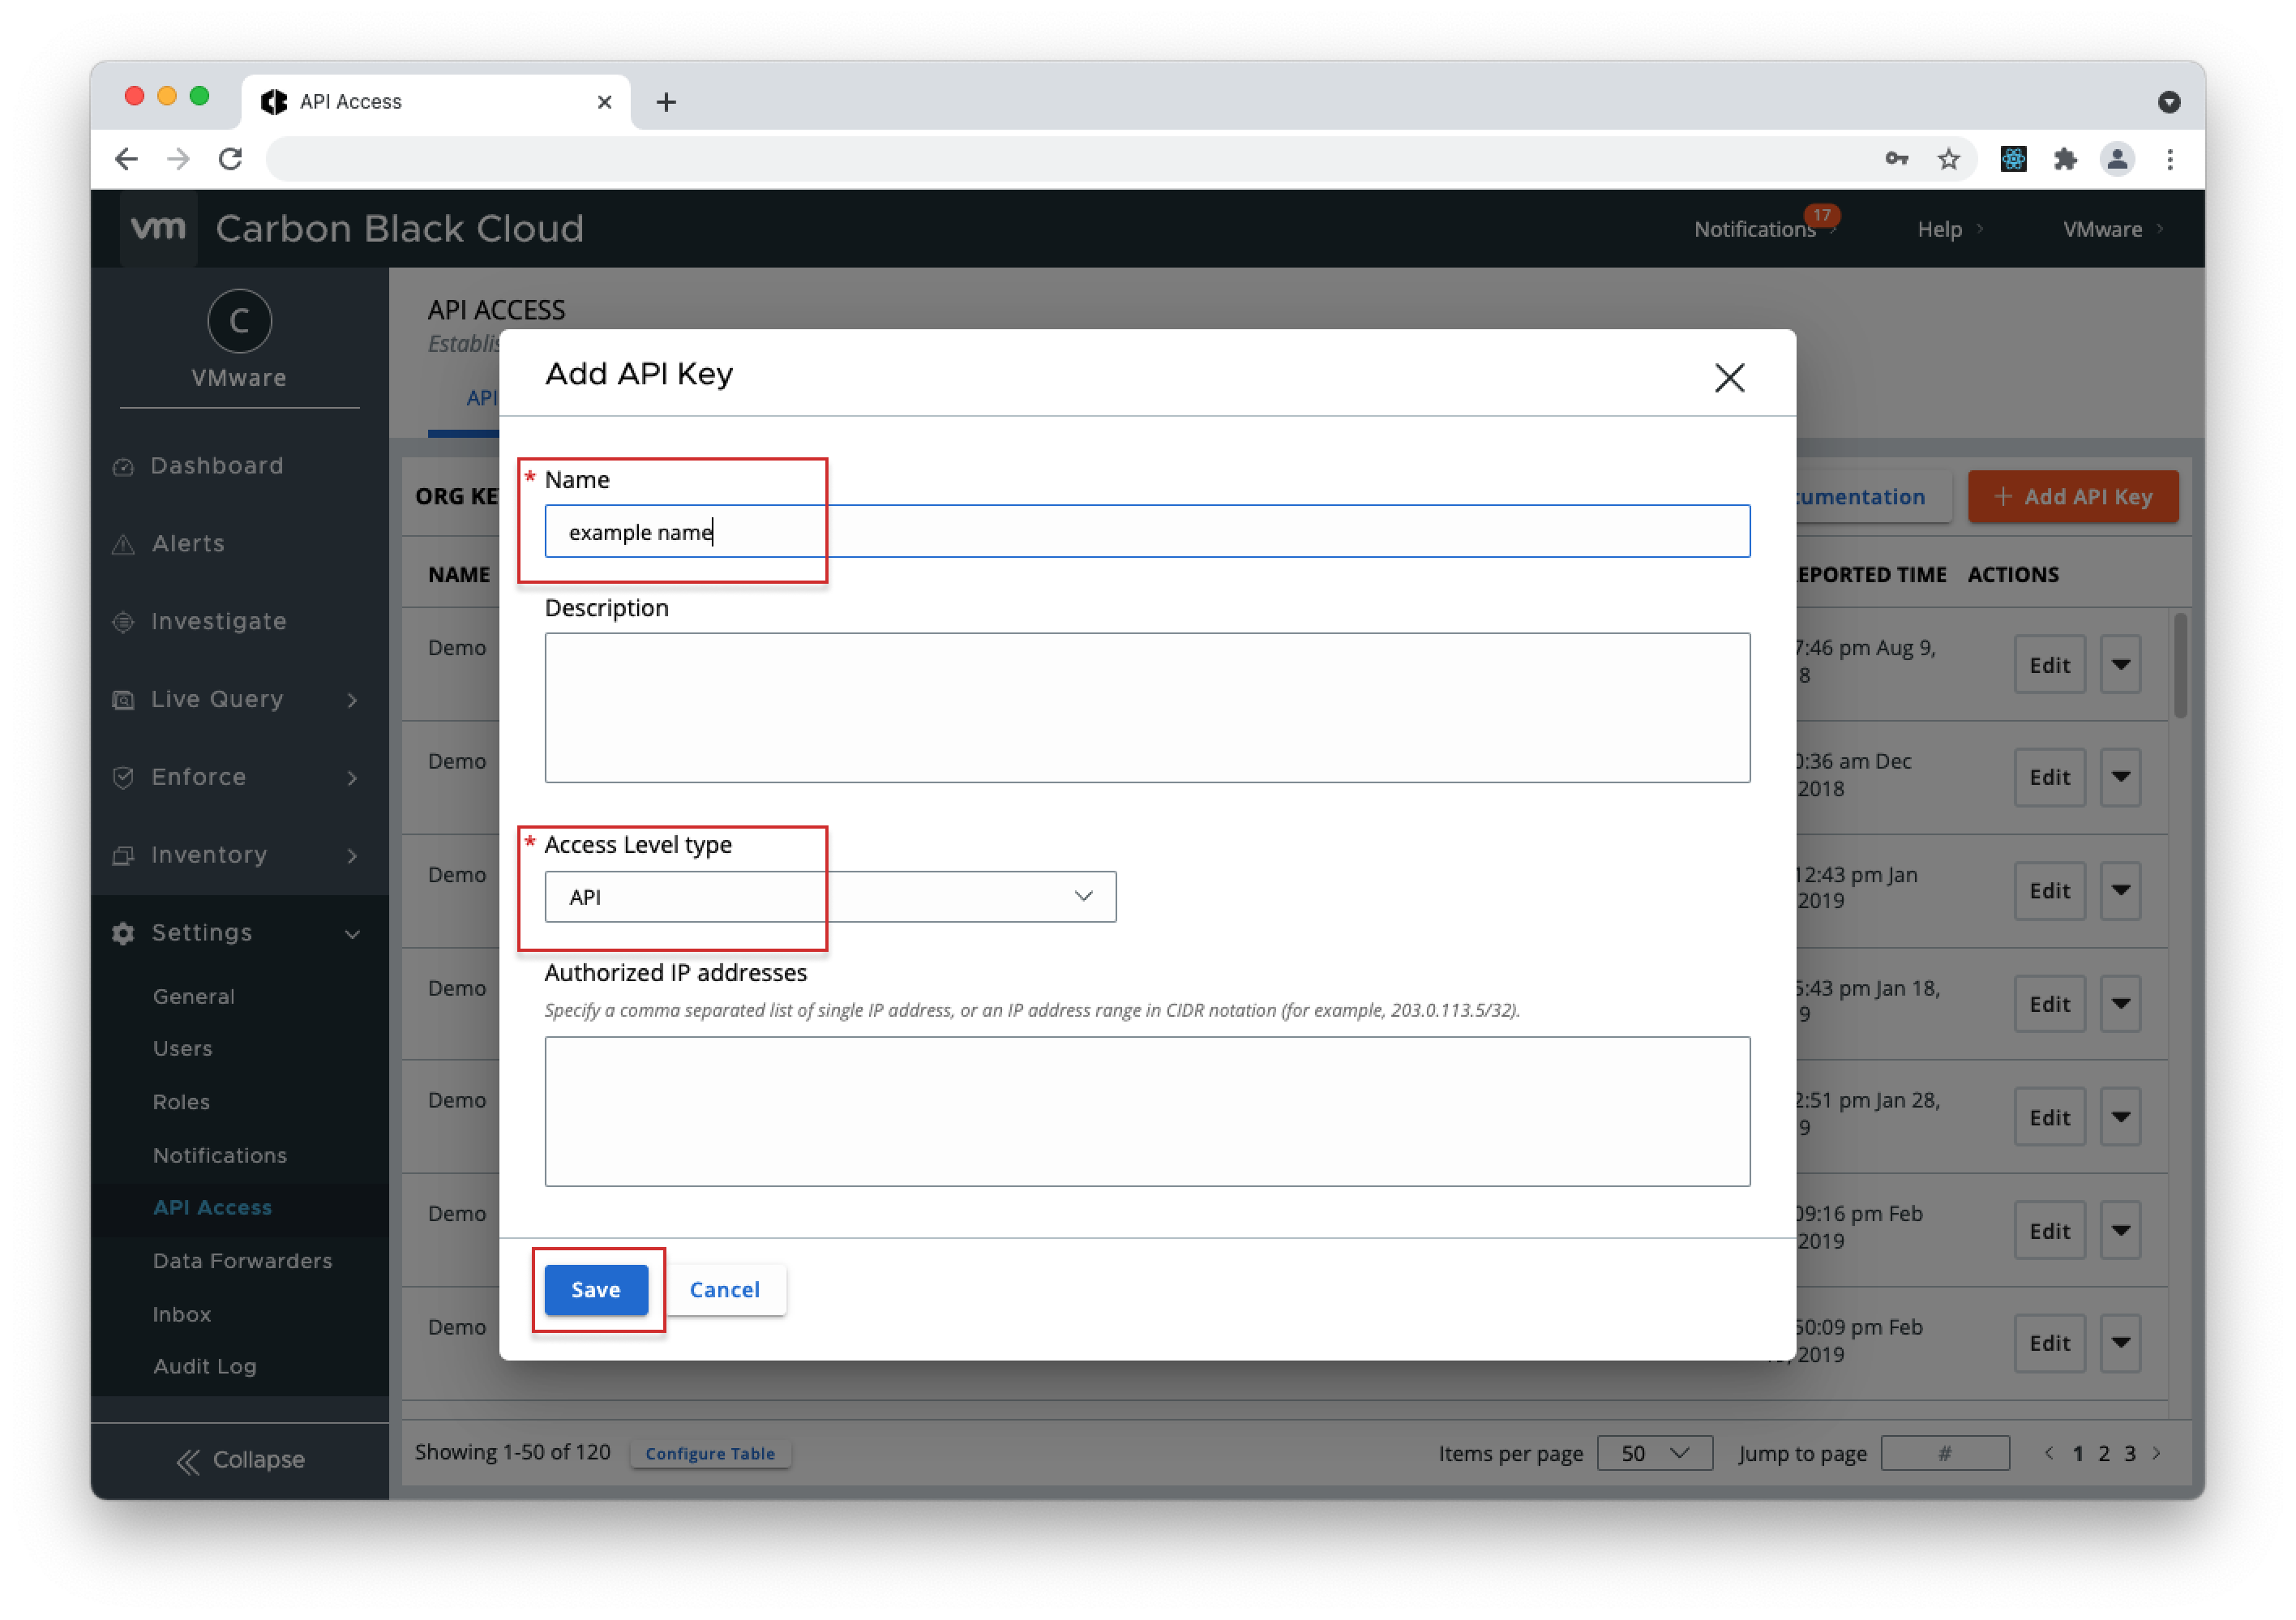
- 2. Give the Key a name, select "Access Level Type" > choose "API" and click Save.
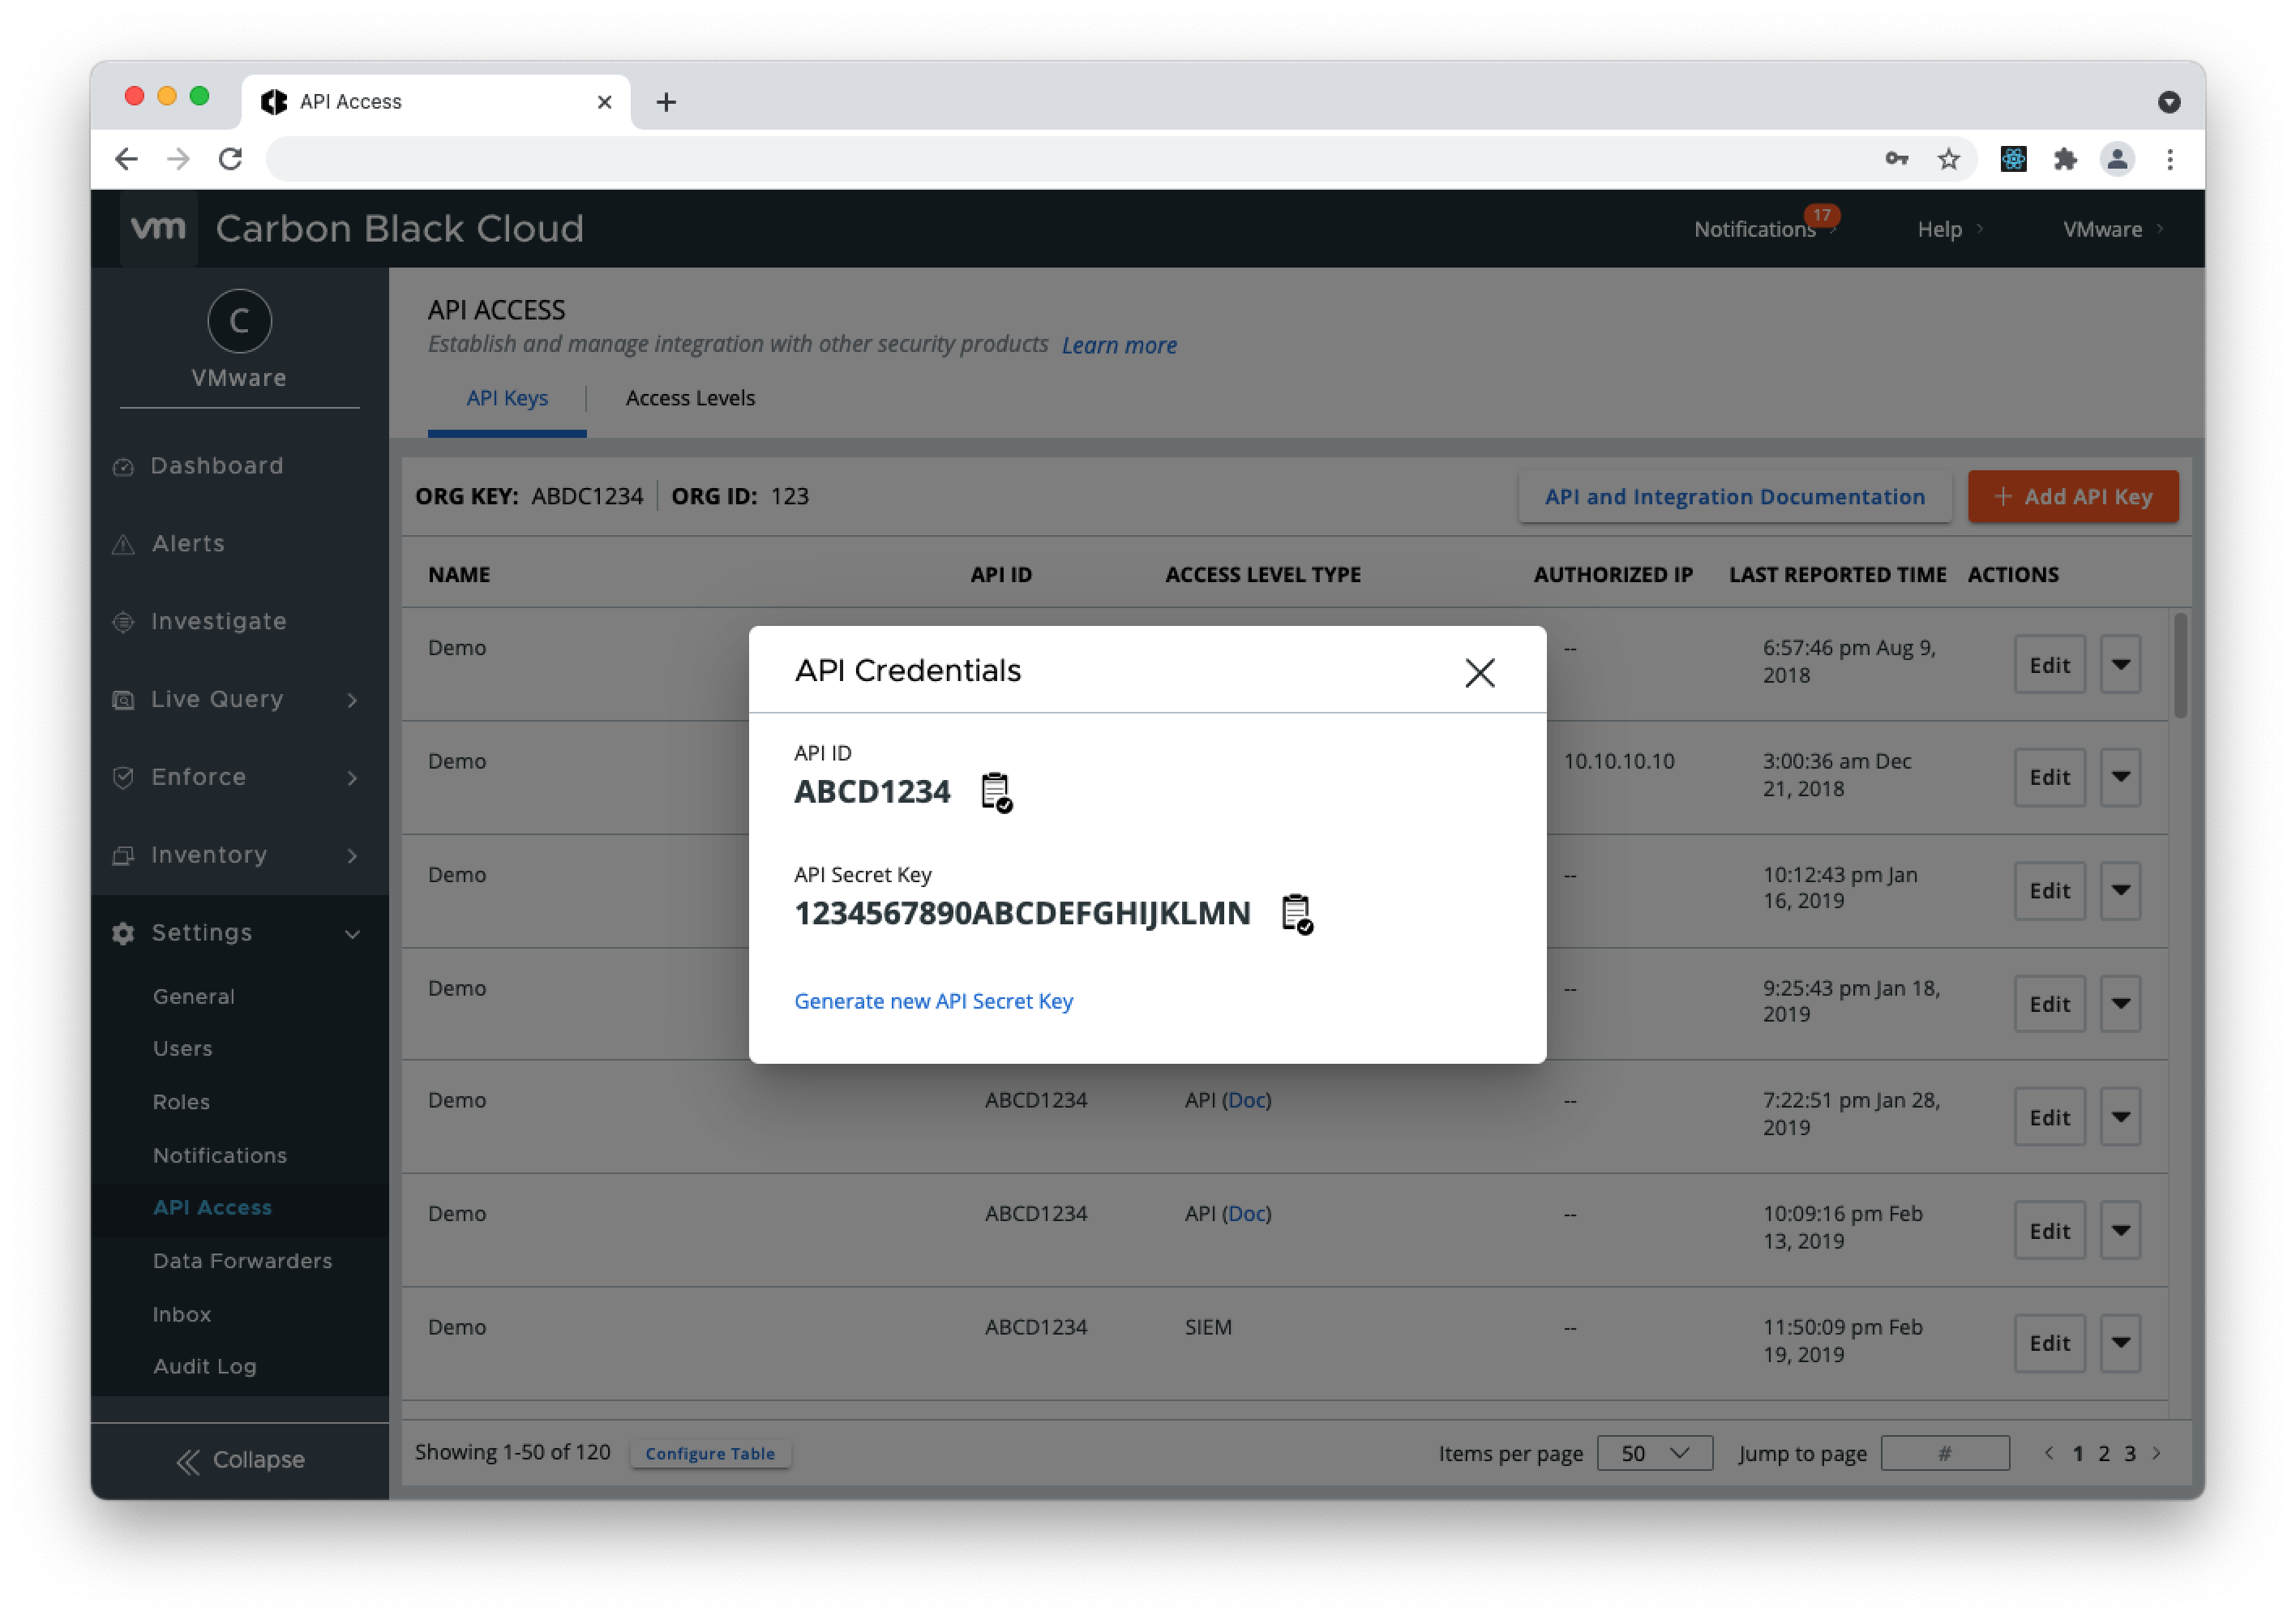
- 3. Copy the API Secret Key and API ID from the pop-up modal (store the API Secret Key somewhere securely, because it cannot be retrieved after initial creation) and open the QRadar console.
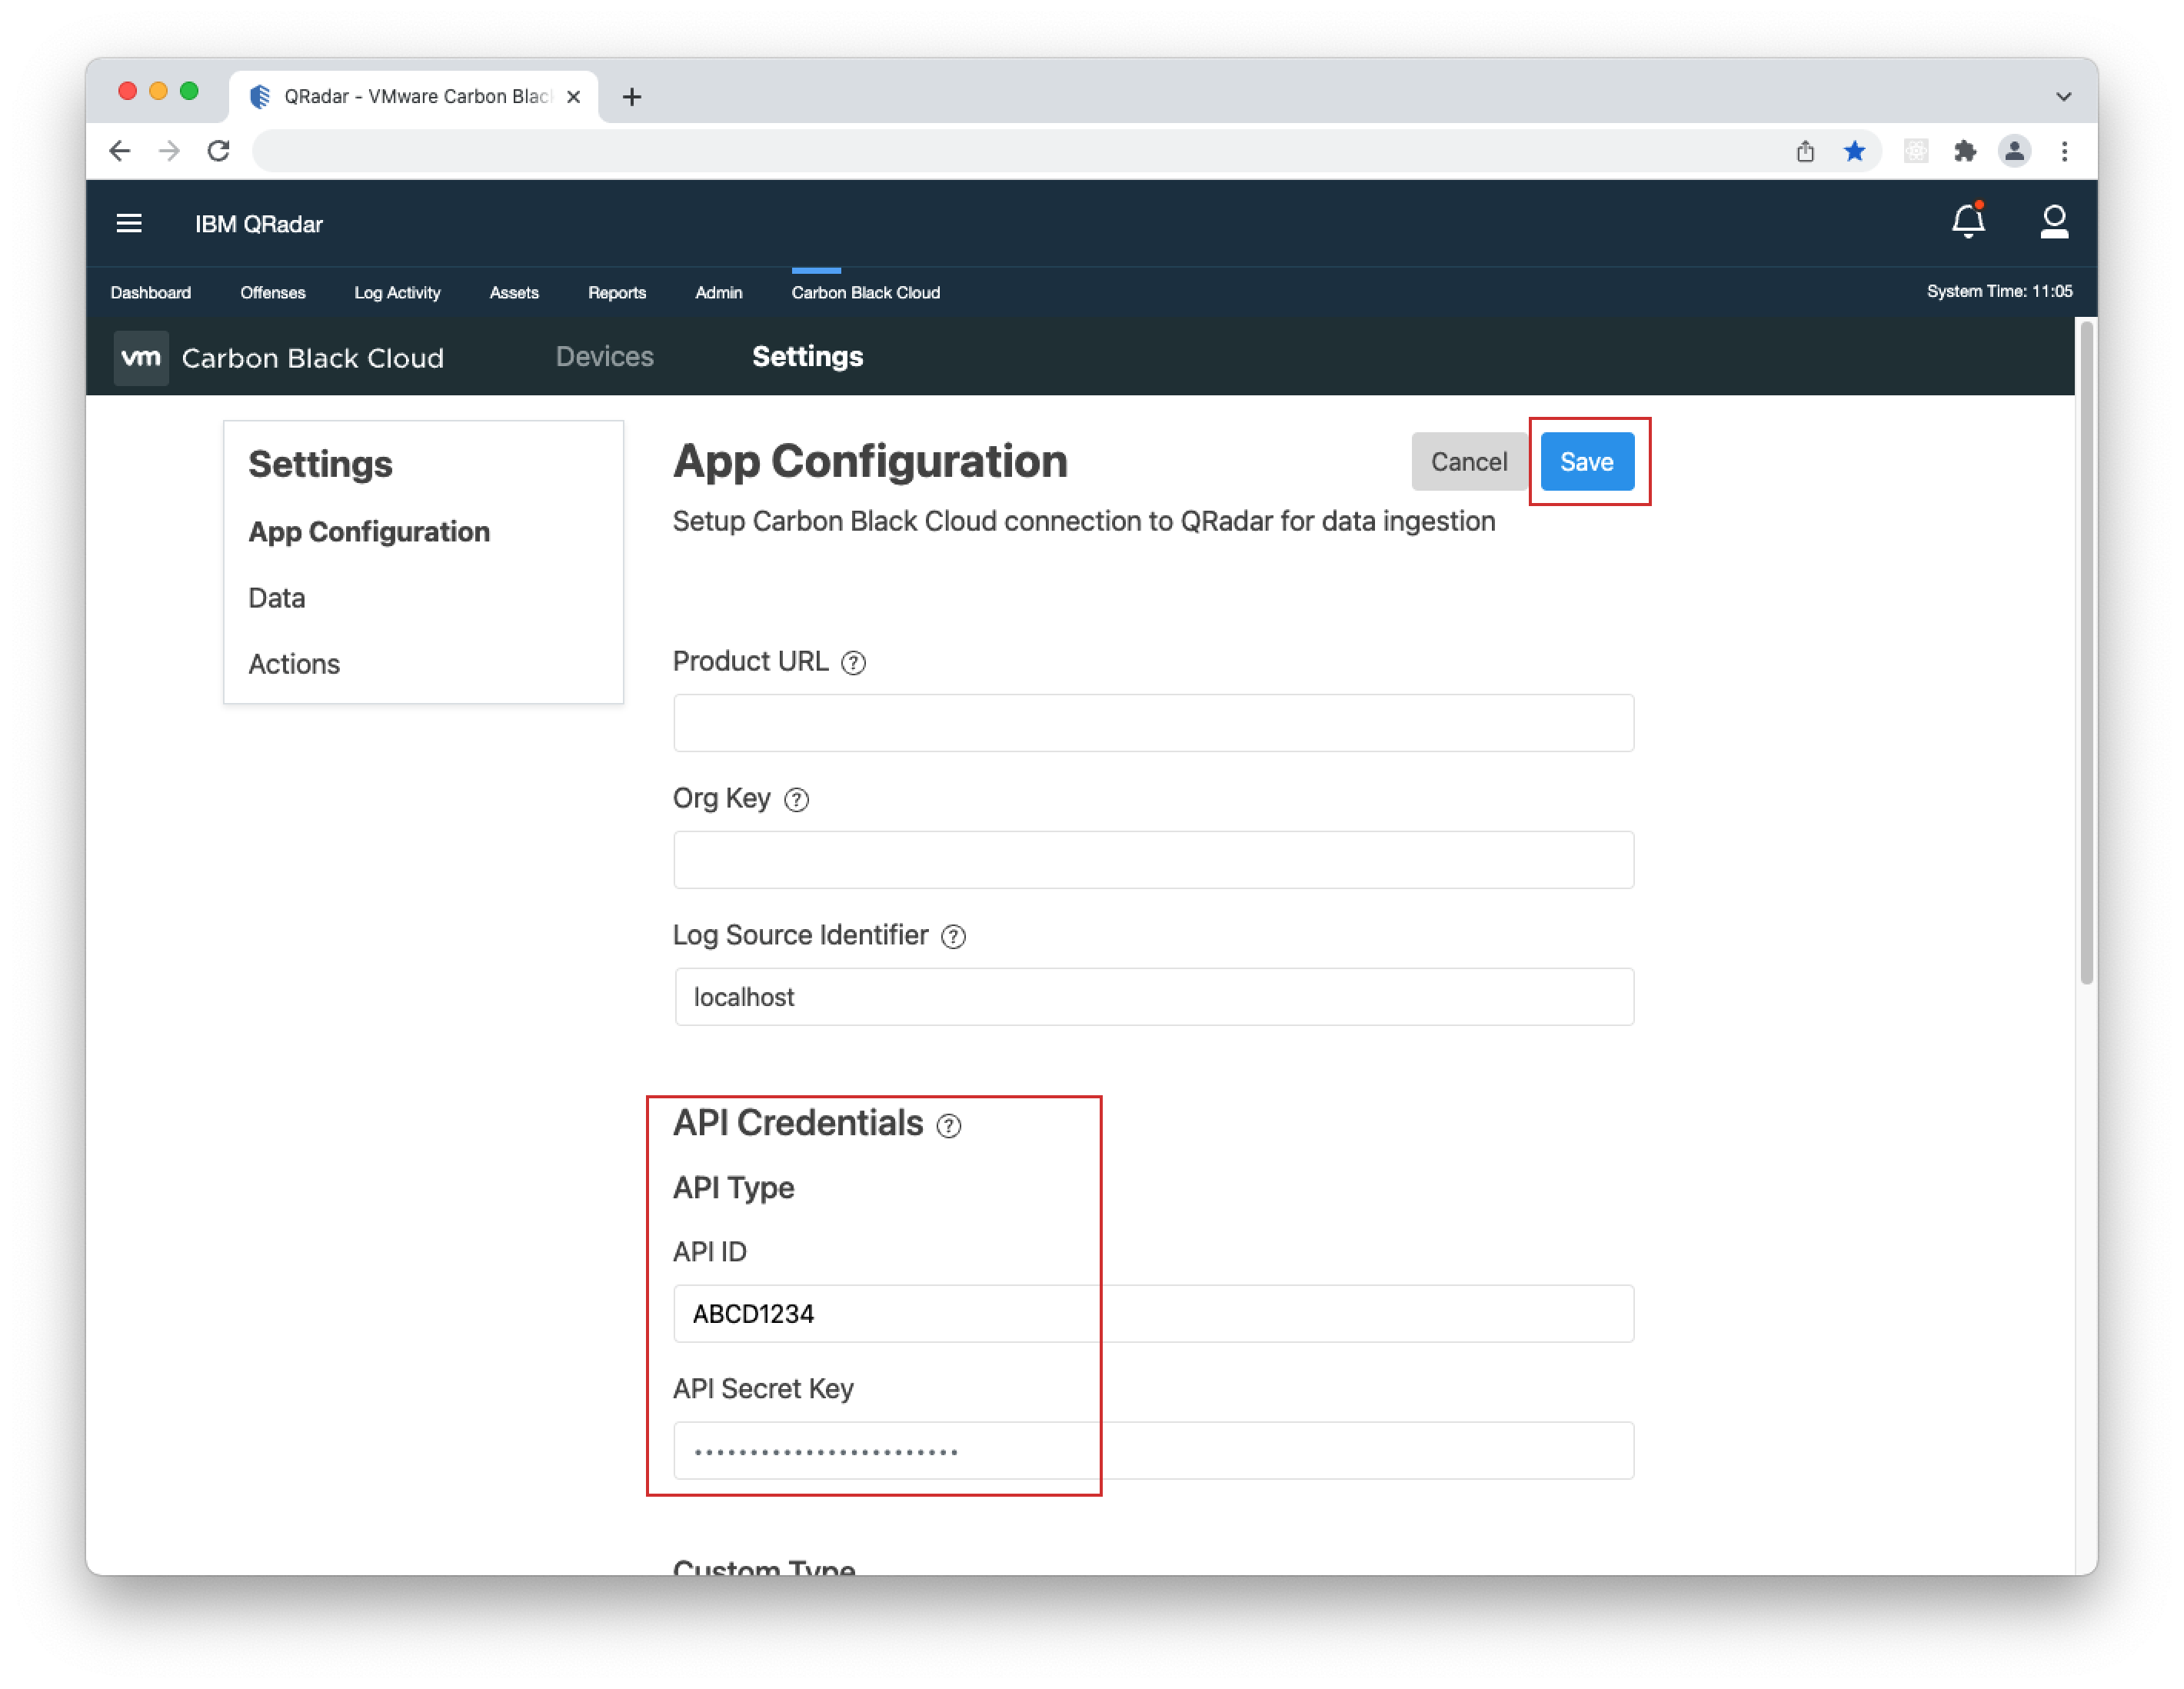
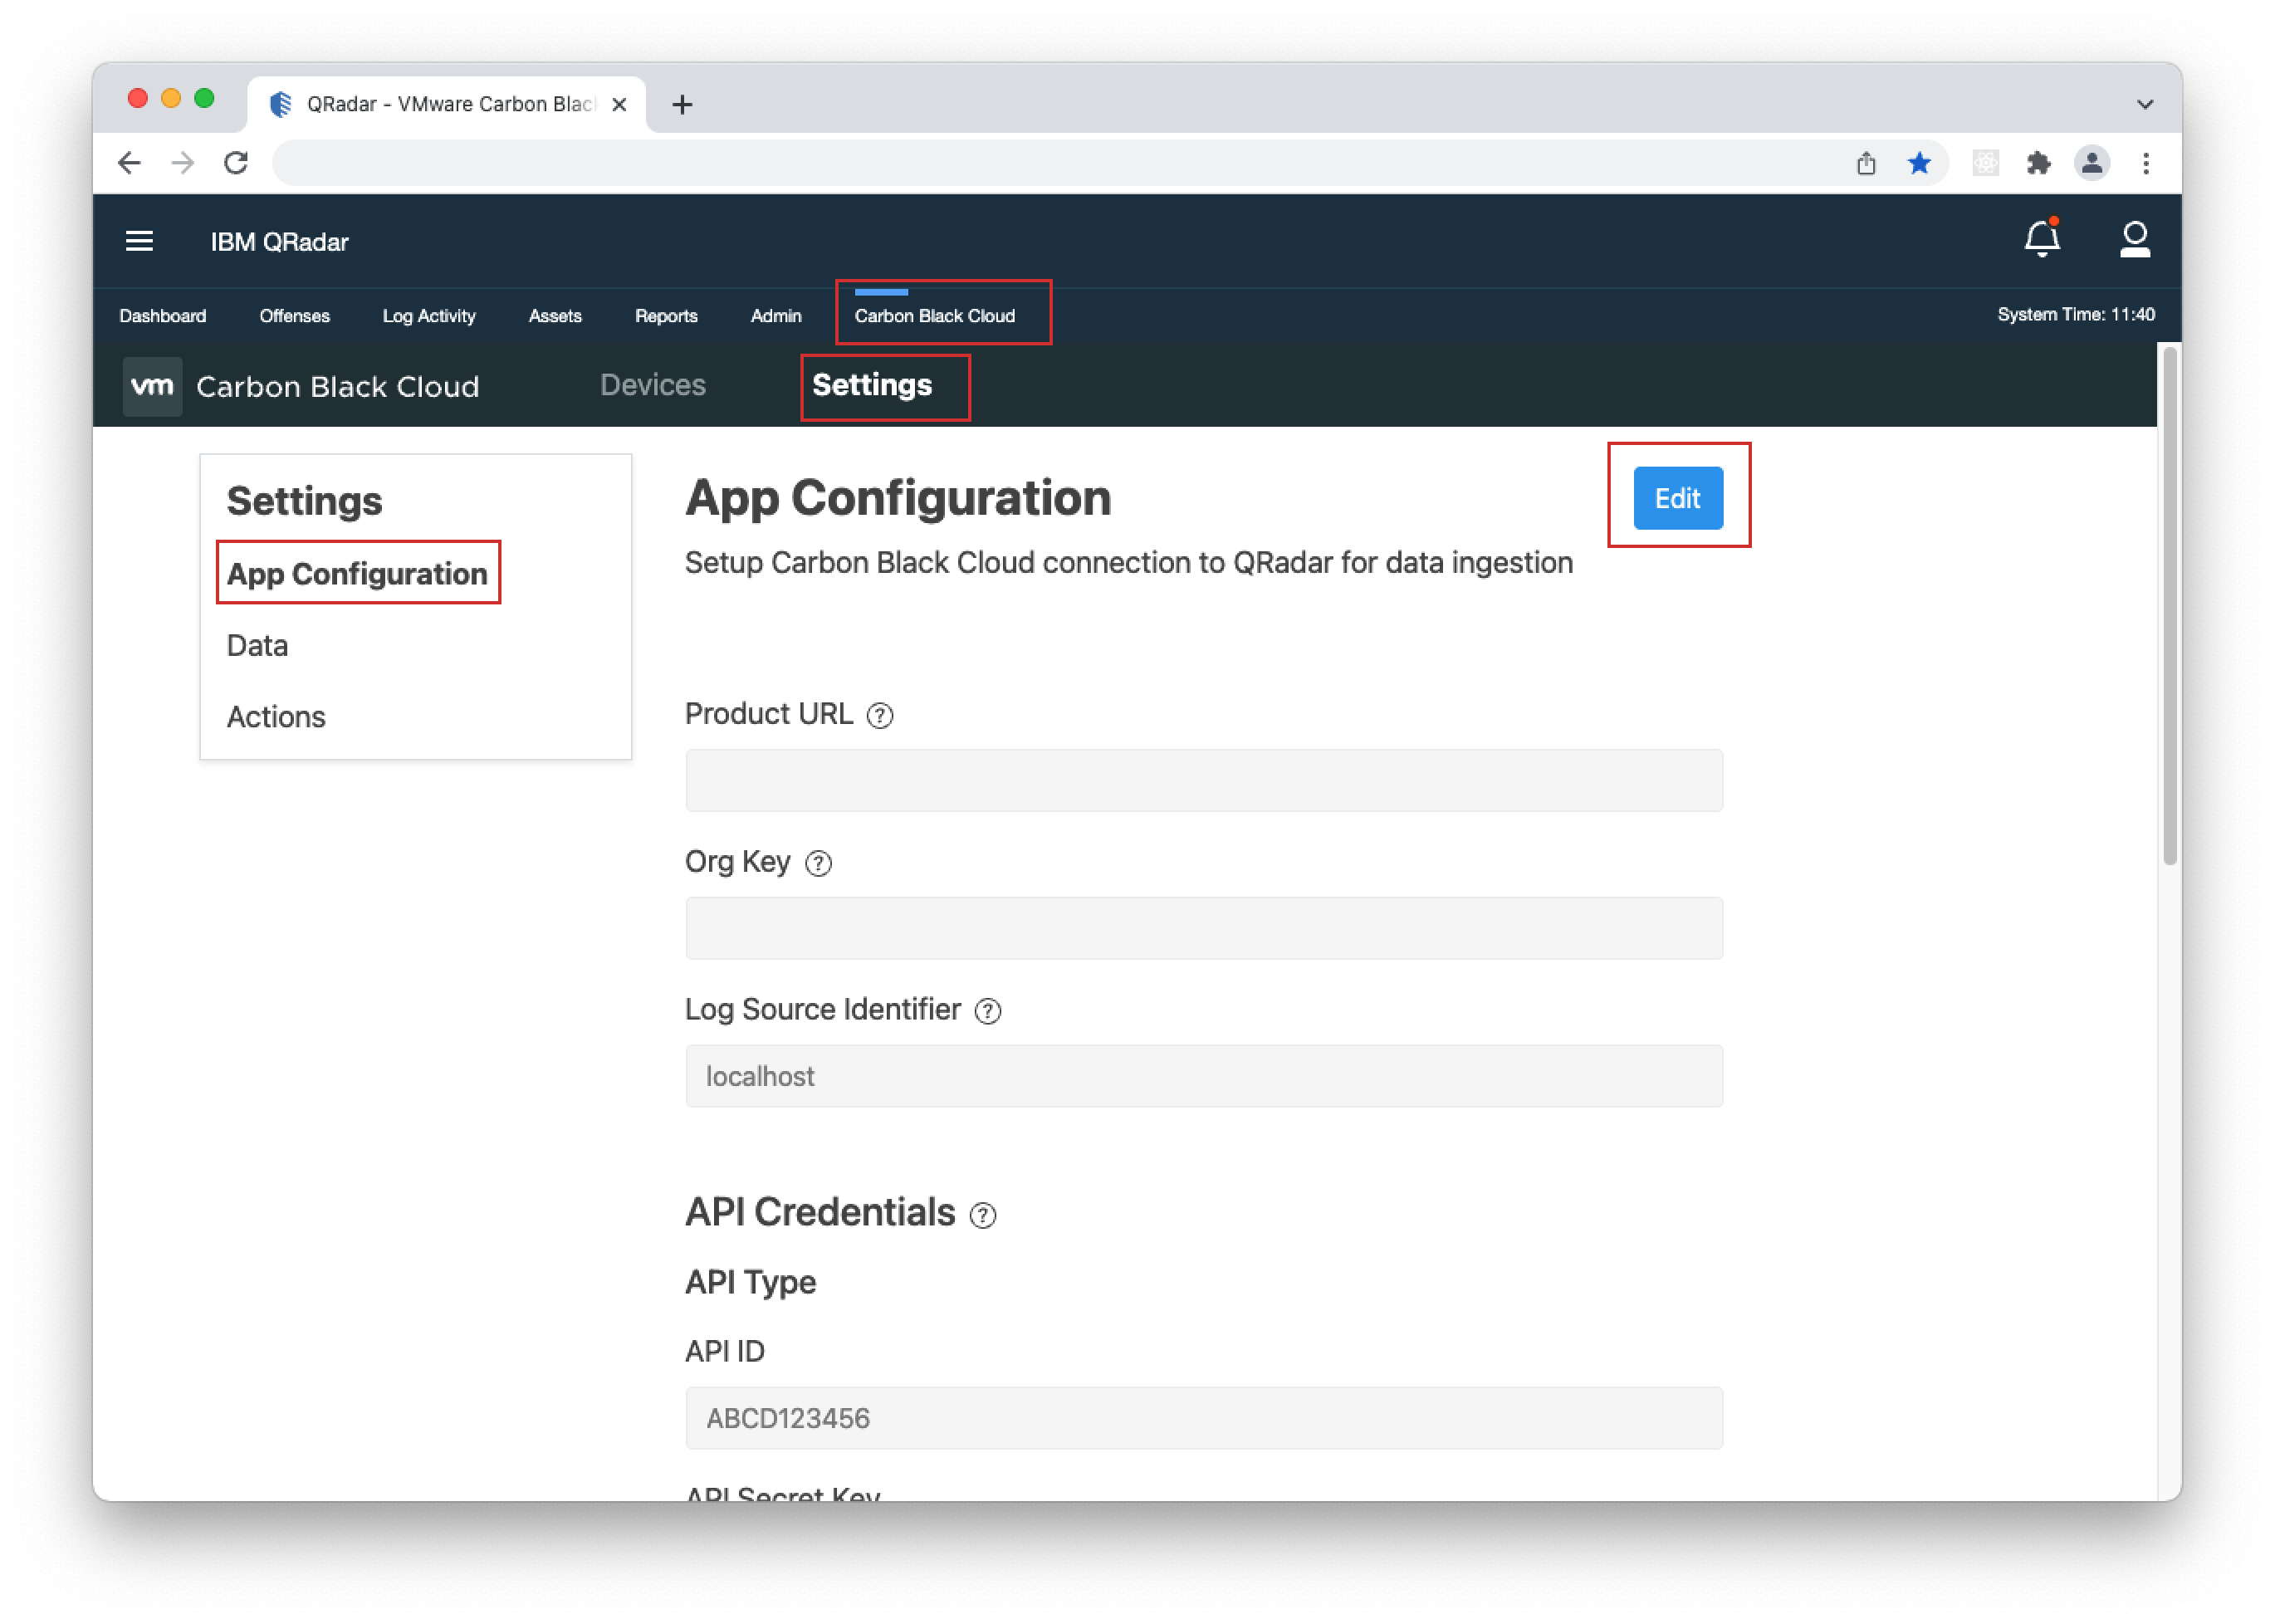
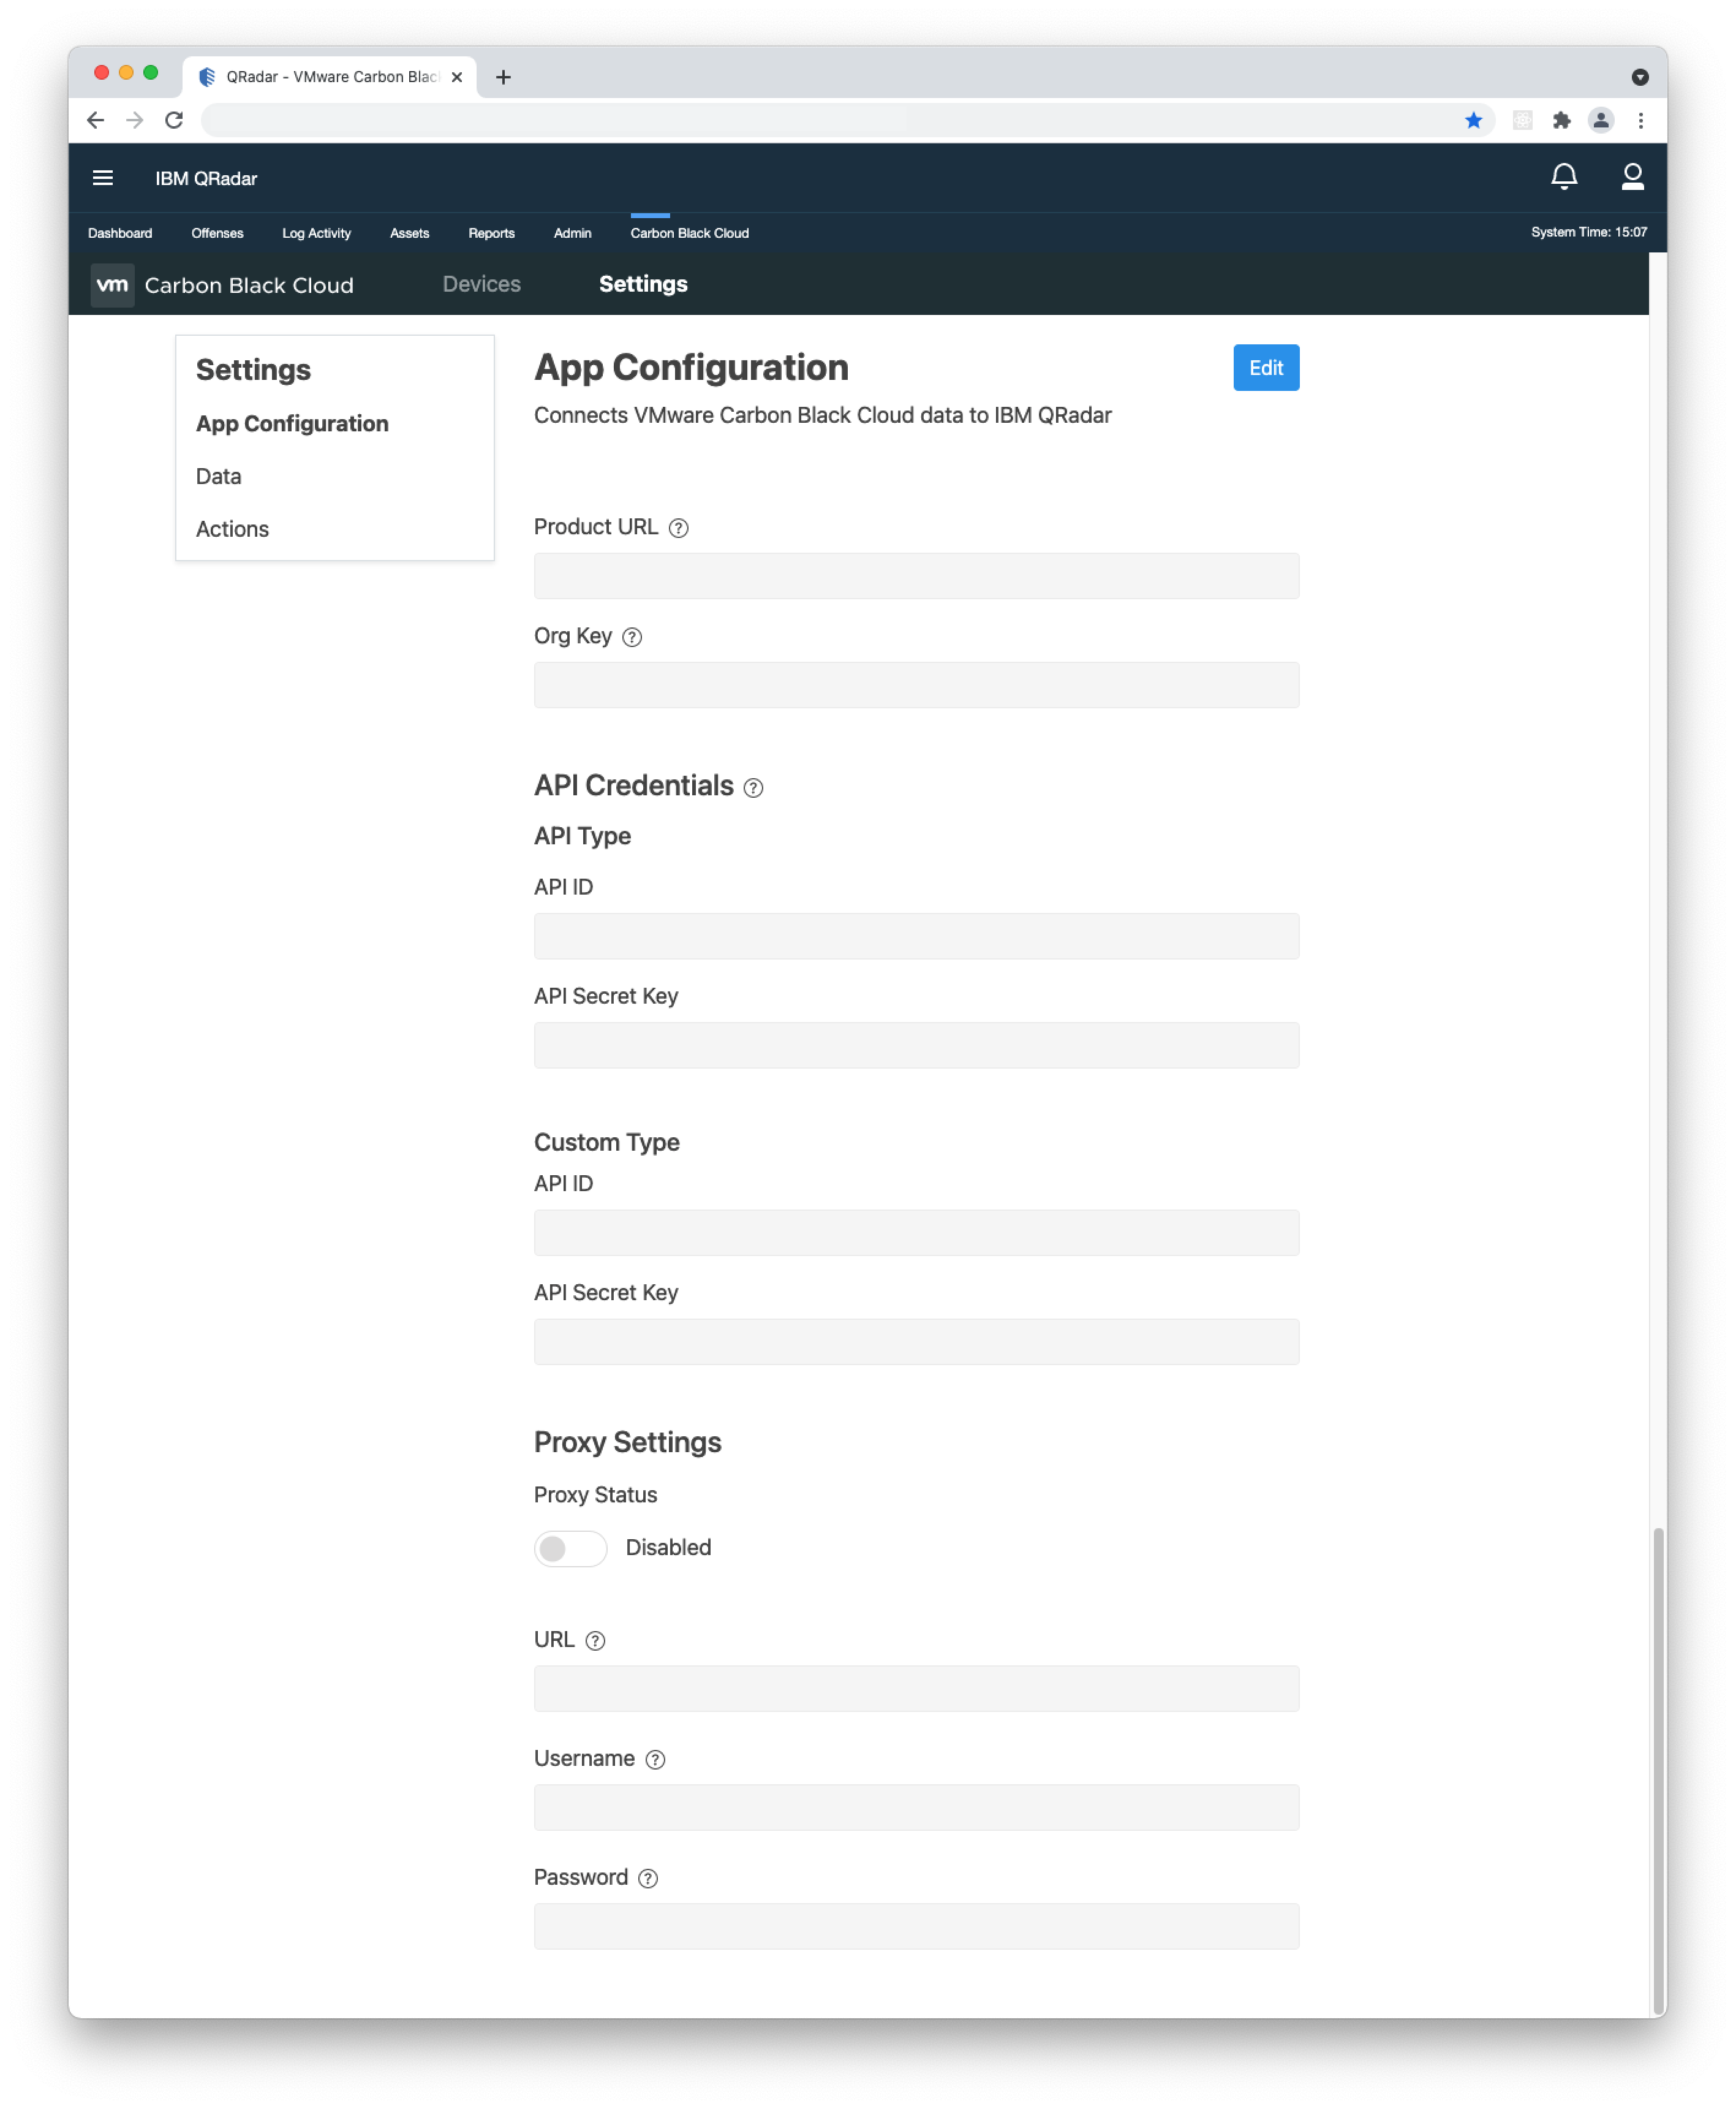
- 4. Go to Carbon Black Cloud > Settings > App Configuration and click Edit.
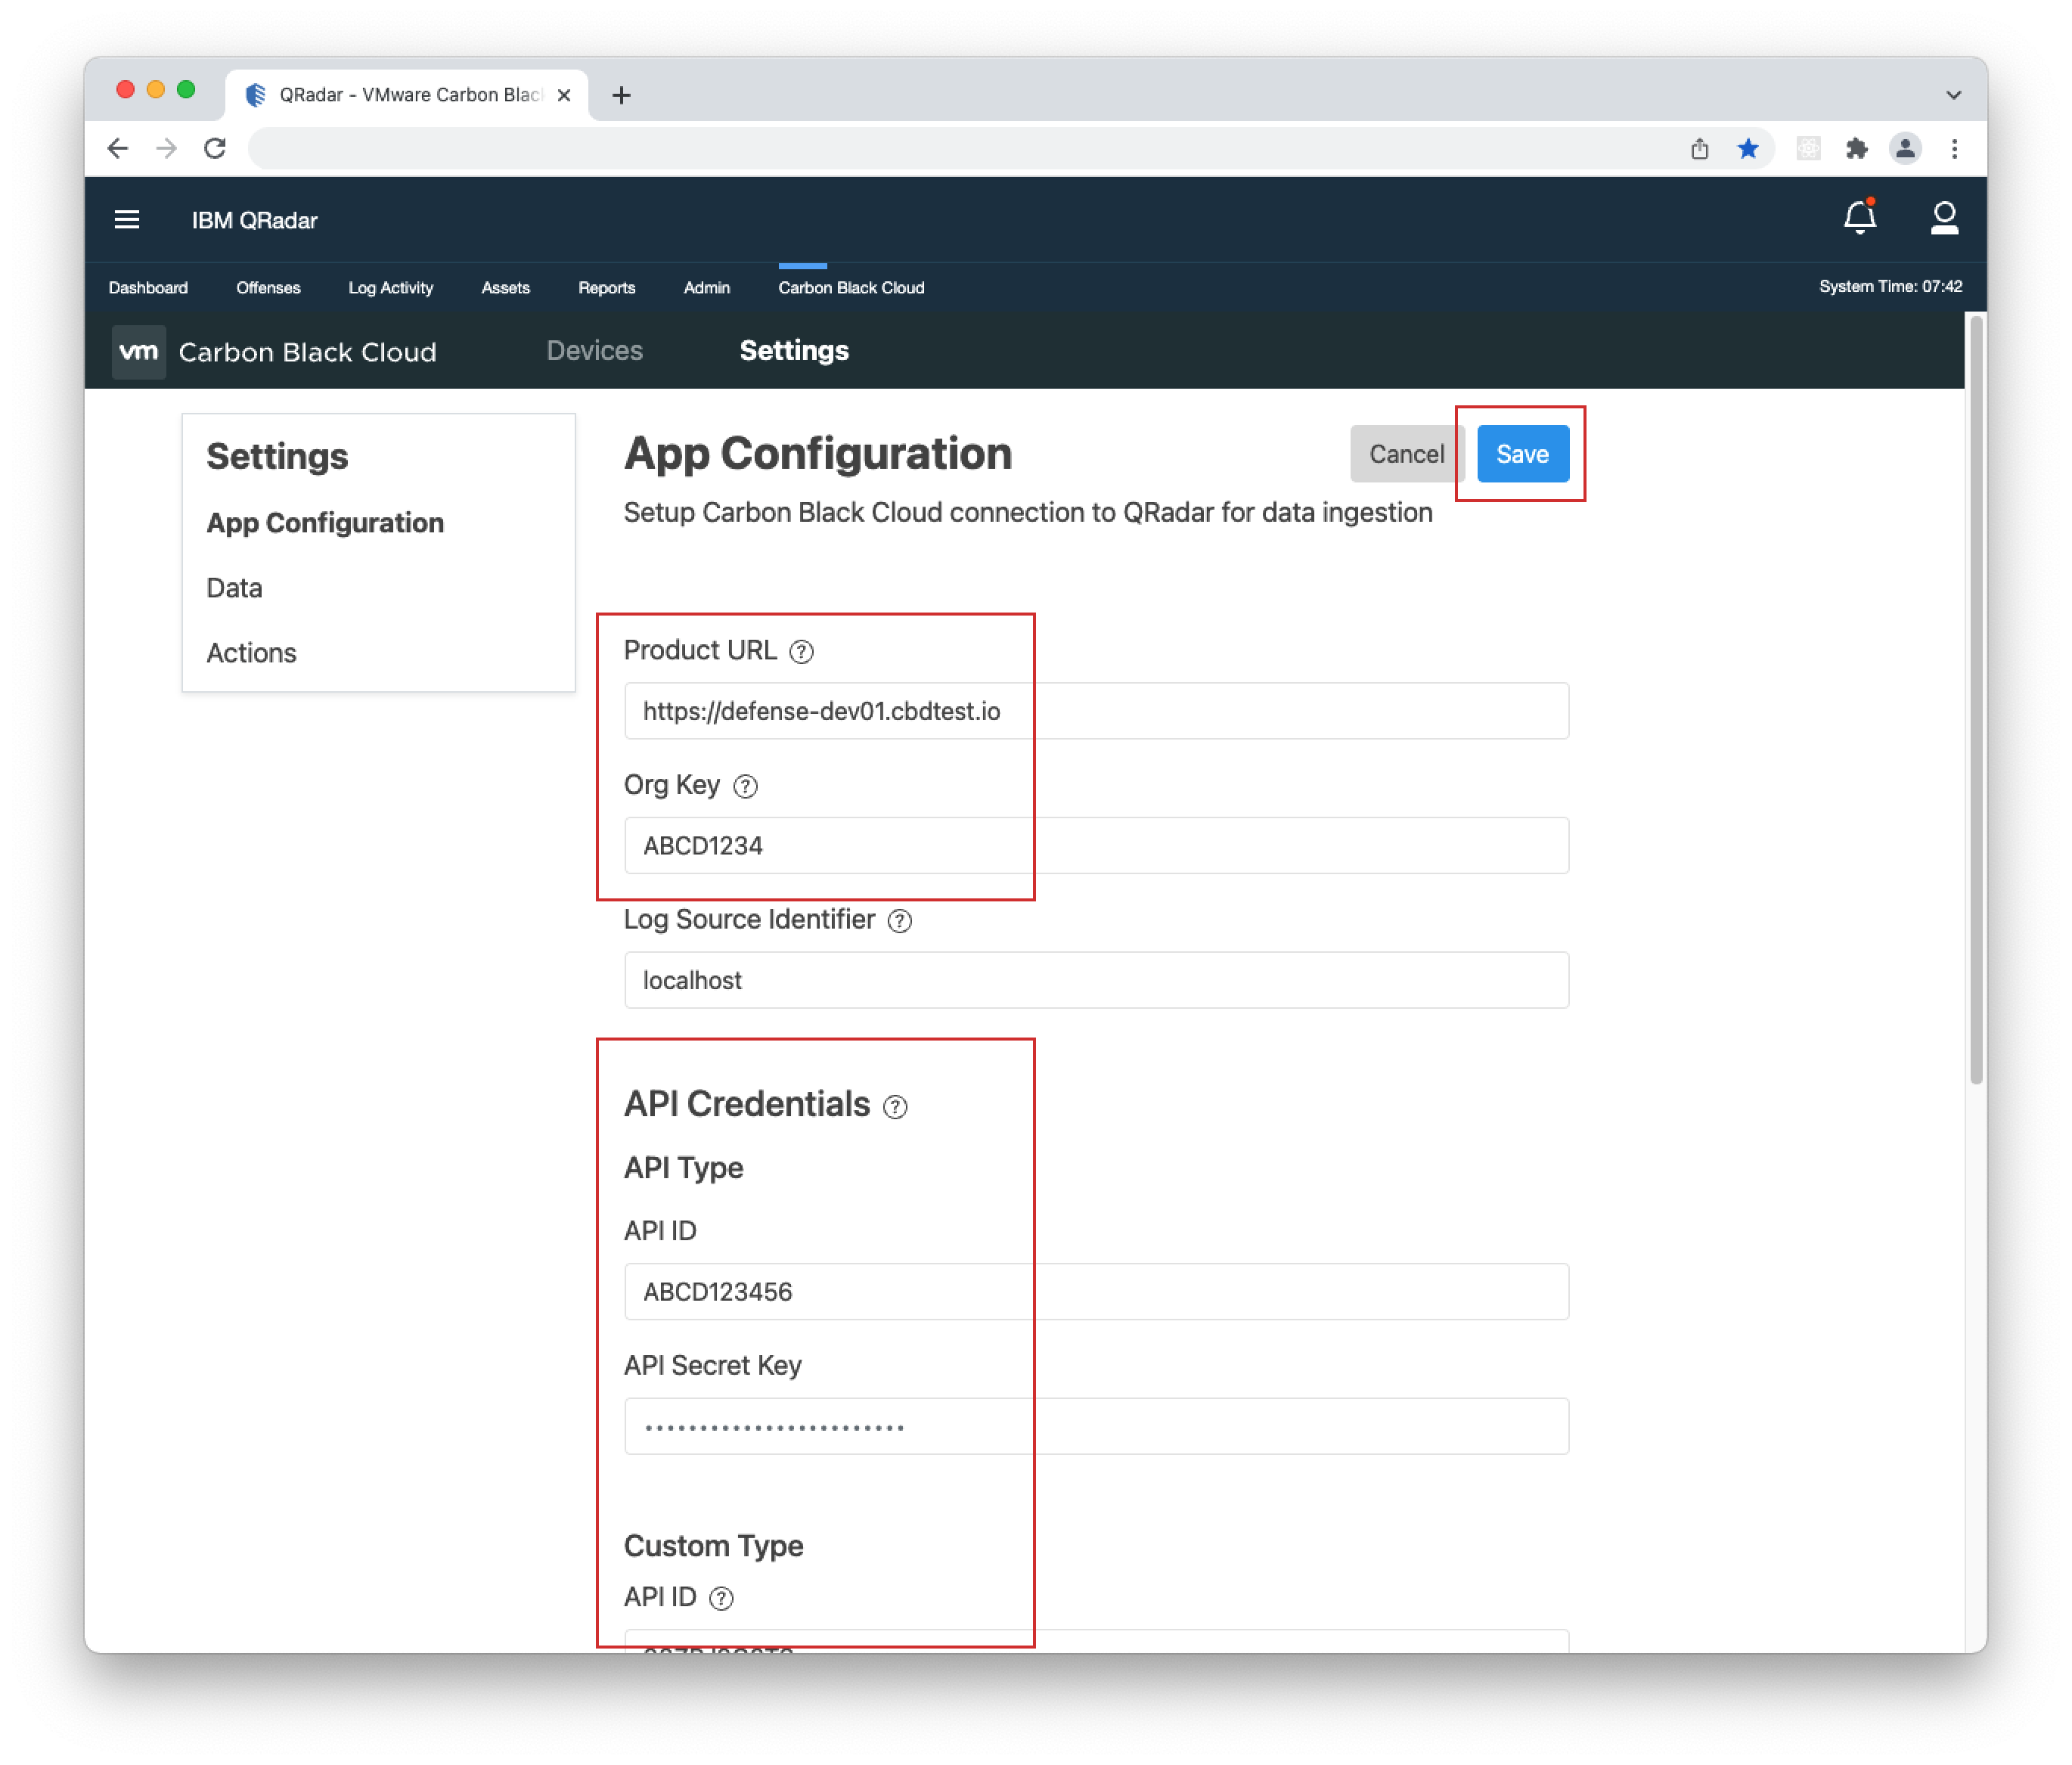
- 5. Add the API ID and API Secret Key into their respective "API Type" fields and click Save.
 1.
1.
 2.
2.
 3.
3.
 4.
4.
 5.
5.
"Custom" Type Credentials
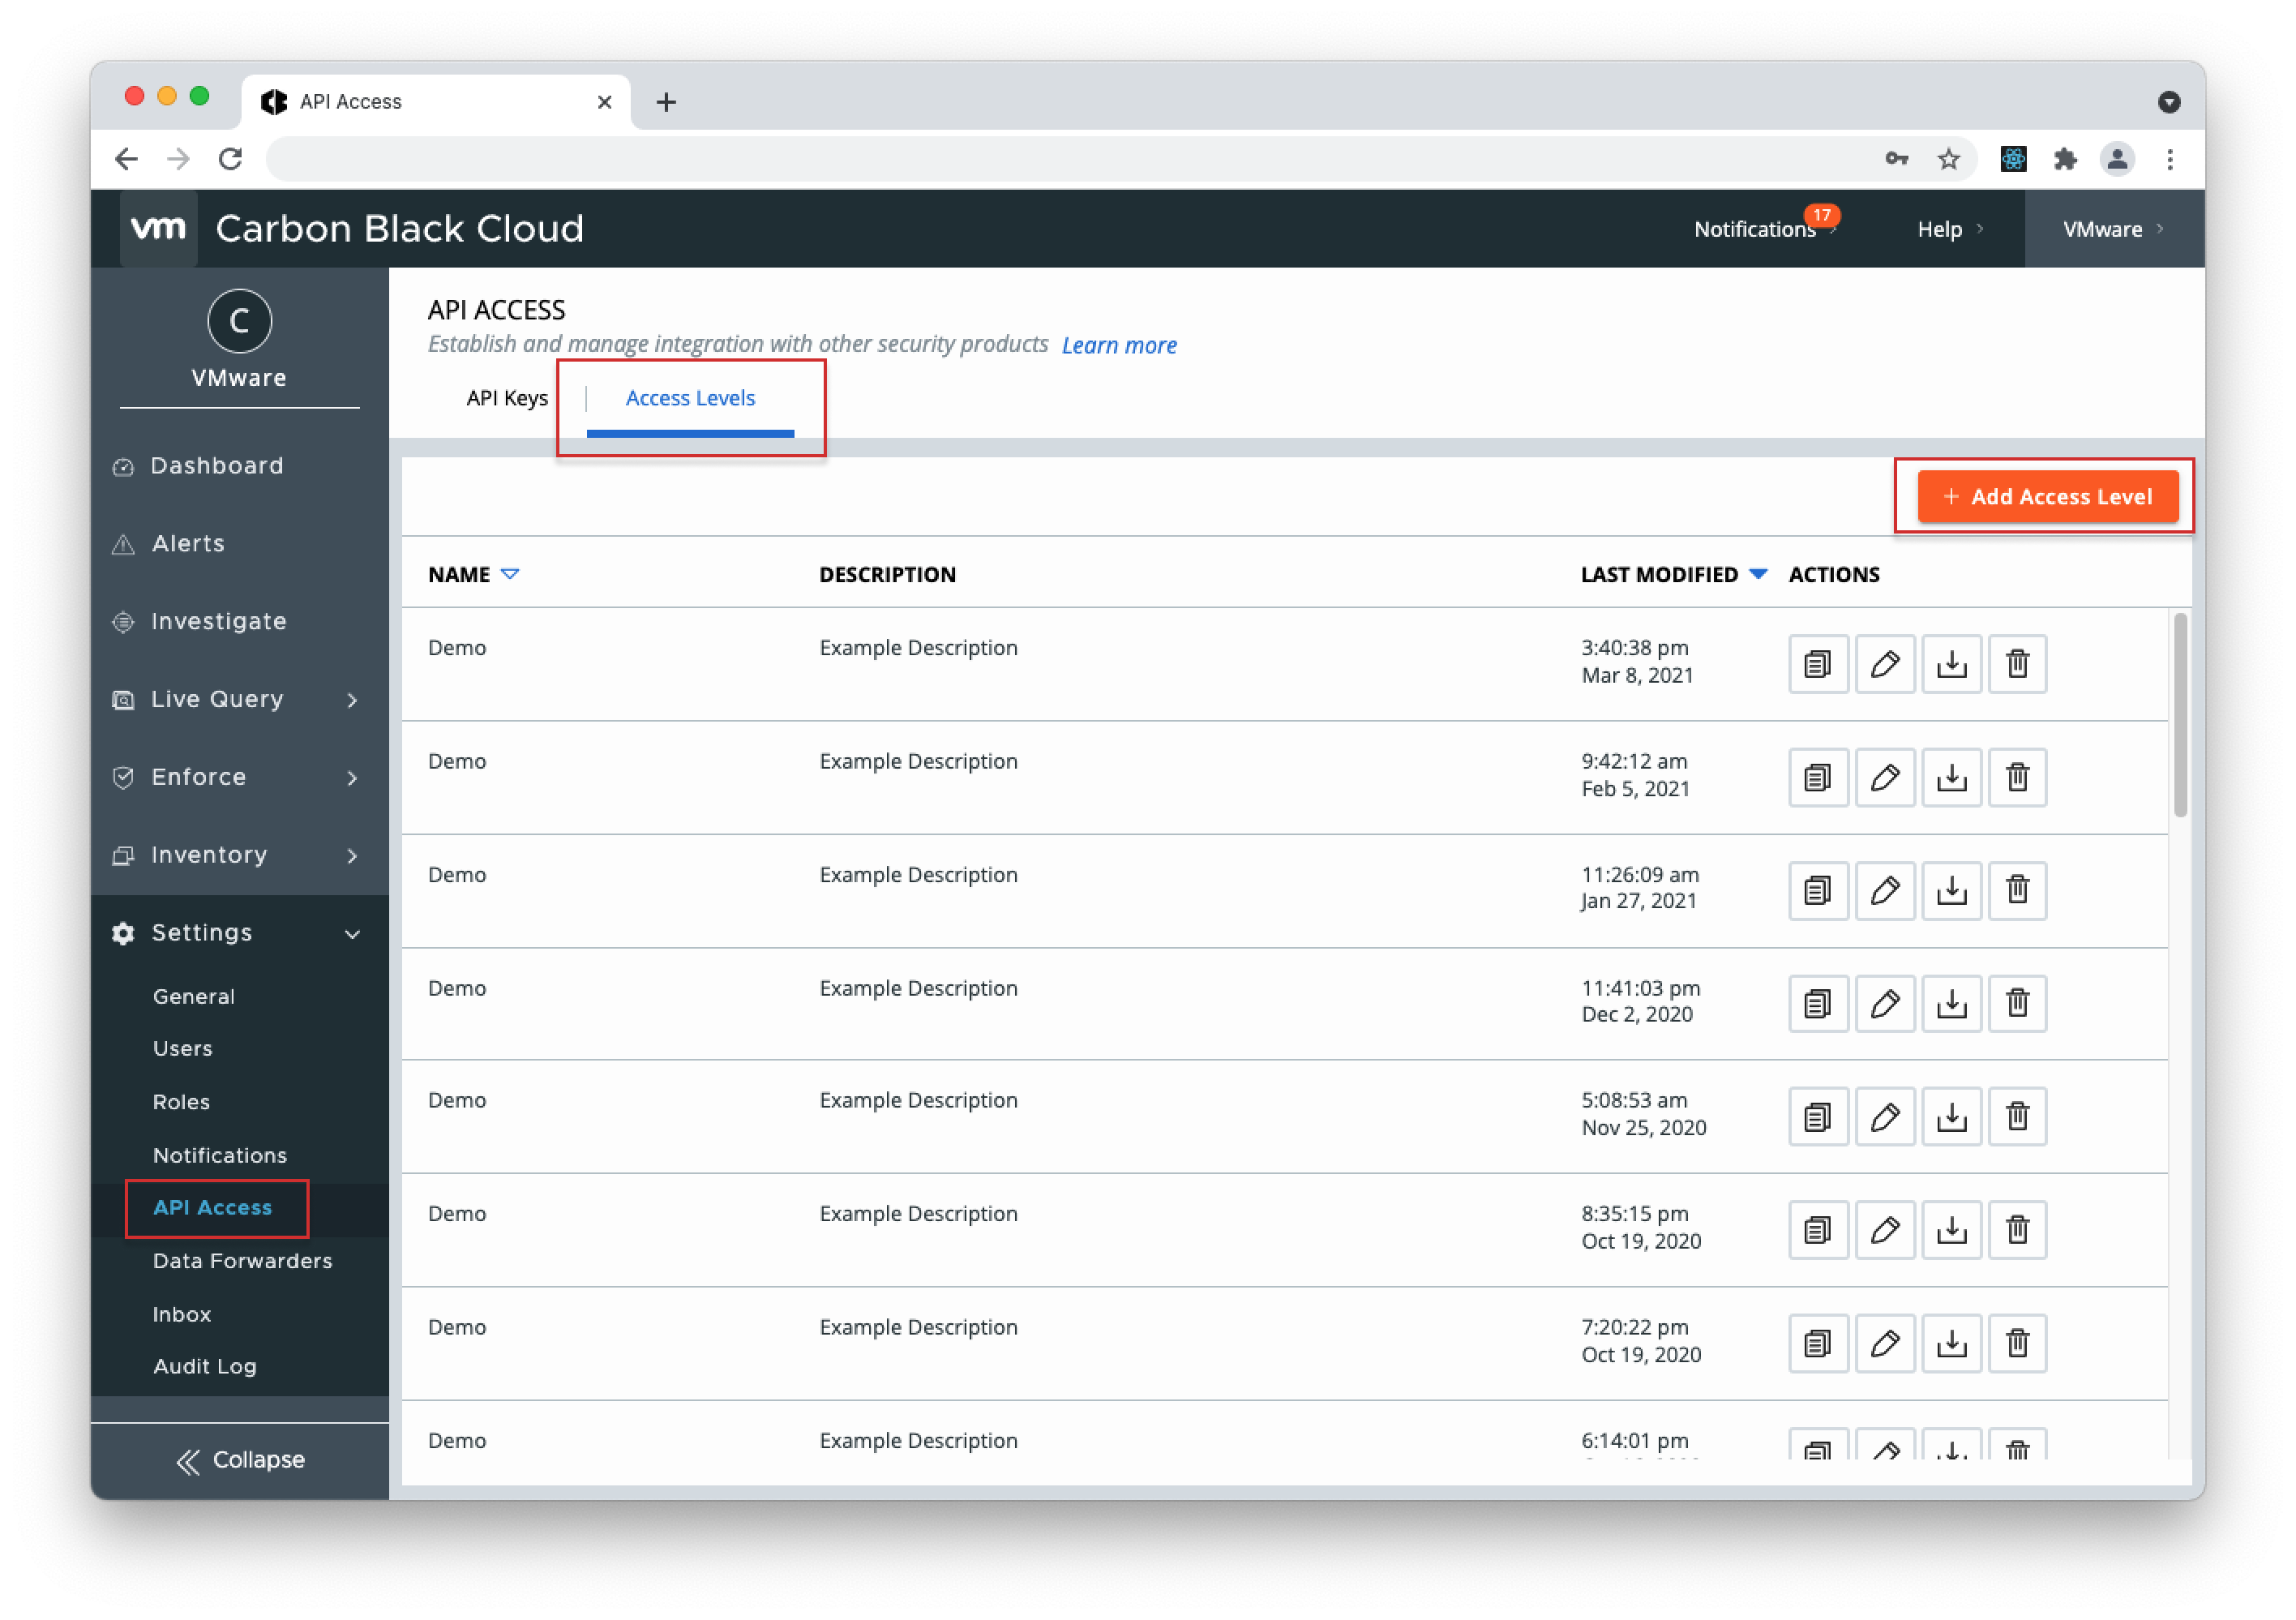
- 1. Open your Carbon Black Cloud console, go to Settings > API Access, select "Access Levels" and click "+ Add Access Level".
- 2. Fill in the "Name" and "Description" fields, grant the new Access Level with the following RBAC permissions and click Save.
Alerts (org.alerts) - READ
Alerts (org.alerts.close) - EXECUTE
Applications (org.reputations) - CREATE, READ
Custom Detections (org.watchlists) - CREATE, READ, UPDATE, DELETE
Device (device.quarantine) - EXECUTE
Device (device.bypass) - EXECUTE
Device (device) - READ
Device (device.policy) - UPDATE
Device (device.bg-scan) - EXECUTE
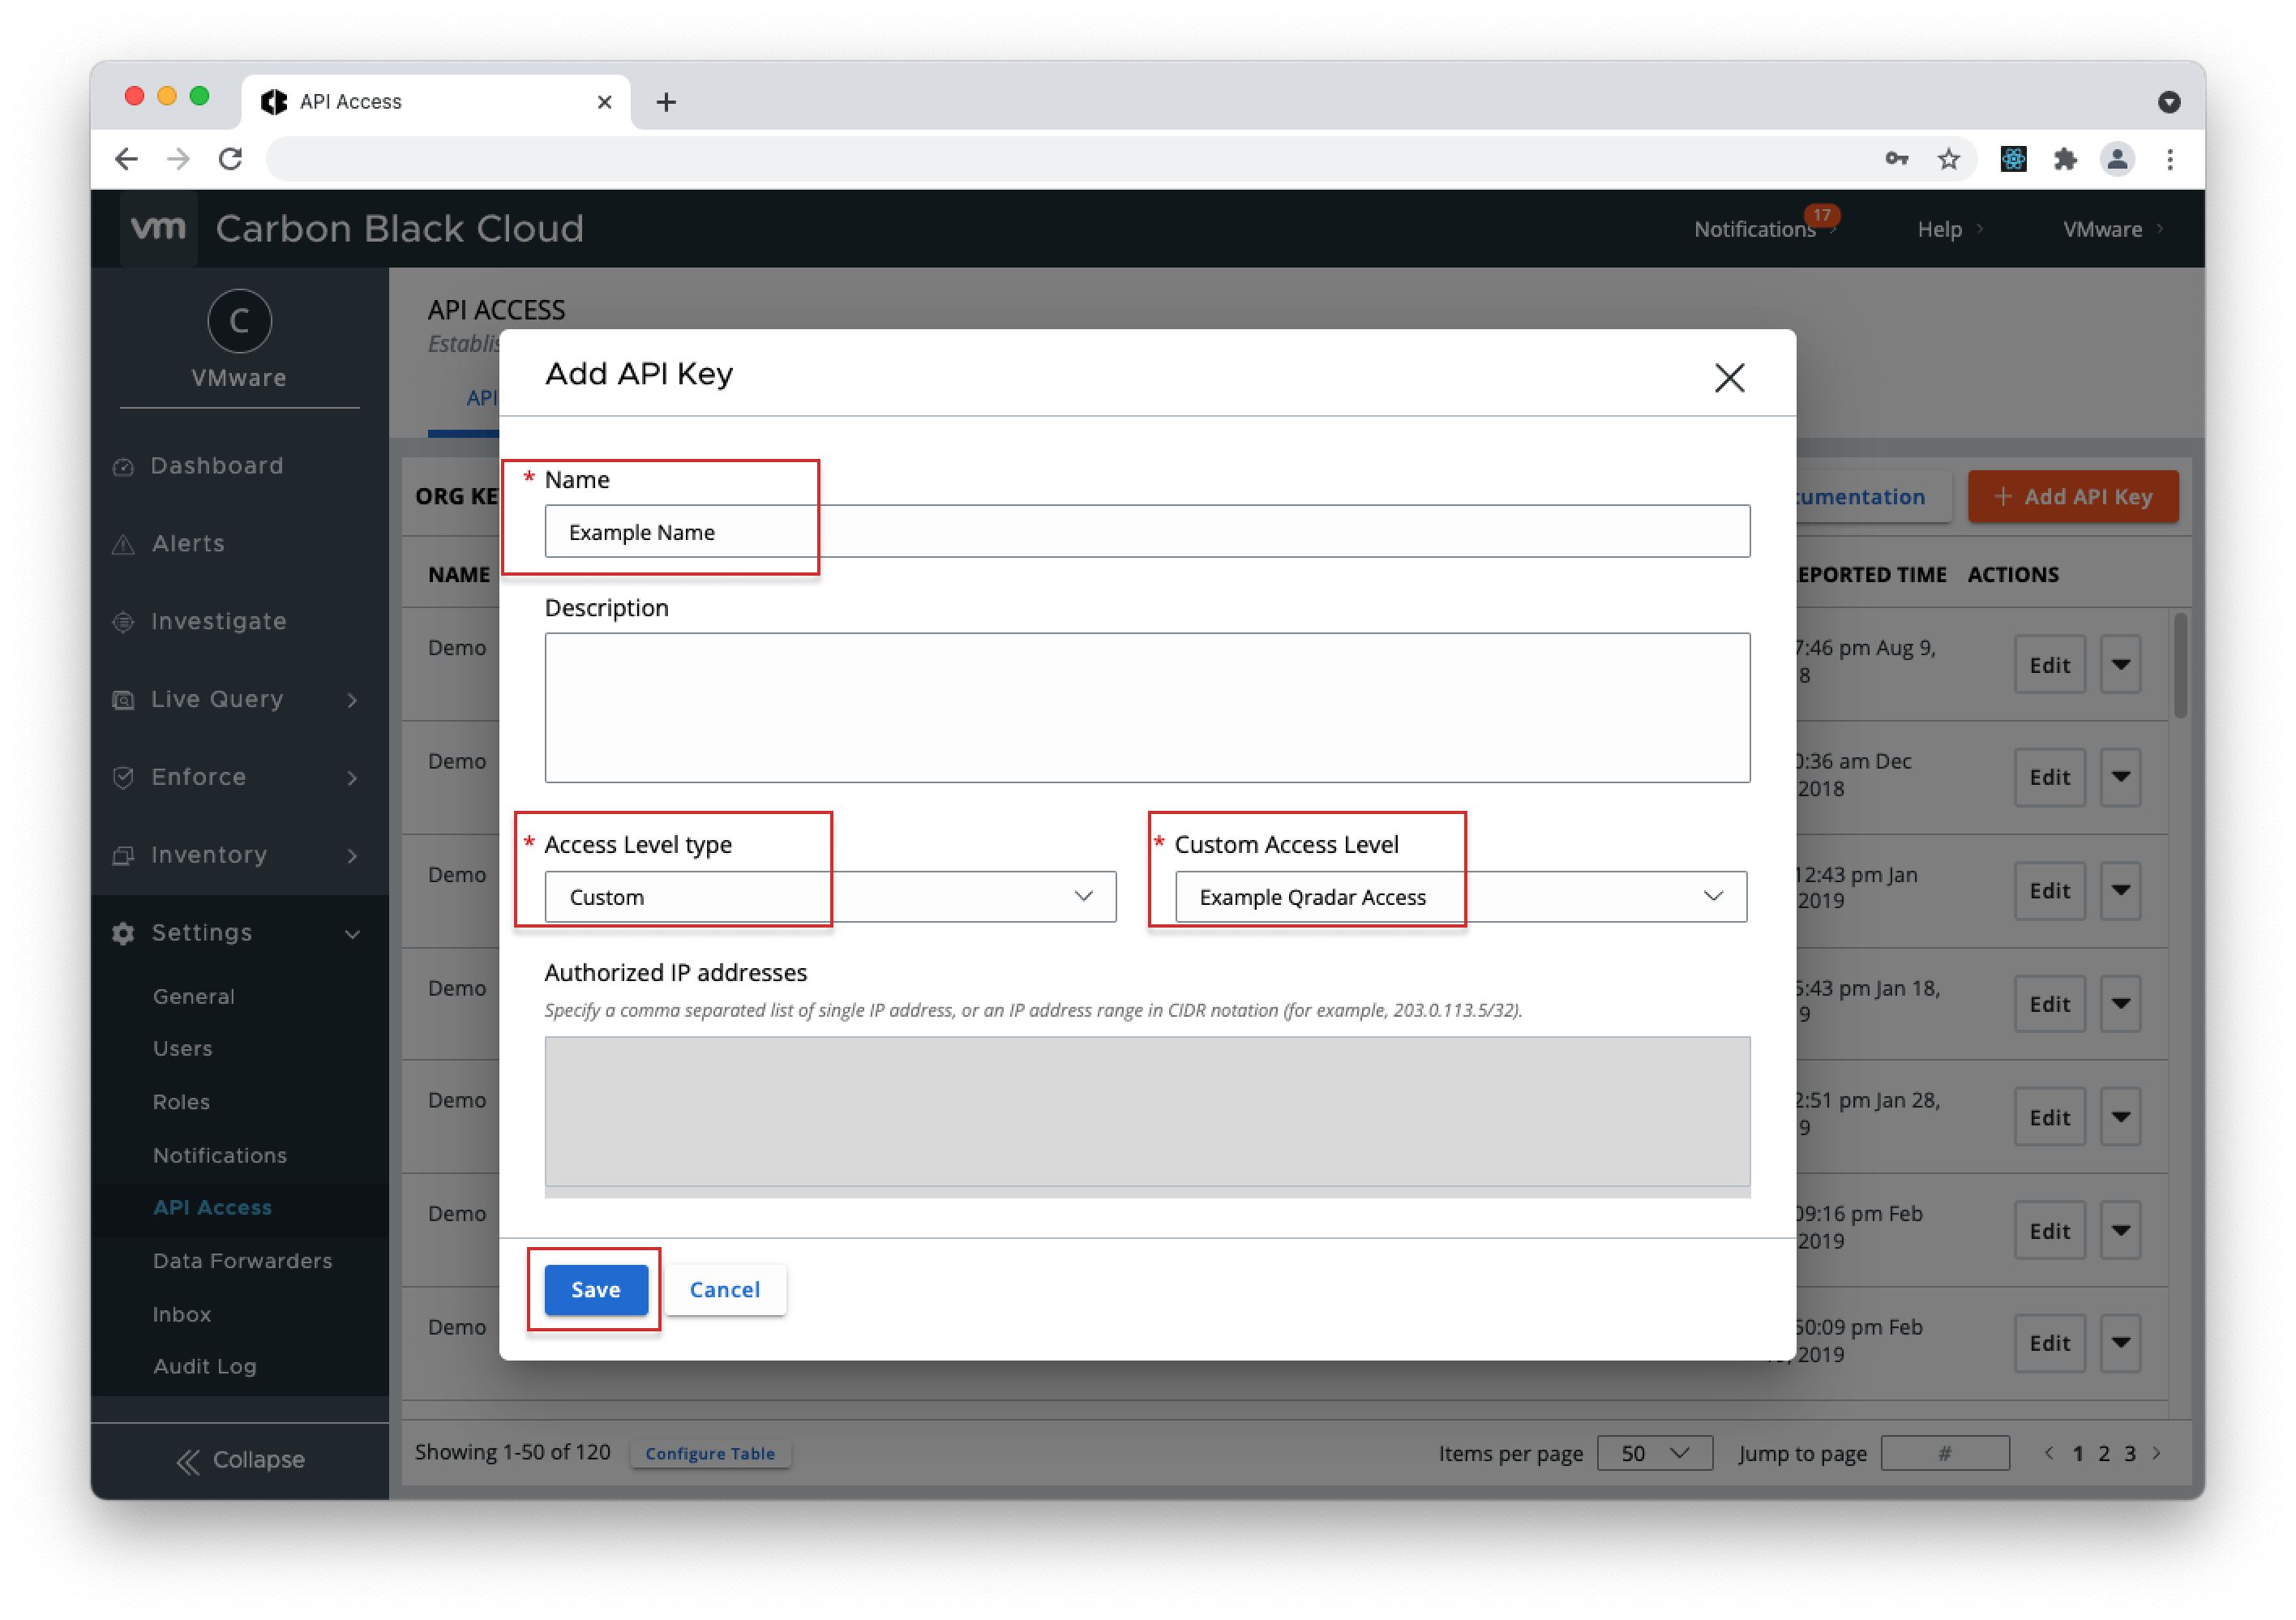
Unified Binary Store (ubs.org.sha256) - READ - 3. Go to the "API Keys" tab and click "+ Add API Key".
- 4. Enter a "Name", click on the "Access Level type" dropdown, select "Custom", click on the "Custom Access Level" dropdown and select the level you created in step 2, then click Save.
- 5. Copy the API Secret Key and API ID from the pop-up modal (store the API Secret Key somewhere securely, because it cannot be retrieved after initial creation) and open the QRadar console.
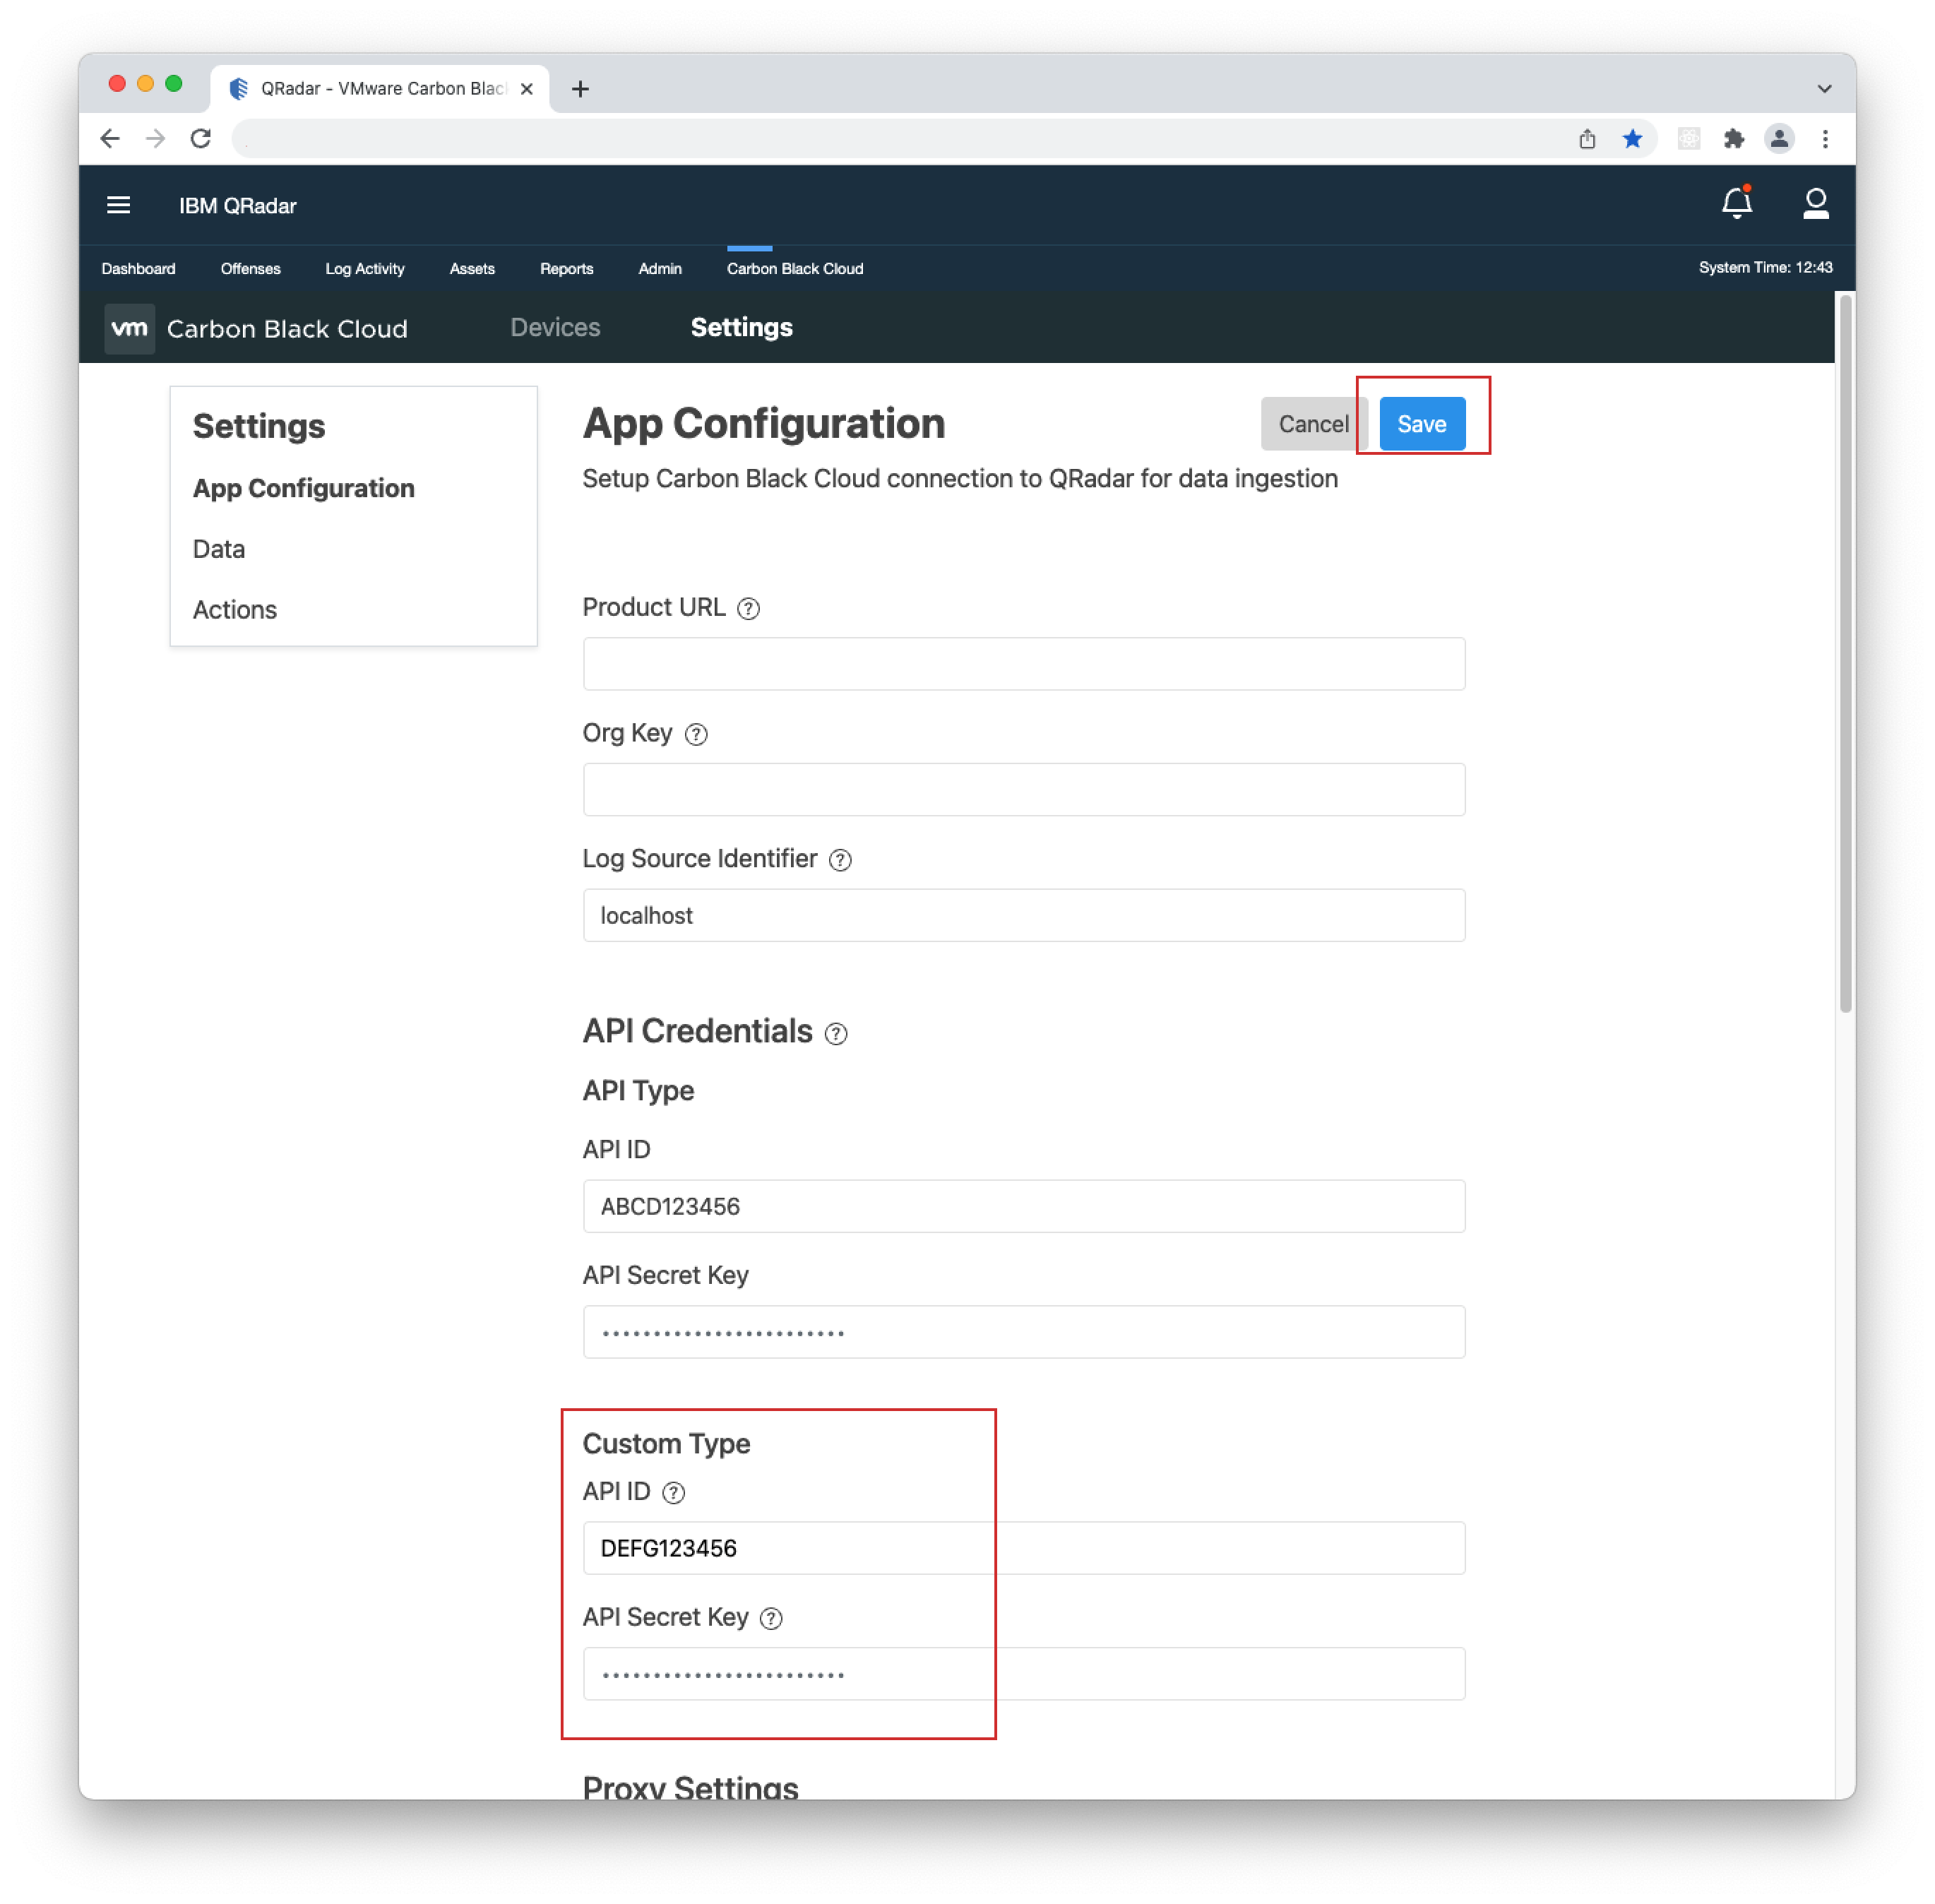
- 6. Go to Carbon Black Cloud > Settings > App Configuration, click Edit.
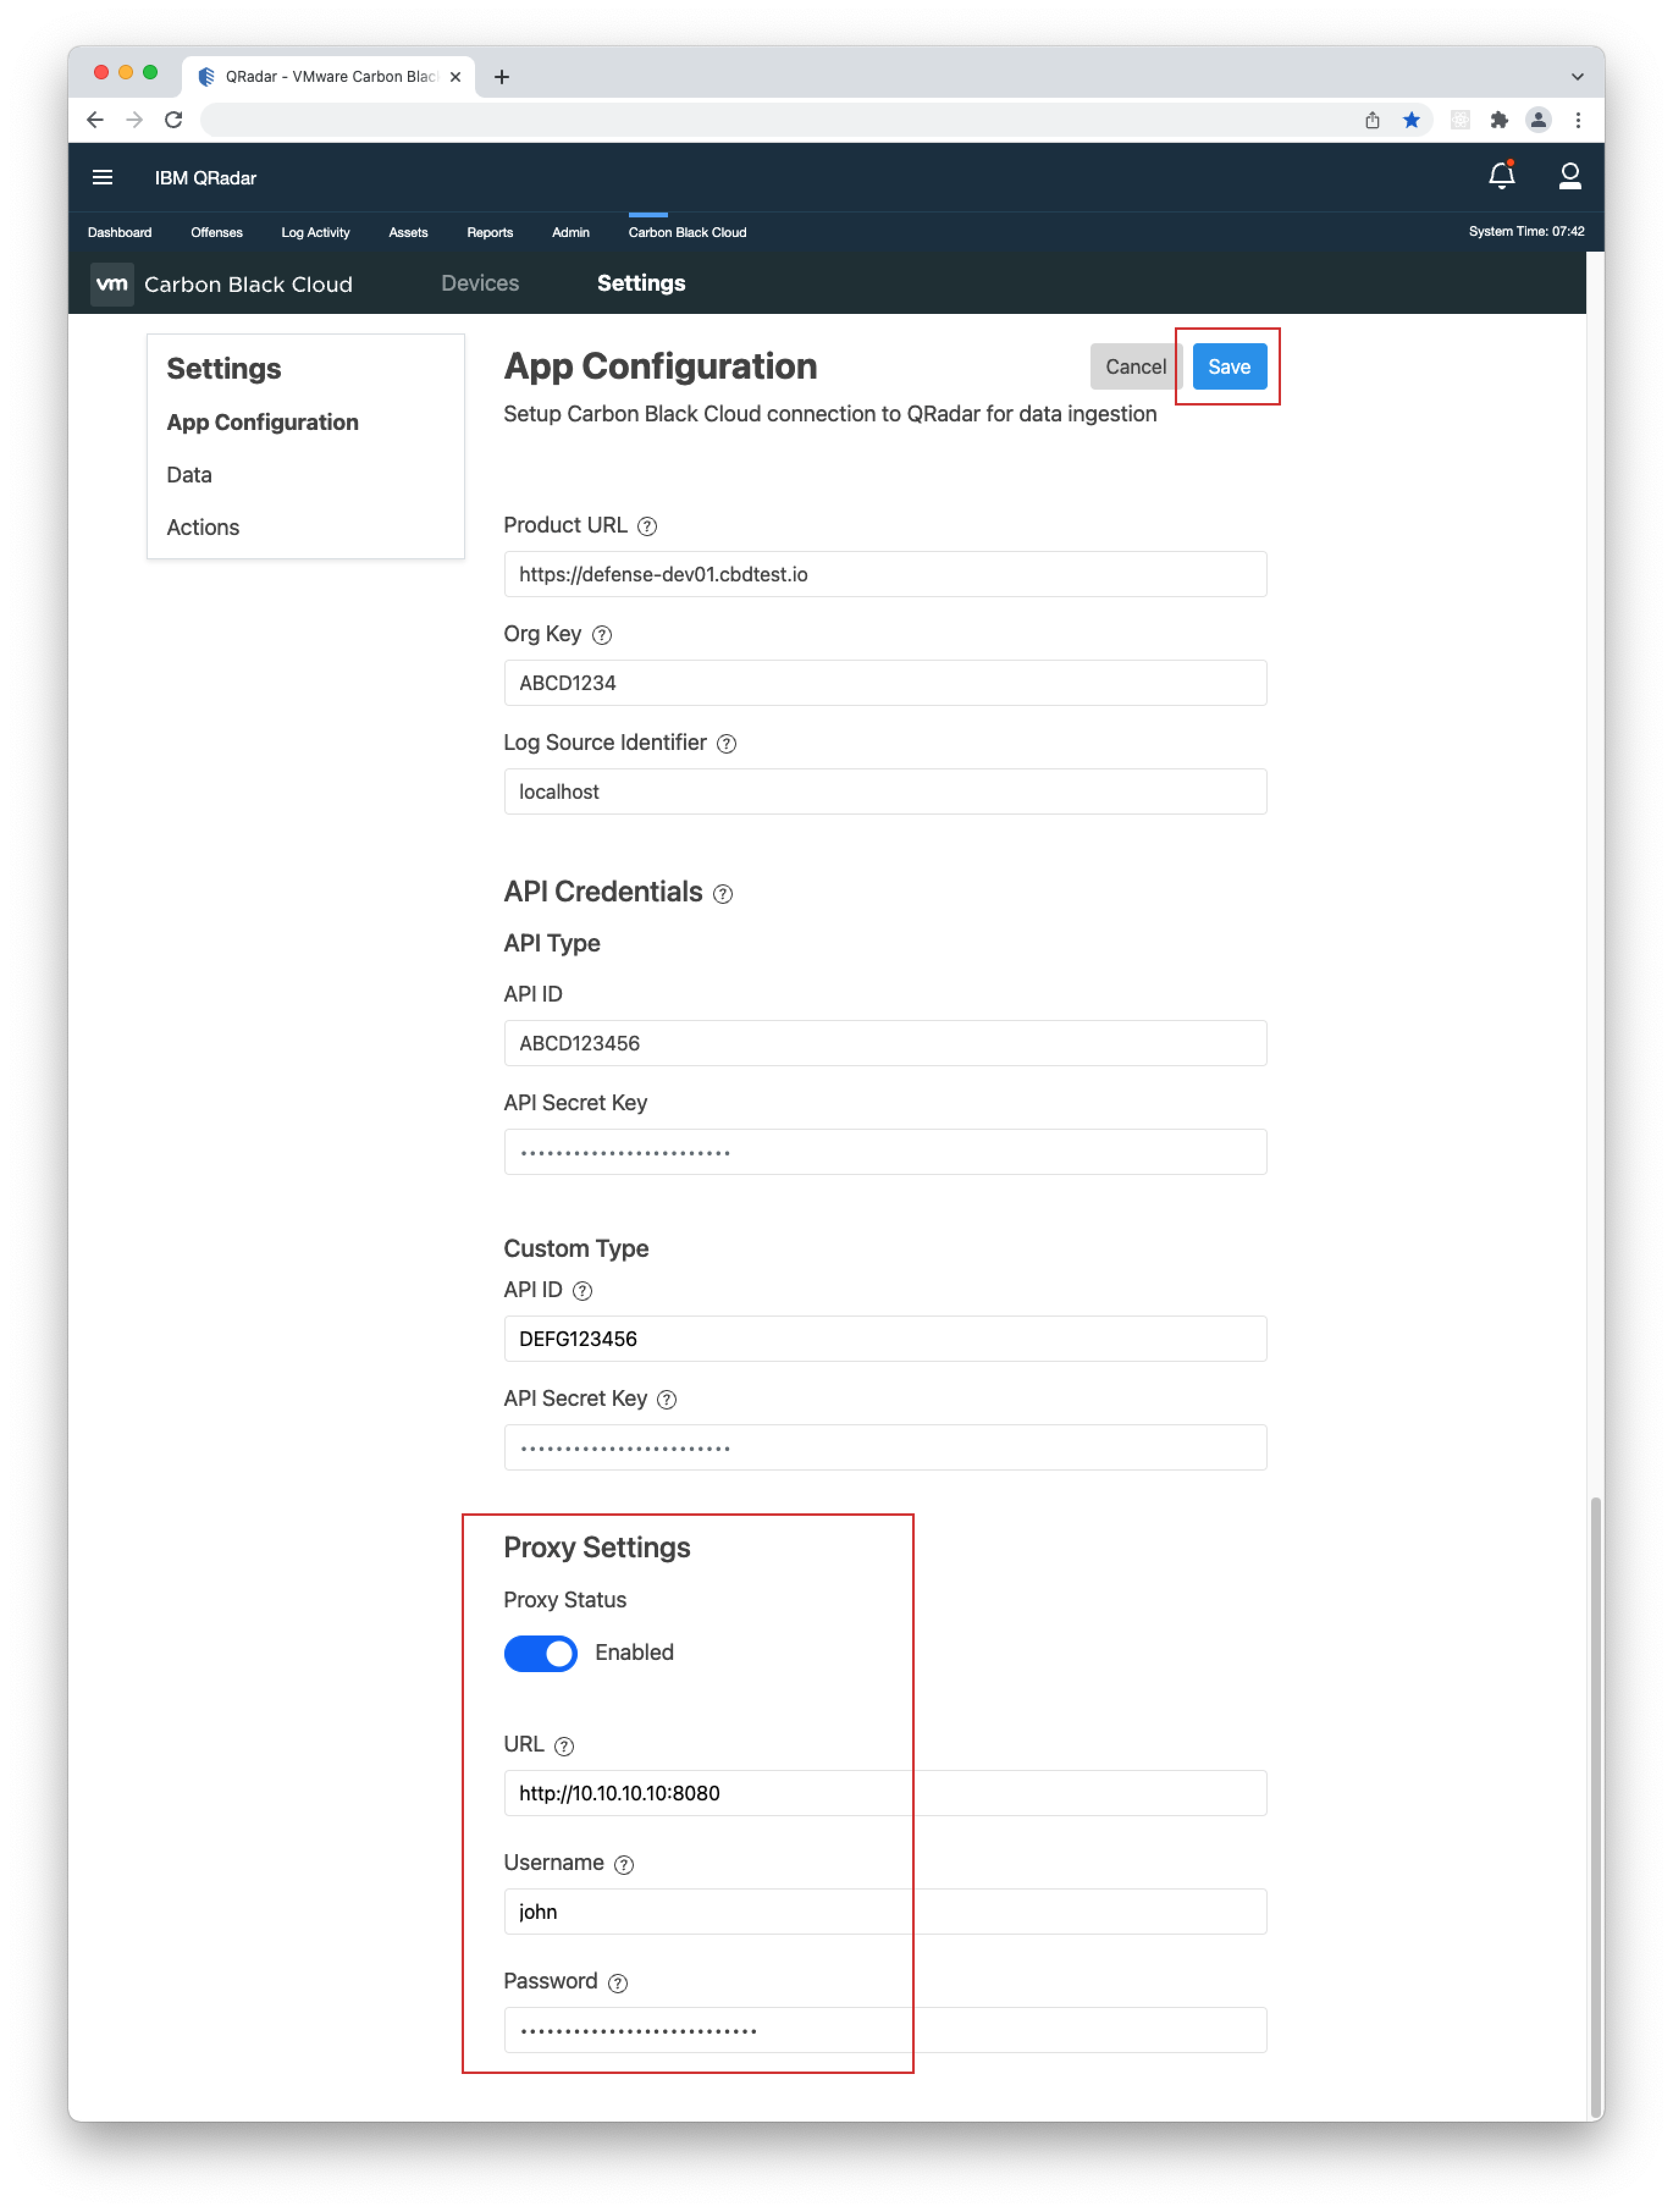
- 7. Add the API ID and API Secret Key to their respective "Custom Type" fields and click Save.
 1.
1.
 2.
3.
2.
3.
 4.
4.
 5.
5.
 6.
6.
 7.
7.
If you encounter any errors or need additional information, check out the Troubleshooting page.
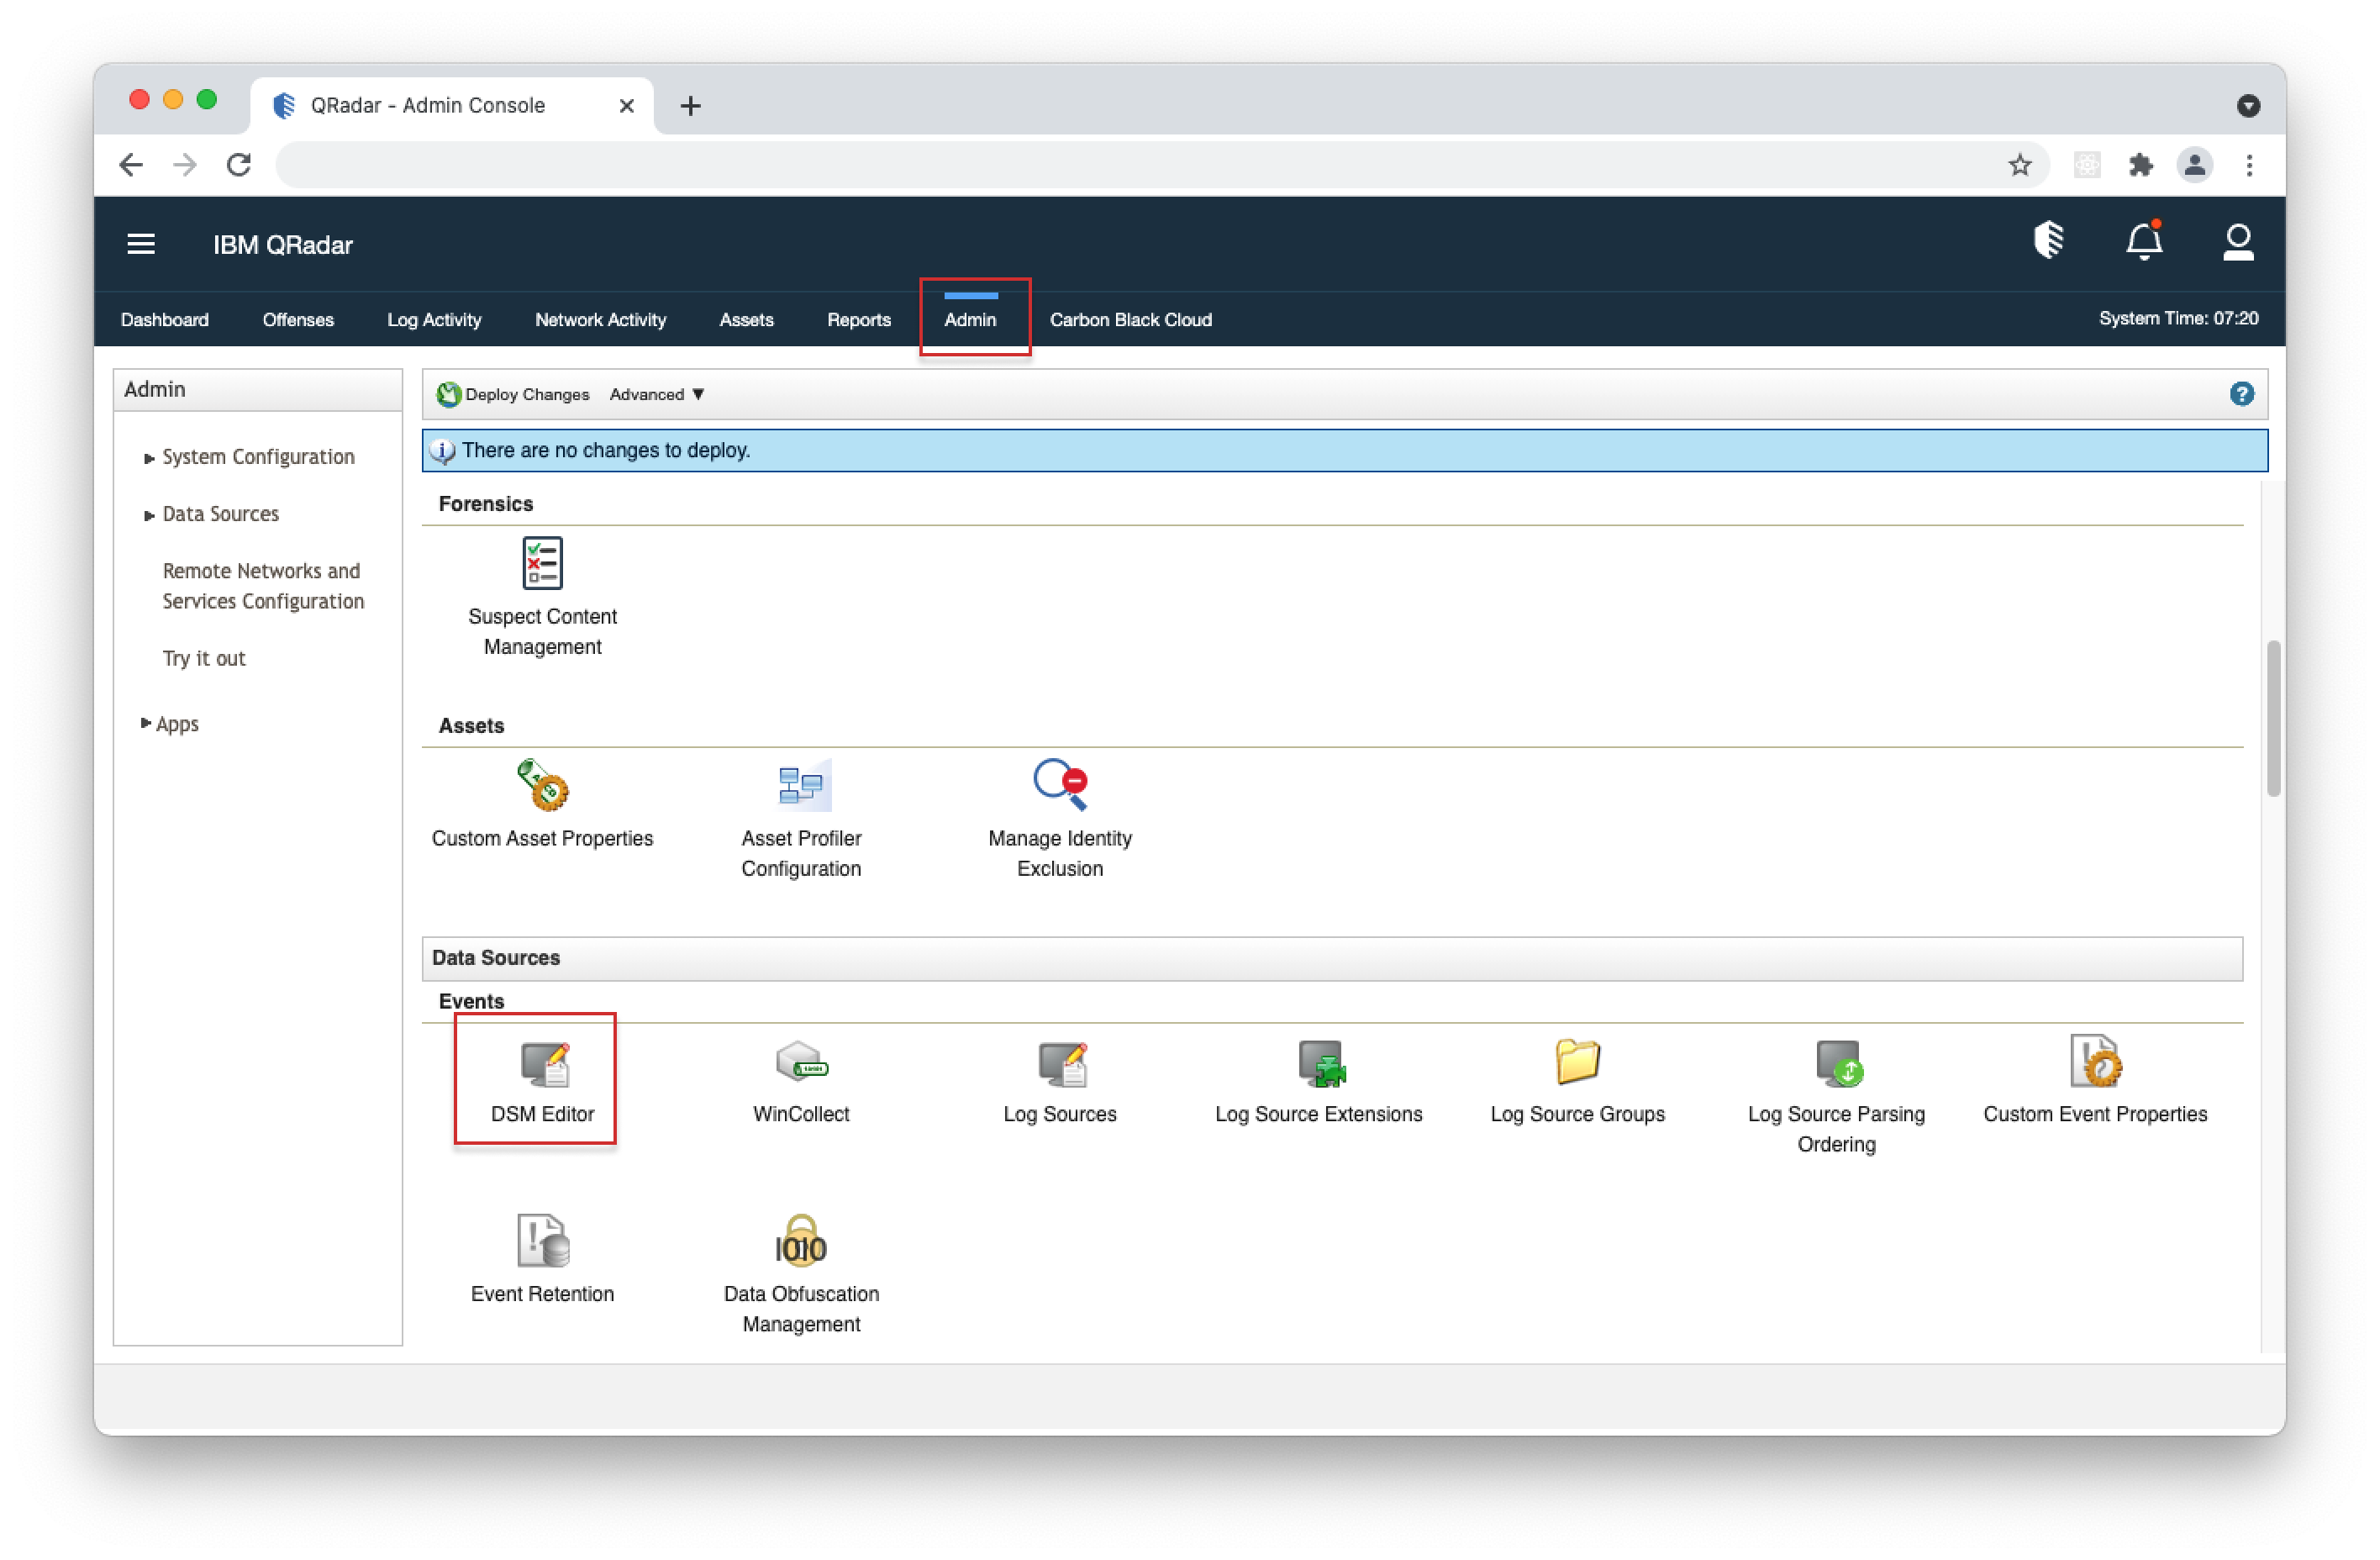
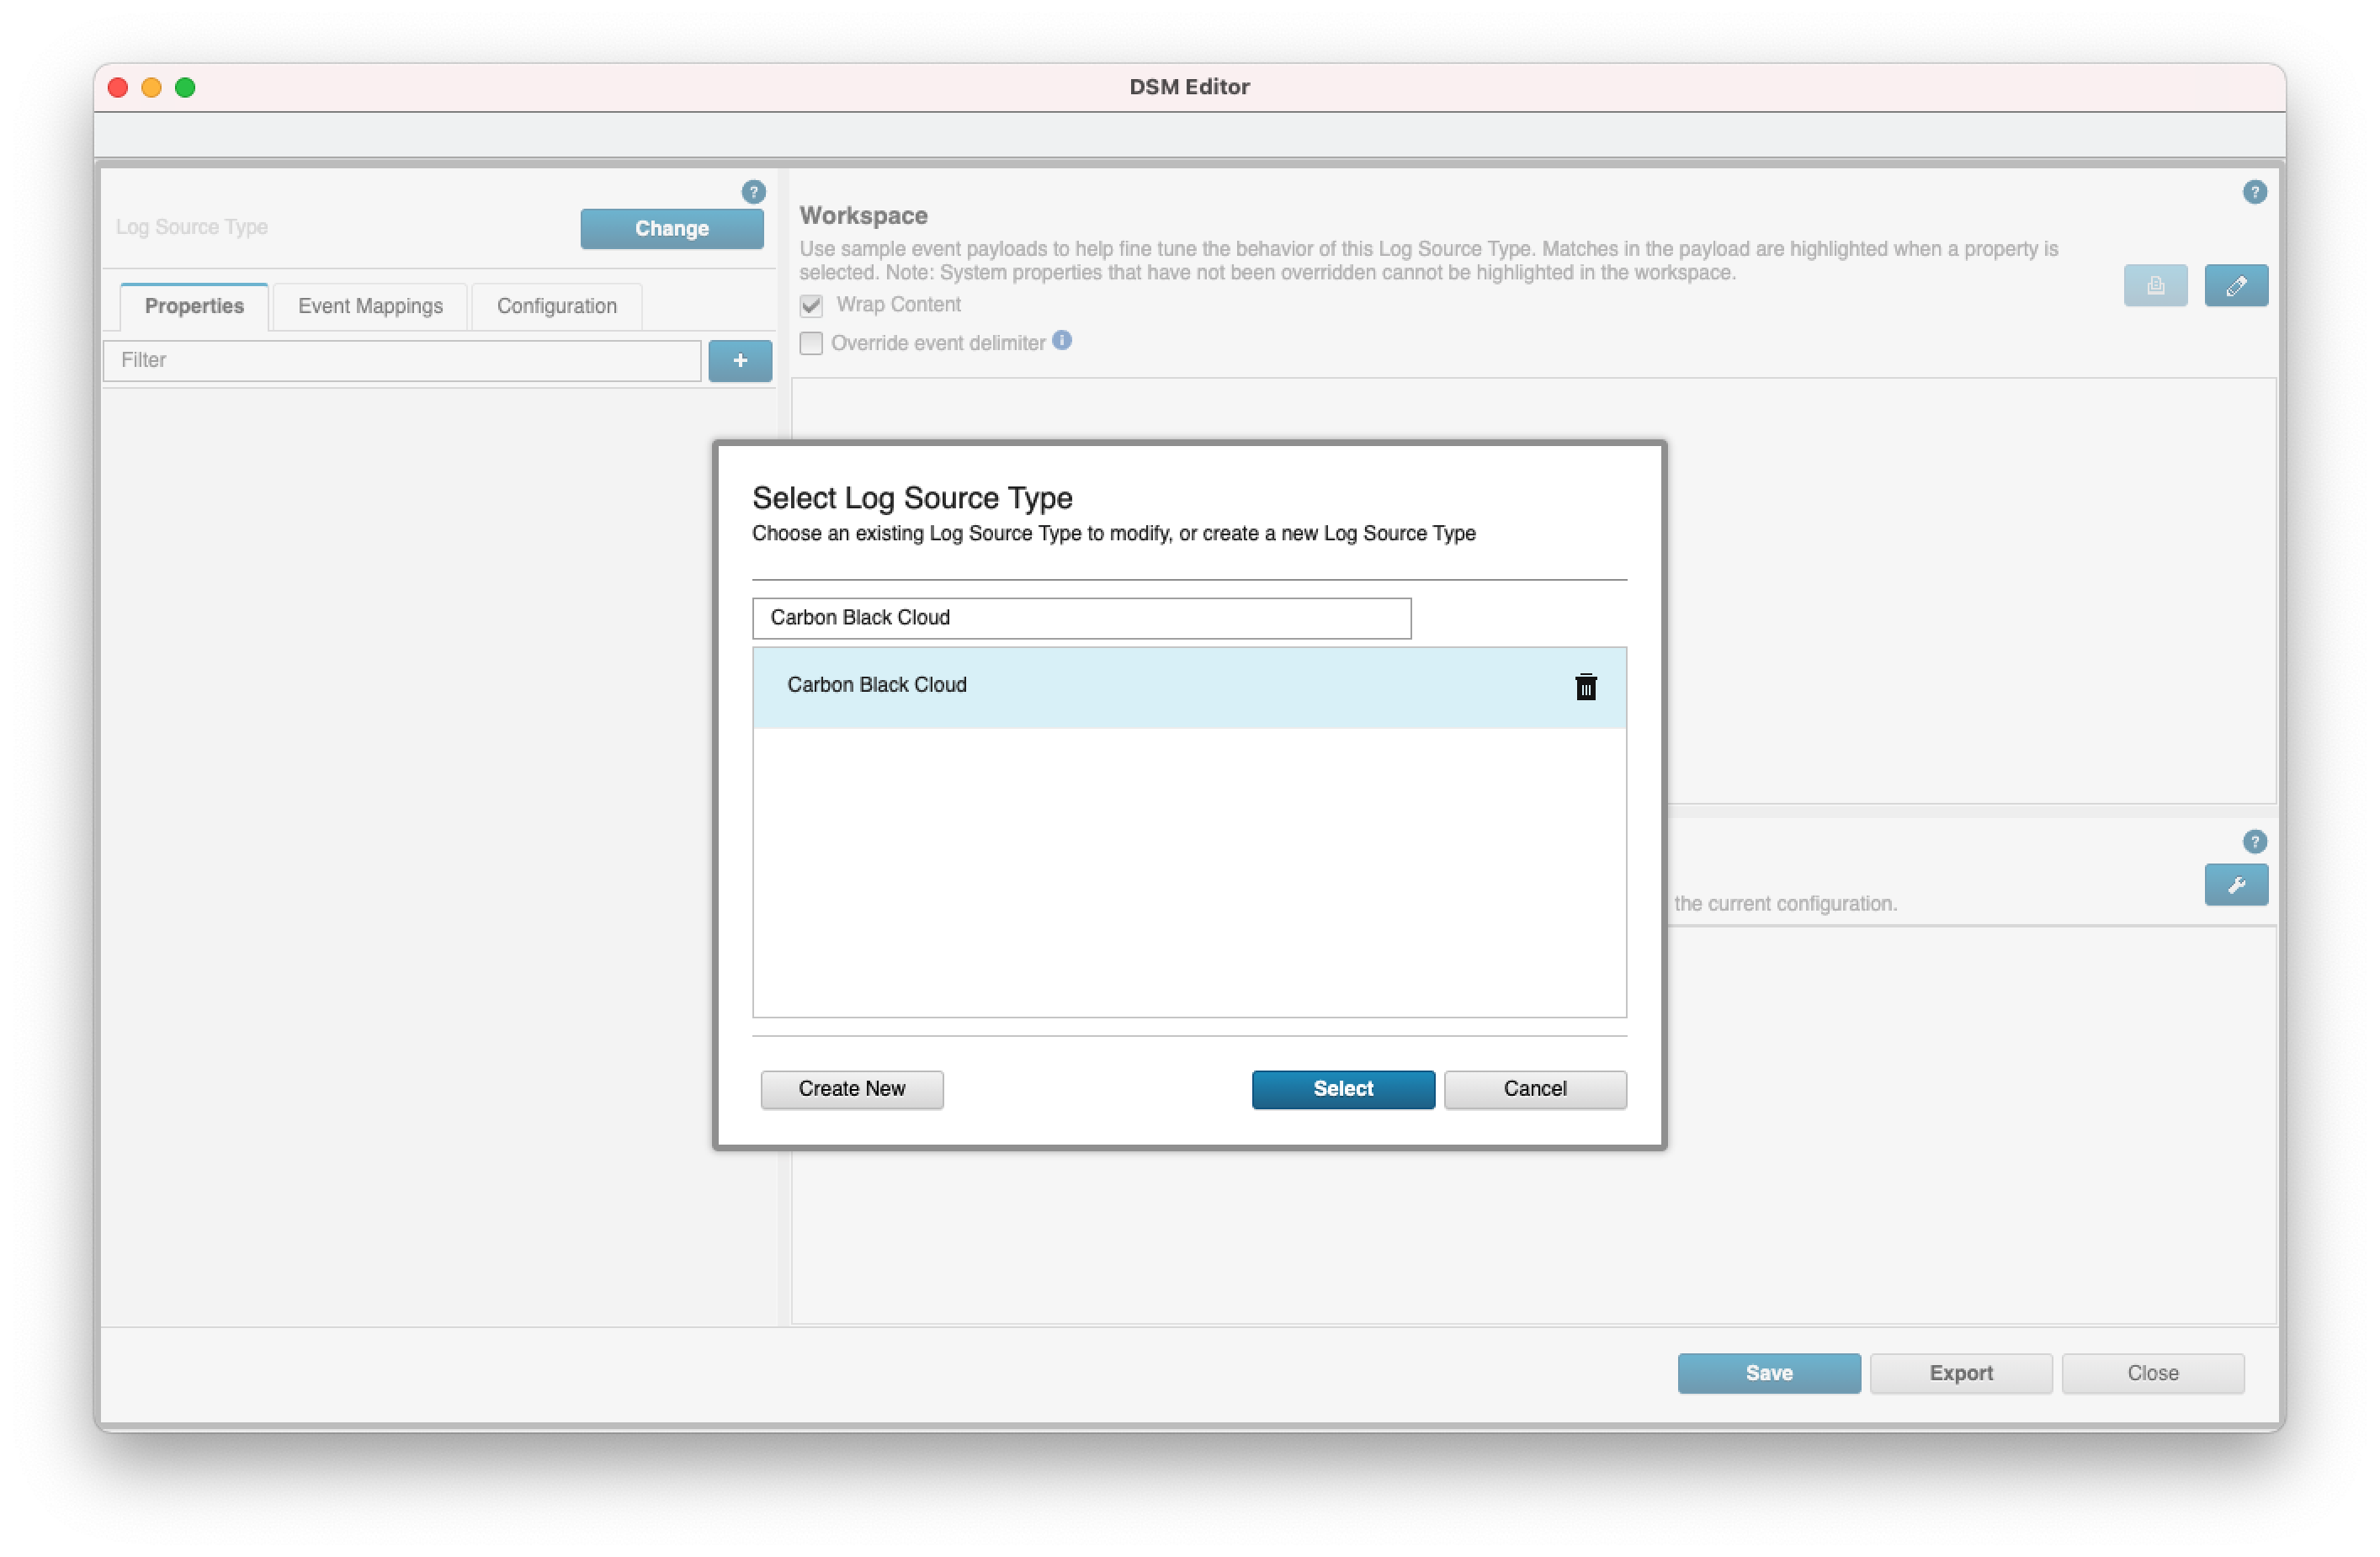
- 1. Open your QRadar console and navigate to Admin > DSM Editor.
- 2. In the popup window, search for "Carbon Black Cloud" and click select.
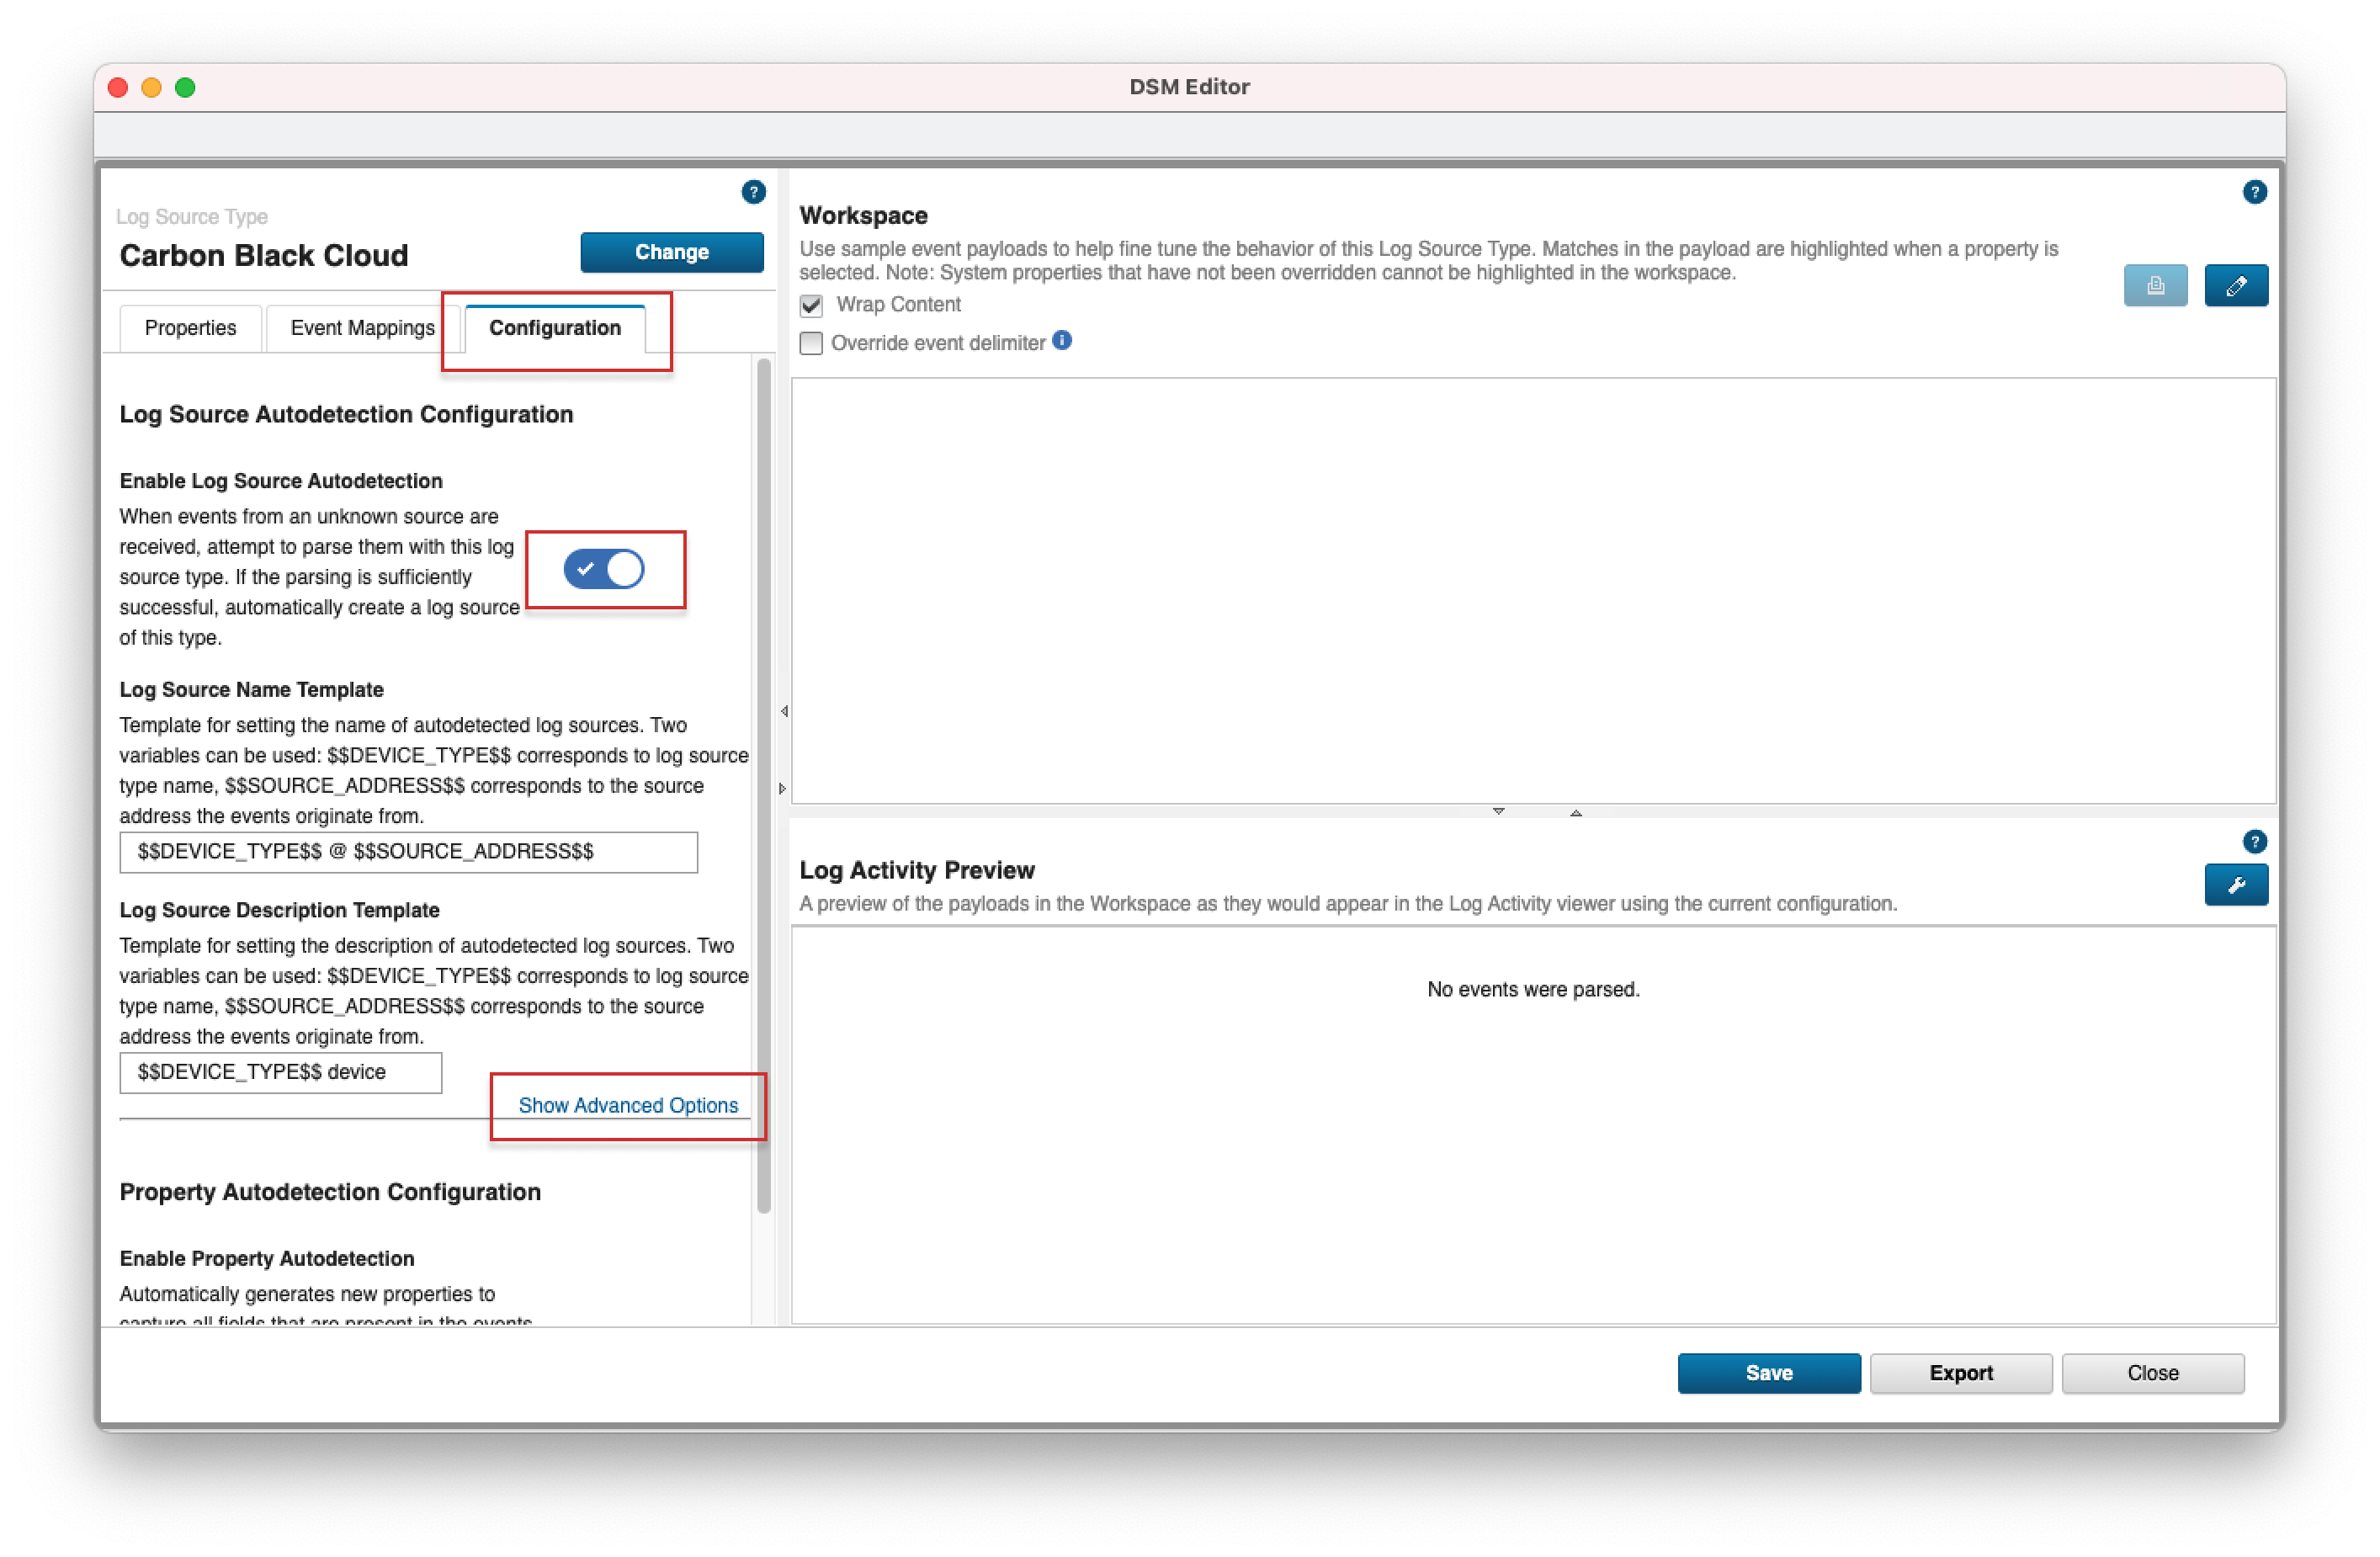
- 3. Select the "Configuration" tab, toggle on the "Enable Log Source Autodetection" option and click "Show Advanced Options".
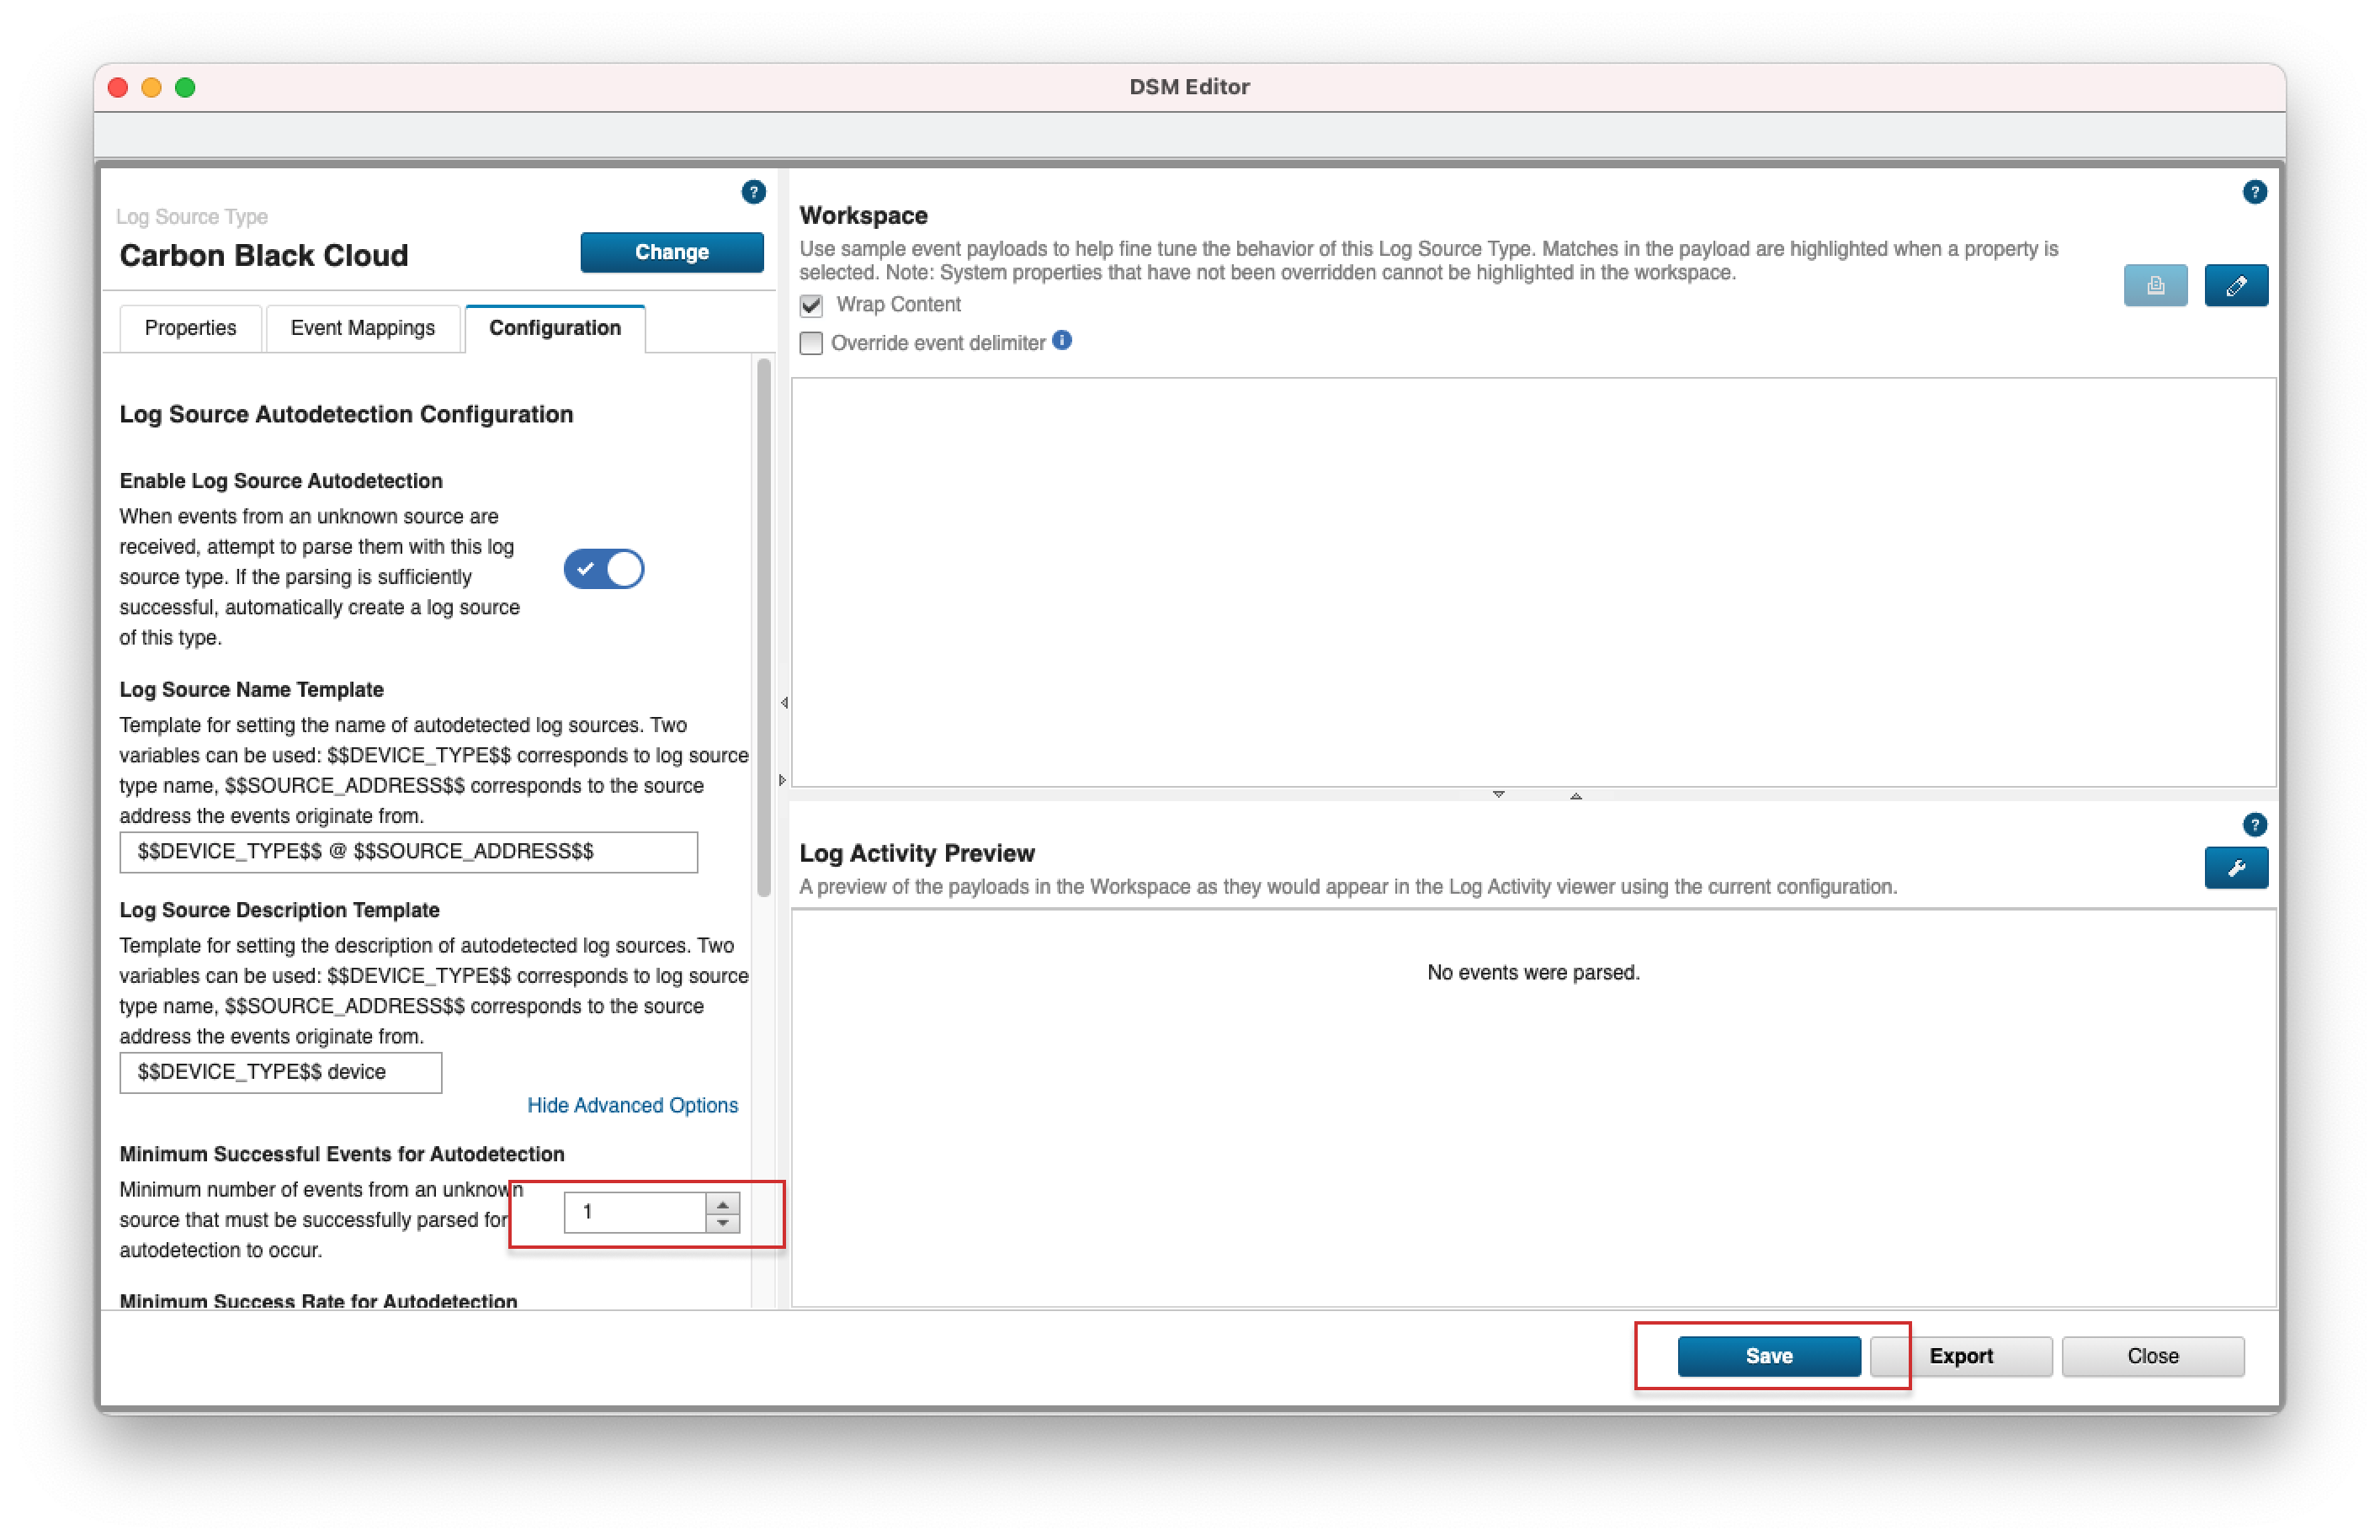
- 4. Select a value for "Minimum Successful Events for Autodetection" - we recommend a lower number for this field. Click Save and close the DSM Editor.
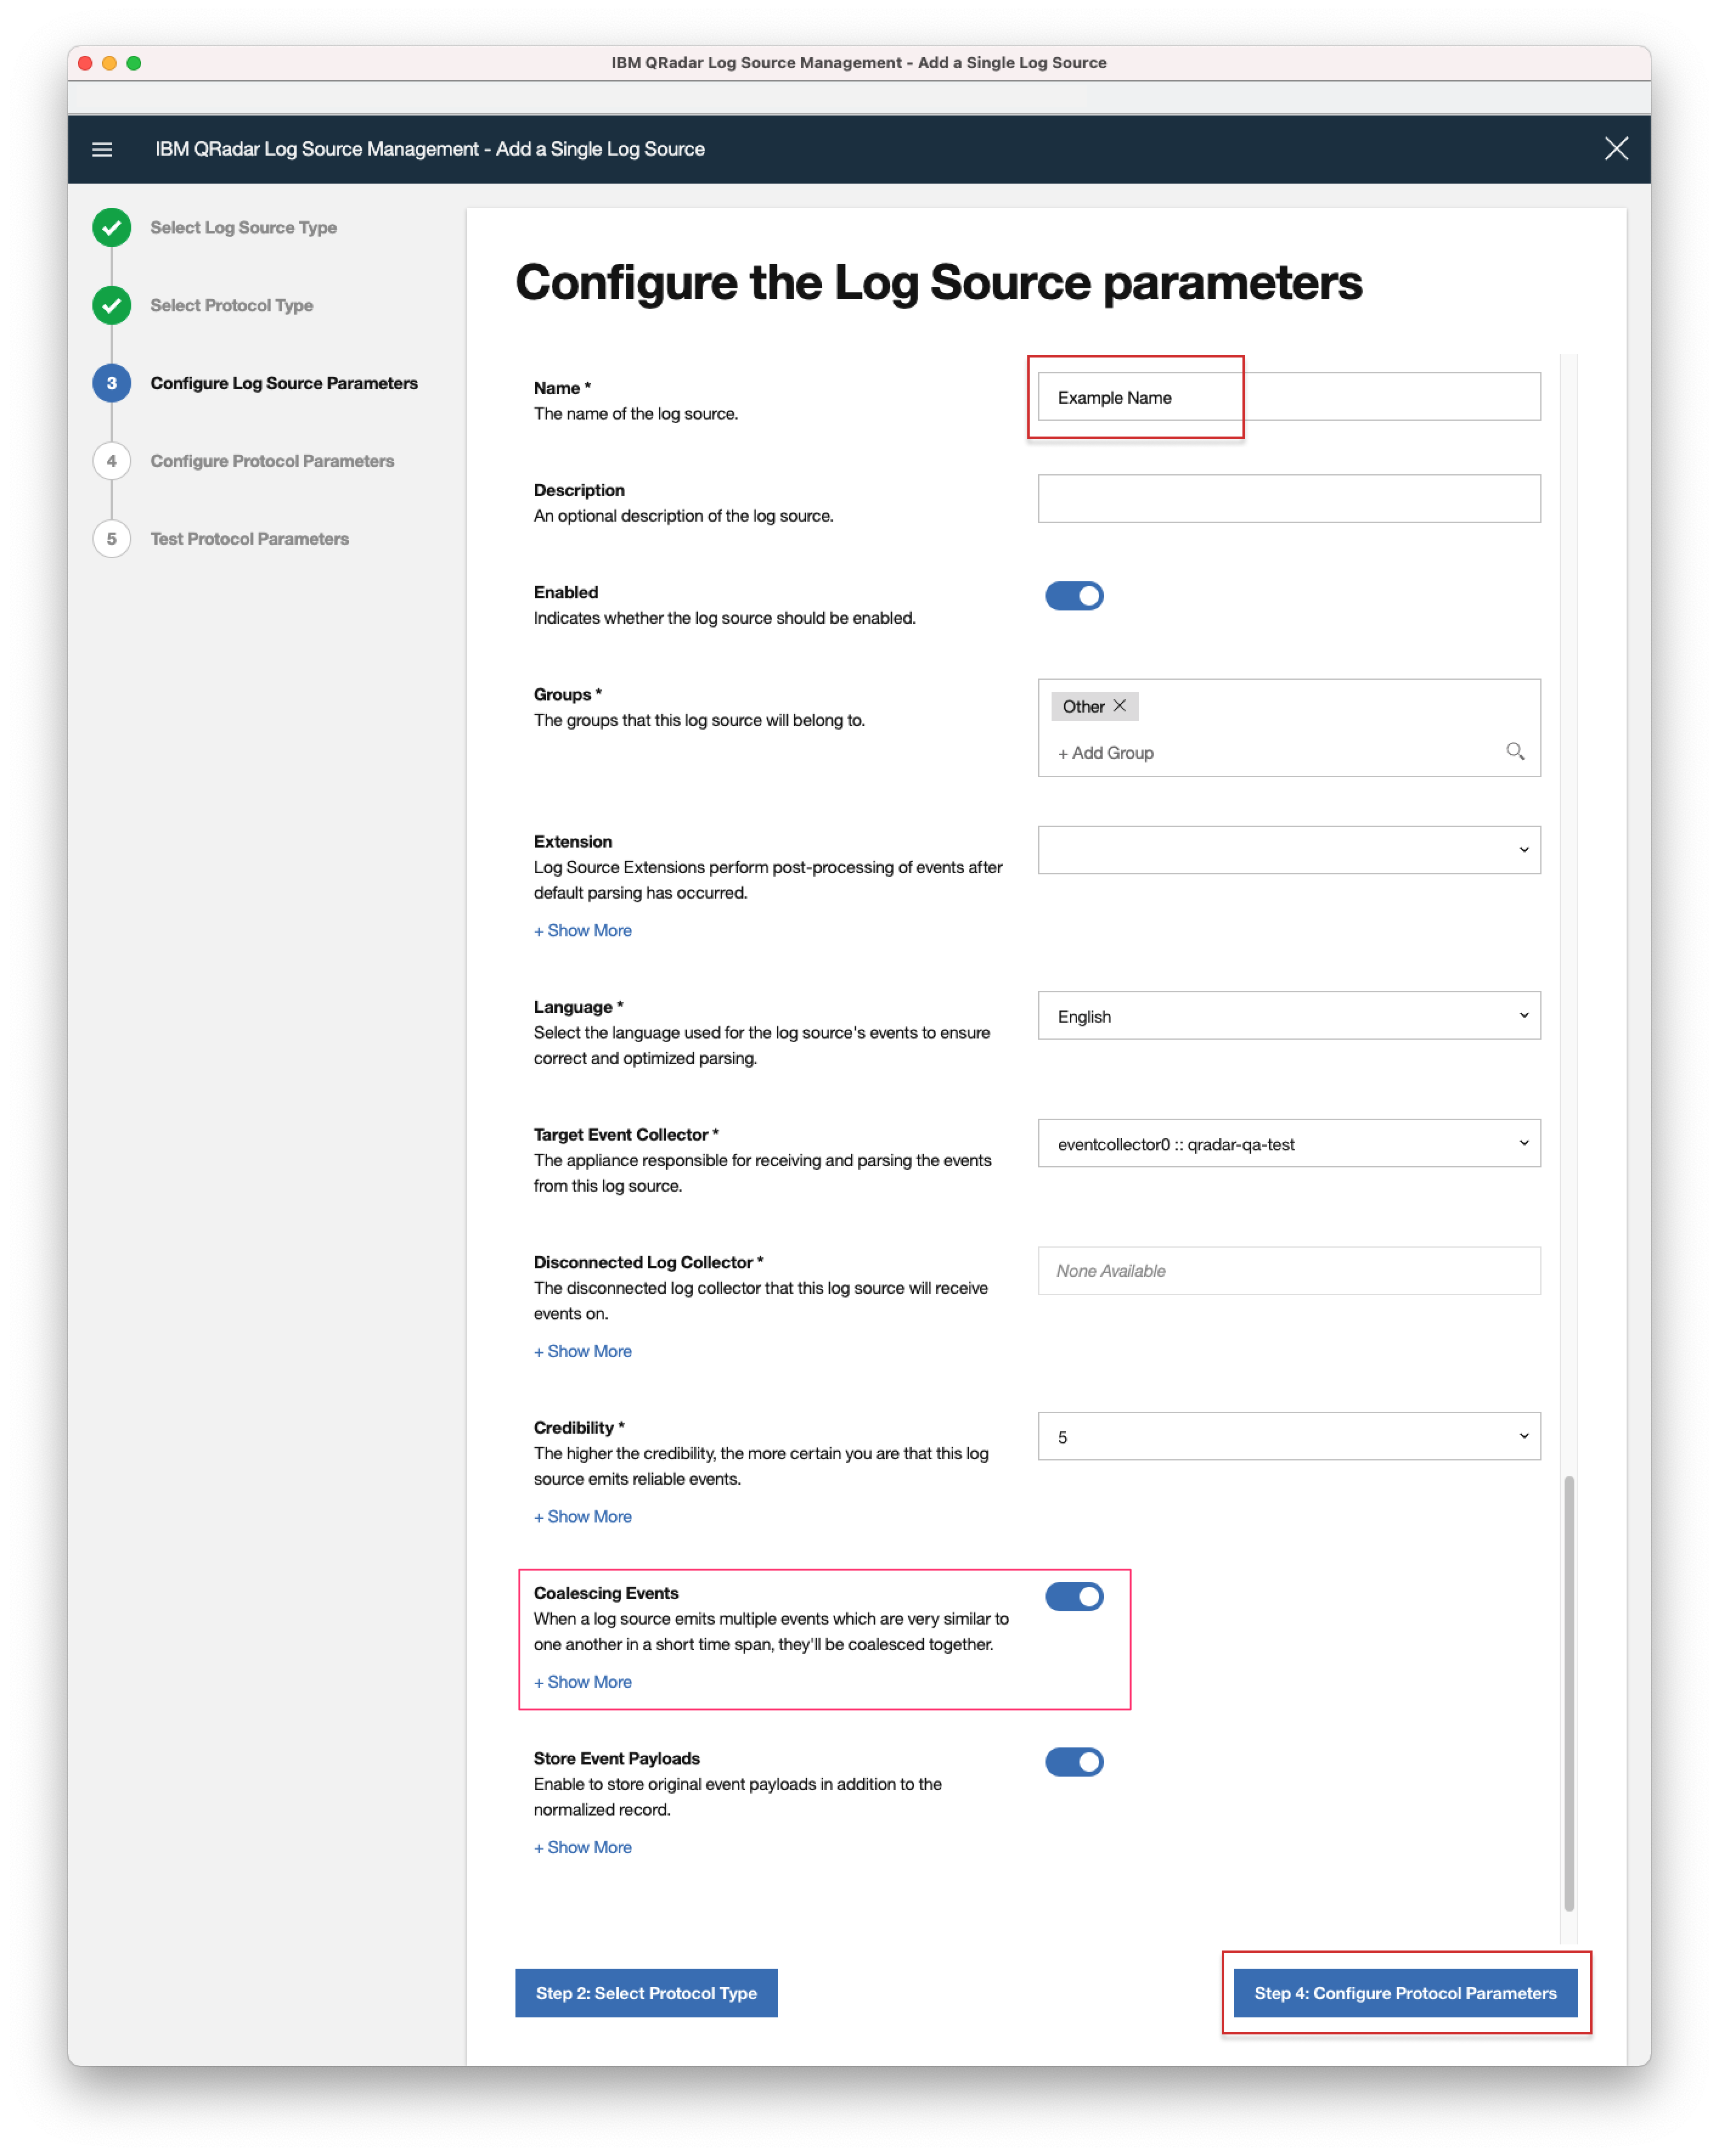
- Note: If the Log Source is created automatically this means that Coalescing Events option is enabled. Coalescing Events means that when a log source emits multiple events which are very similar to one another in a short time span, they'll be coalesced together. The event count of the single event will reflect the number of events have been coalesced. This is good to be enabled to reduce storage cost of events. Disable if there are important fields contained in the event outside of the previous noted fields.
- Optional: You can pick a custom name for the Log Source by editing the Log Source Name Template value. The default Log Source name is CarbonBlackCloudCustom @ localhost.
 1.
1.
 2.
2.
 3.
3.
 4.
4.
If you encounter any errors or need additional information, check out the Troubleshooting page.
If the autodetection and creation of the Log Source fails for some reason, you can manually create a Log Source following the steps described in Additional Guides > Create Syslog Log Source.
Data Forwarder Input
This method of data ingestion is recommended when you have a high volume or significant bursts of data as it provides higher scalability. The Data Forwarder streams the data to an AWS S3 bucket and then it is pulled into QRadar via the Amazon AWS REST API Protocol. Use the data forwarder input in conjunction with the built-in API input to access the full features of the app.
Supported data and features:
Requirements:
- Data Forwarder(s) configured in Carbon Black Cloud
- Amazon AWS S3 REST API Protocol for QRadar updated to the latest version
Pros:
- Streams data into an AWS S3 bucket at scale
Cons:
- Requires configuration of an AWS S3 bucket
Setup Data Forwarder Input
To use a Data Forwarder input, you will need:
- AWS S3 bucket
- AWS SQS queue
- Management Access Policy and User
- Carbon Black Cloud Data Forwarder(s)
- Log Source in QRadar
Note: For each data type (Alerts and Events), you will need a separate Data Forwarder in Carbon Black Cloud.
Note: You can configure more than one forwarder of either type if you have complex filtering needs.- 1. Create an S3 bucket in the AWS Console.
- 2. Configure the Bucket Policy to Allow Access
- 3. Create Management Access Policy:
{ "Version": "2012-10-17", "Statement": [ { "Sid": "VisualEditor0", "Effect": "Allow", "Action": [ "s3:GetObject", "sqs:GetQueueUrl", "sqs:DeleteMessage", "sqs:SendMessageBatch", "sqs:ReceiveMessage", "sqs:SendMessage" ], "Resource": [ "arn:aws:sqs:<aws-region>:535601802221:<name-of-queue>", "arn:aws:s3:::<name-of-s3-bucket>/*" ] } ] } - 4. Create a user that uses that policy, check Programmatic Access that would generate Access Key ID and Secret Access Key.
- 5. Save the generated Access Key ID and Secret Access Key.
- 1. Create an SQS queue in your AWS Management Console and set the Access policy:
{ "Version": "2008-10-17", "Id": "__default_policy_ID", "Statement": [ { "Sid": "__sender_statement", "Effect": "Allow", "Principal": { "Service": "s3.amazonaws.com" }, "Action": "SQS:SendMessage", "Resource": "arn:aws:sqs:<aws-region>:535601802221:<name-of-queue>", "Condition": { "ForAllValues:ArnEquals": { "aws:SourceArn": "arn:aws:s3:::<name-of-s3-bucket>" } } } ] } - 2. Configure the Event Notification in the S3 bucket to use this queue - navigate to Properties > Event Notifications and set for Destination SQS queue the arn of the new queue.
For more detailed instructions on setting up a Data Forwarder using the APIs, see the following: Note: The same forwarder cannot be used for both Alerts and Events. Create a separate forwarder for each type of data you want to forward. Note: If you use the Data Forwarder to ingest alert data, do not enable any of the built-in alert types under Settings > Data, otherwise you will get duplicate alerts in QRadar.
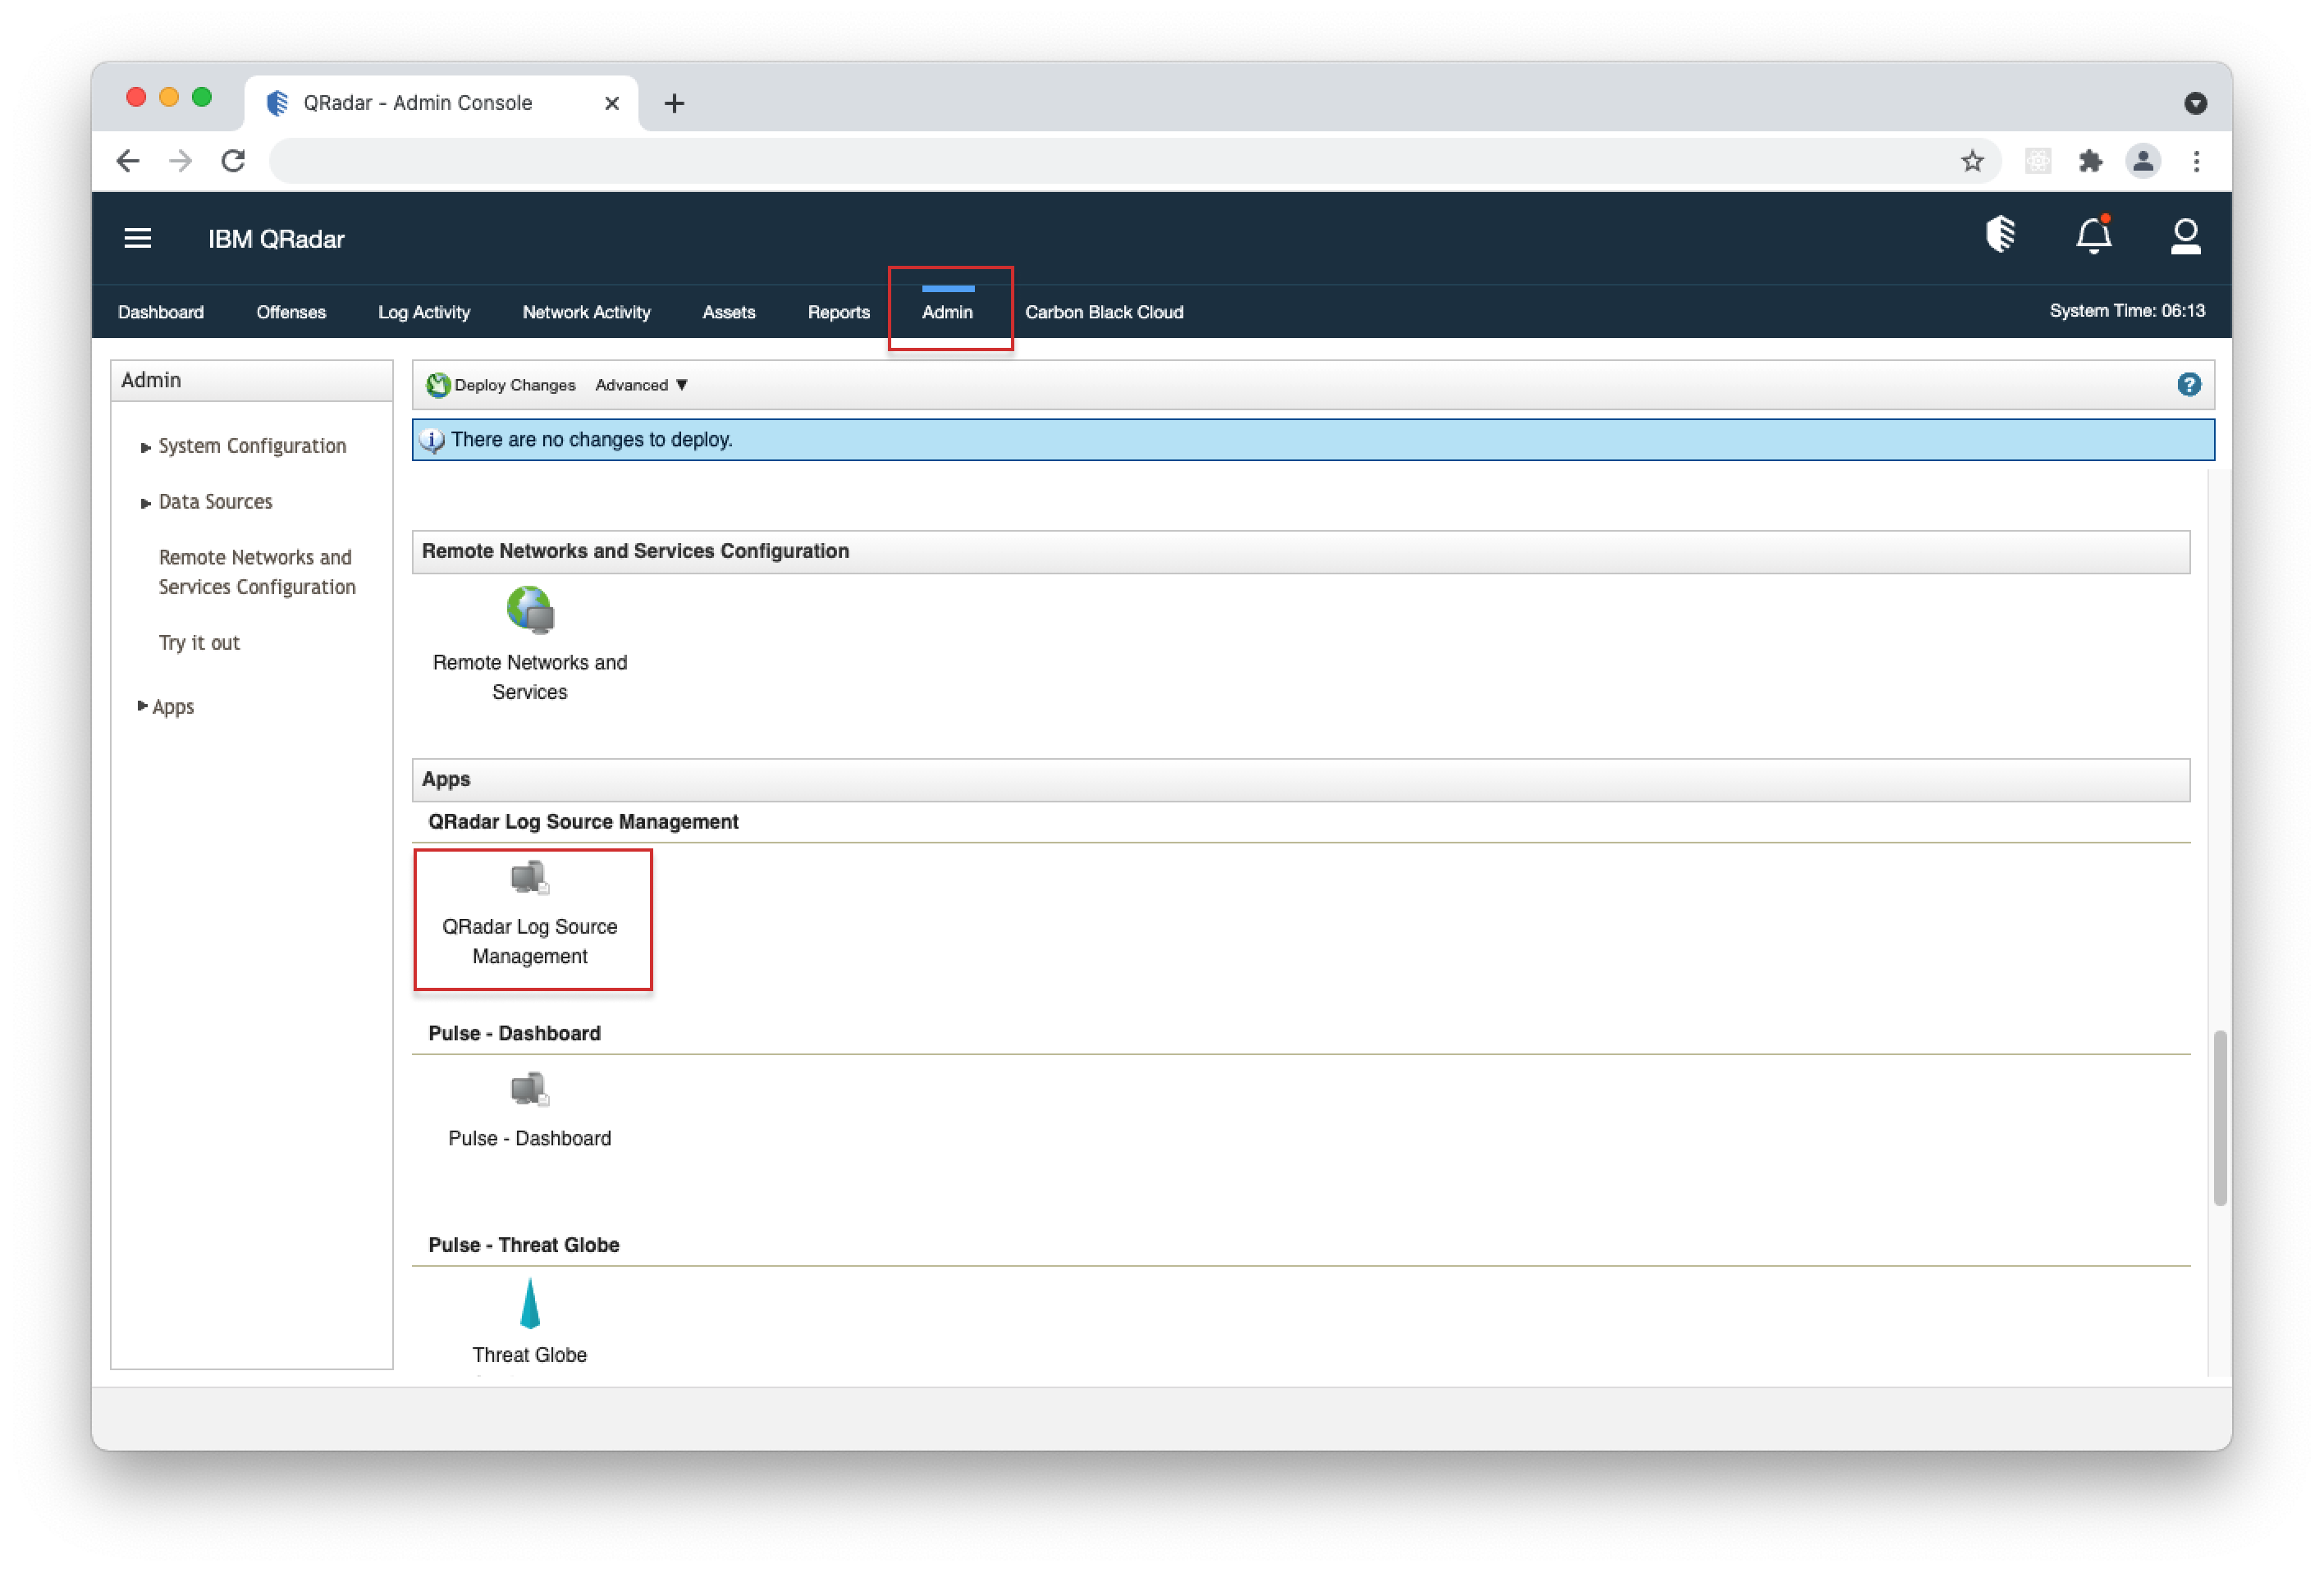
- 1. Open your QRadar console and navigate to Admin > QRadar Log Source Management.
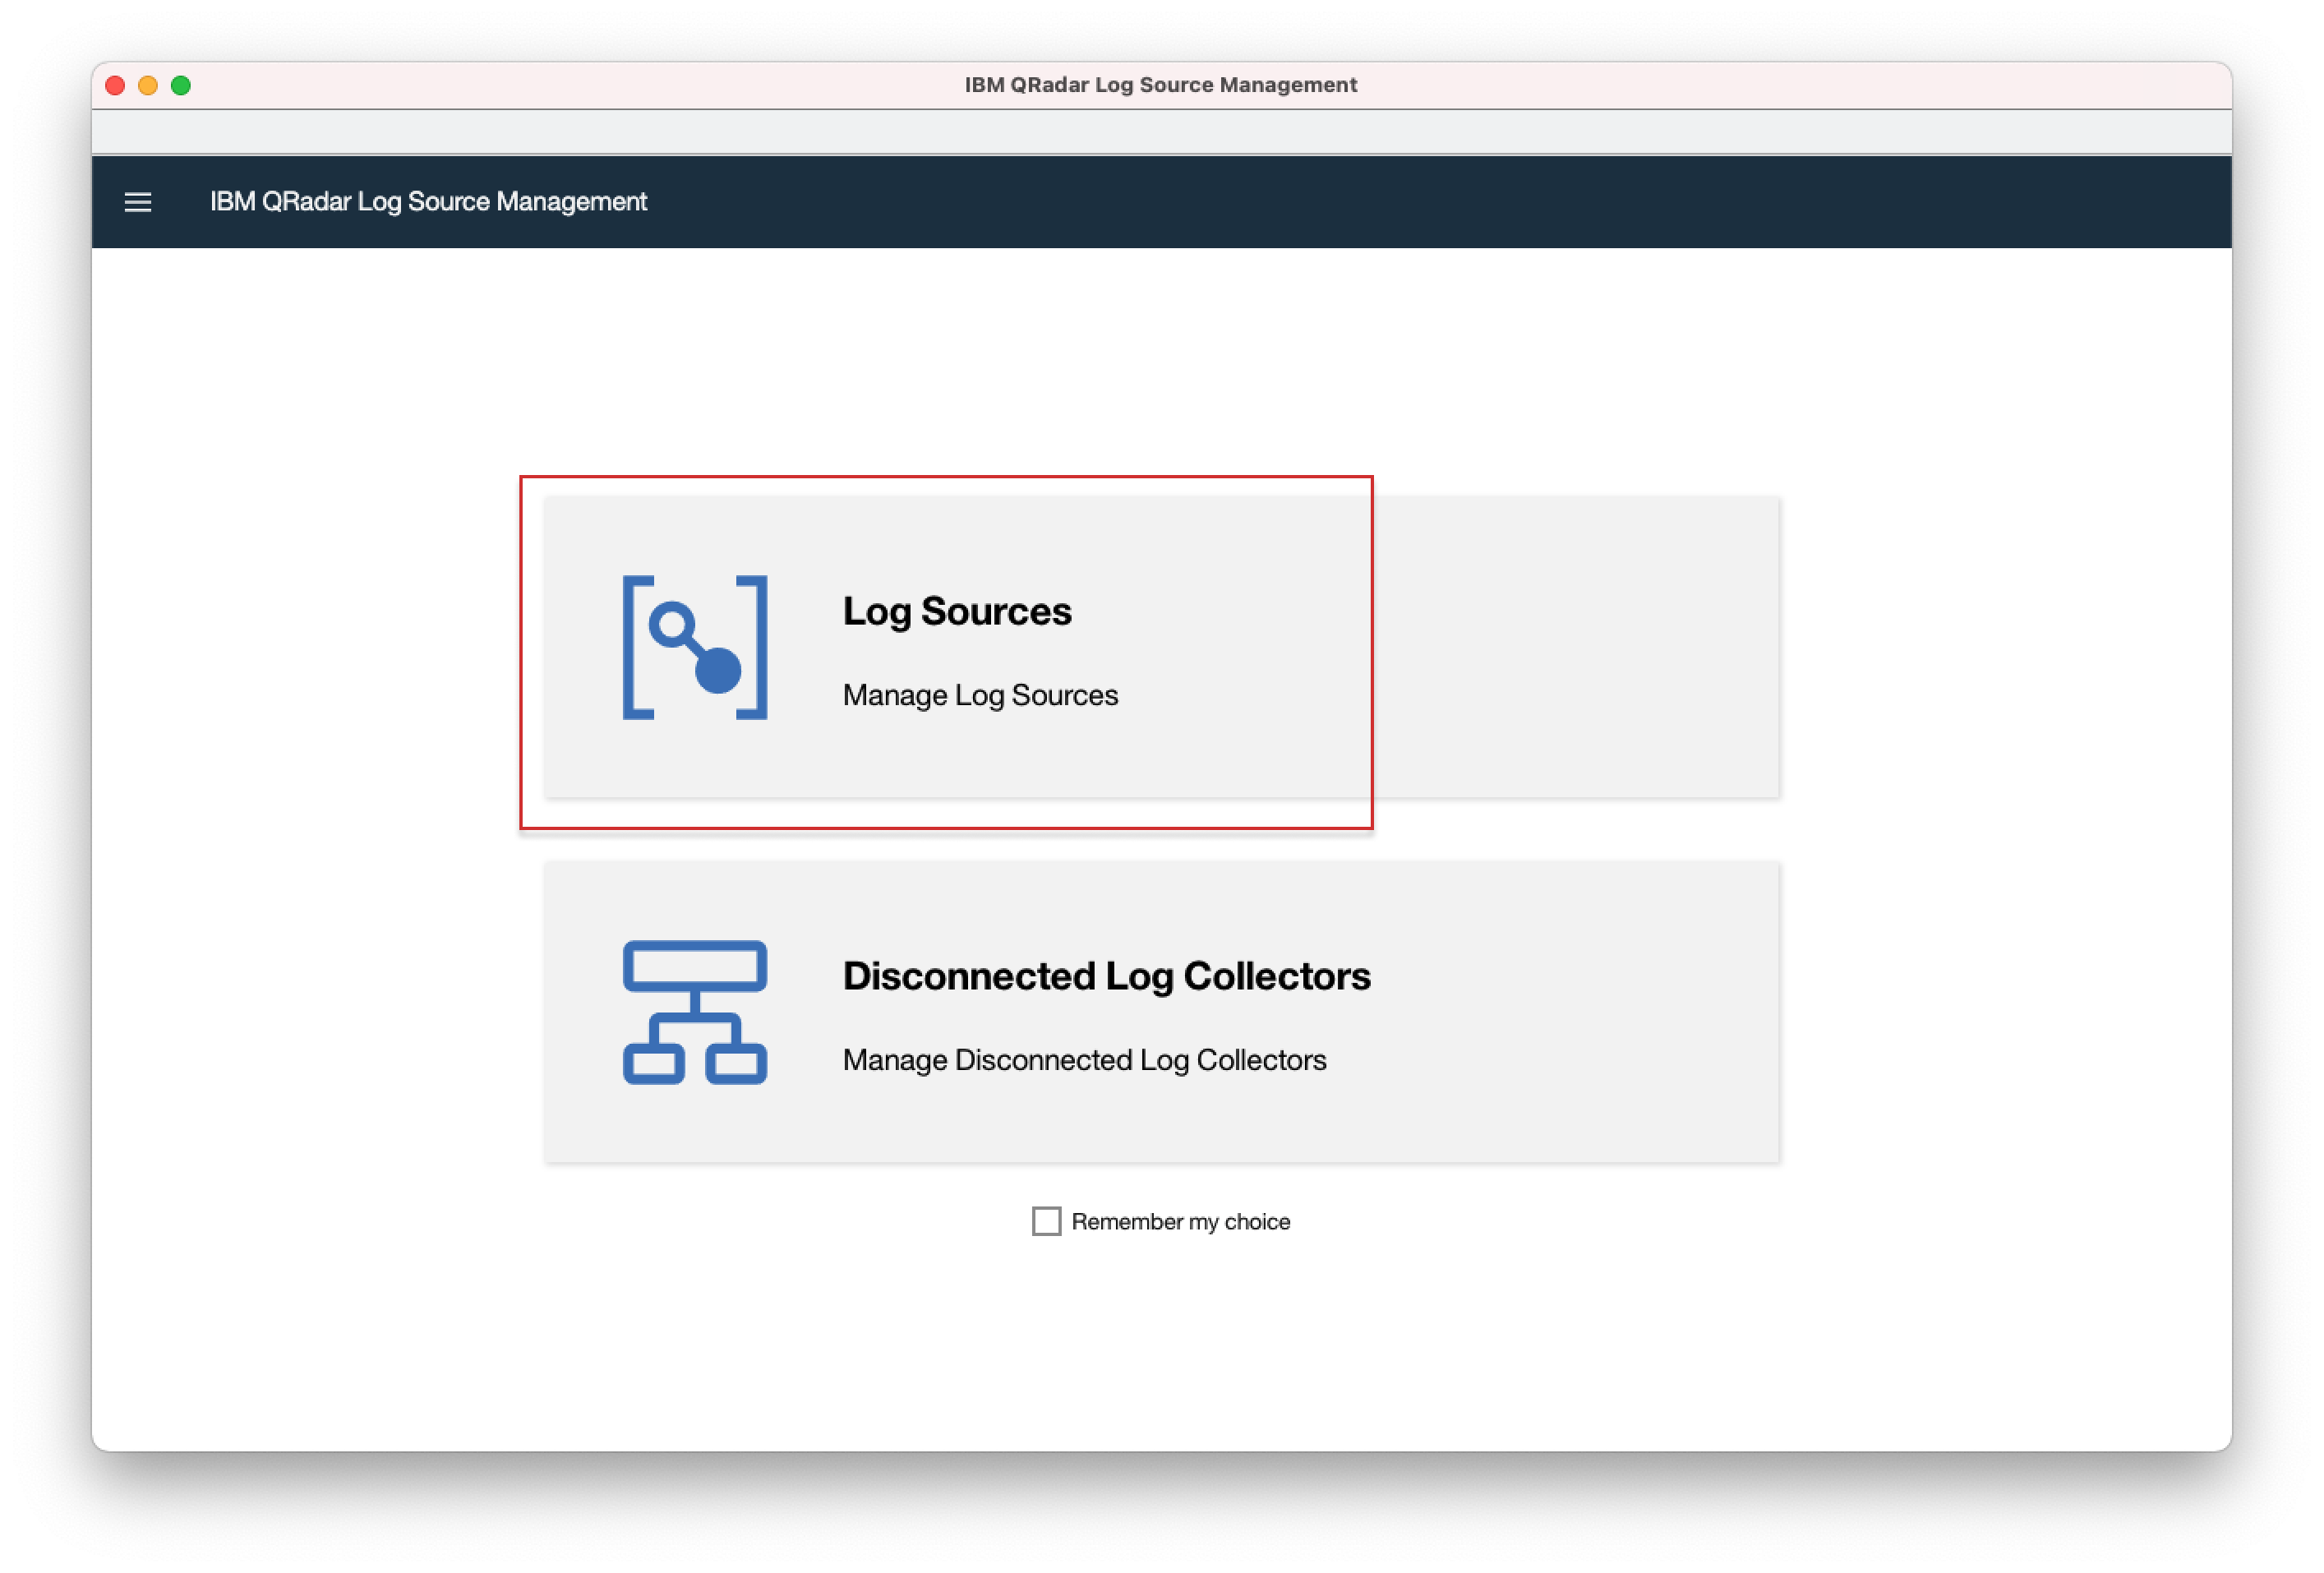
- 2. In the popup window, click "Log Sources".
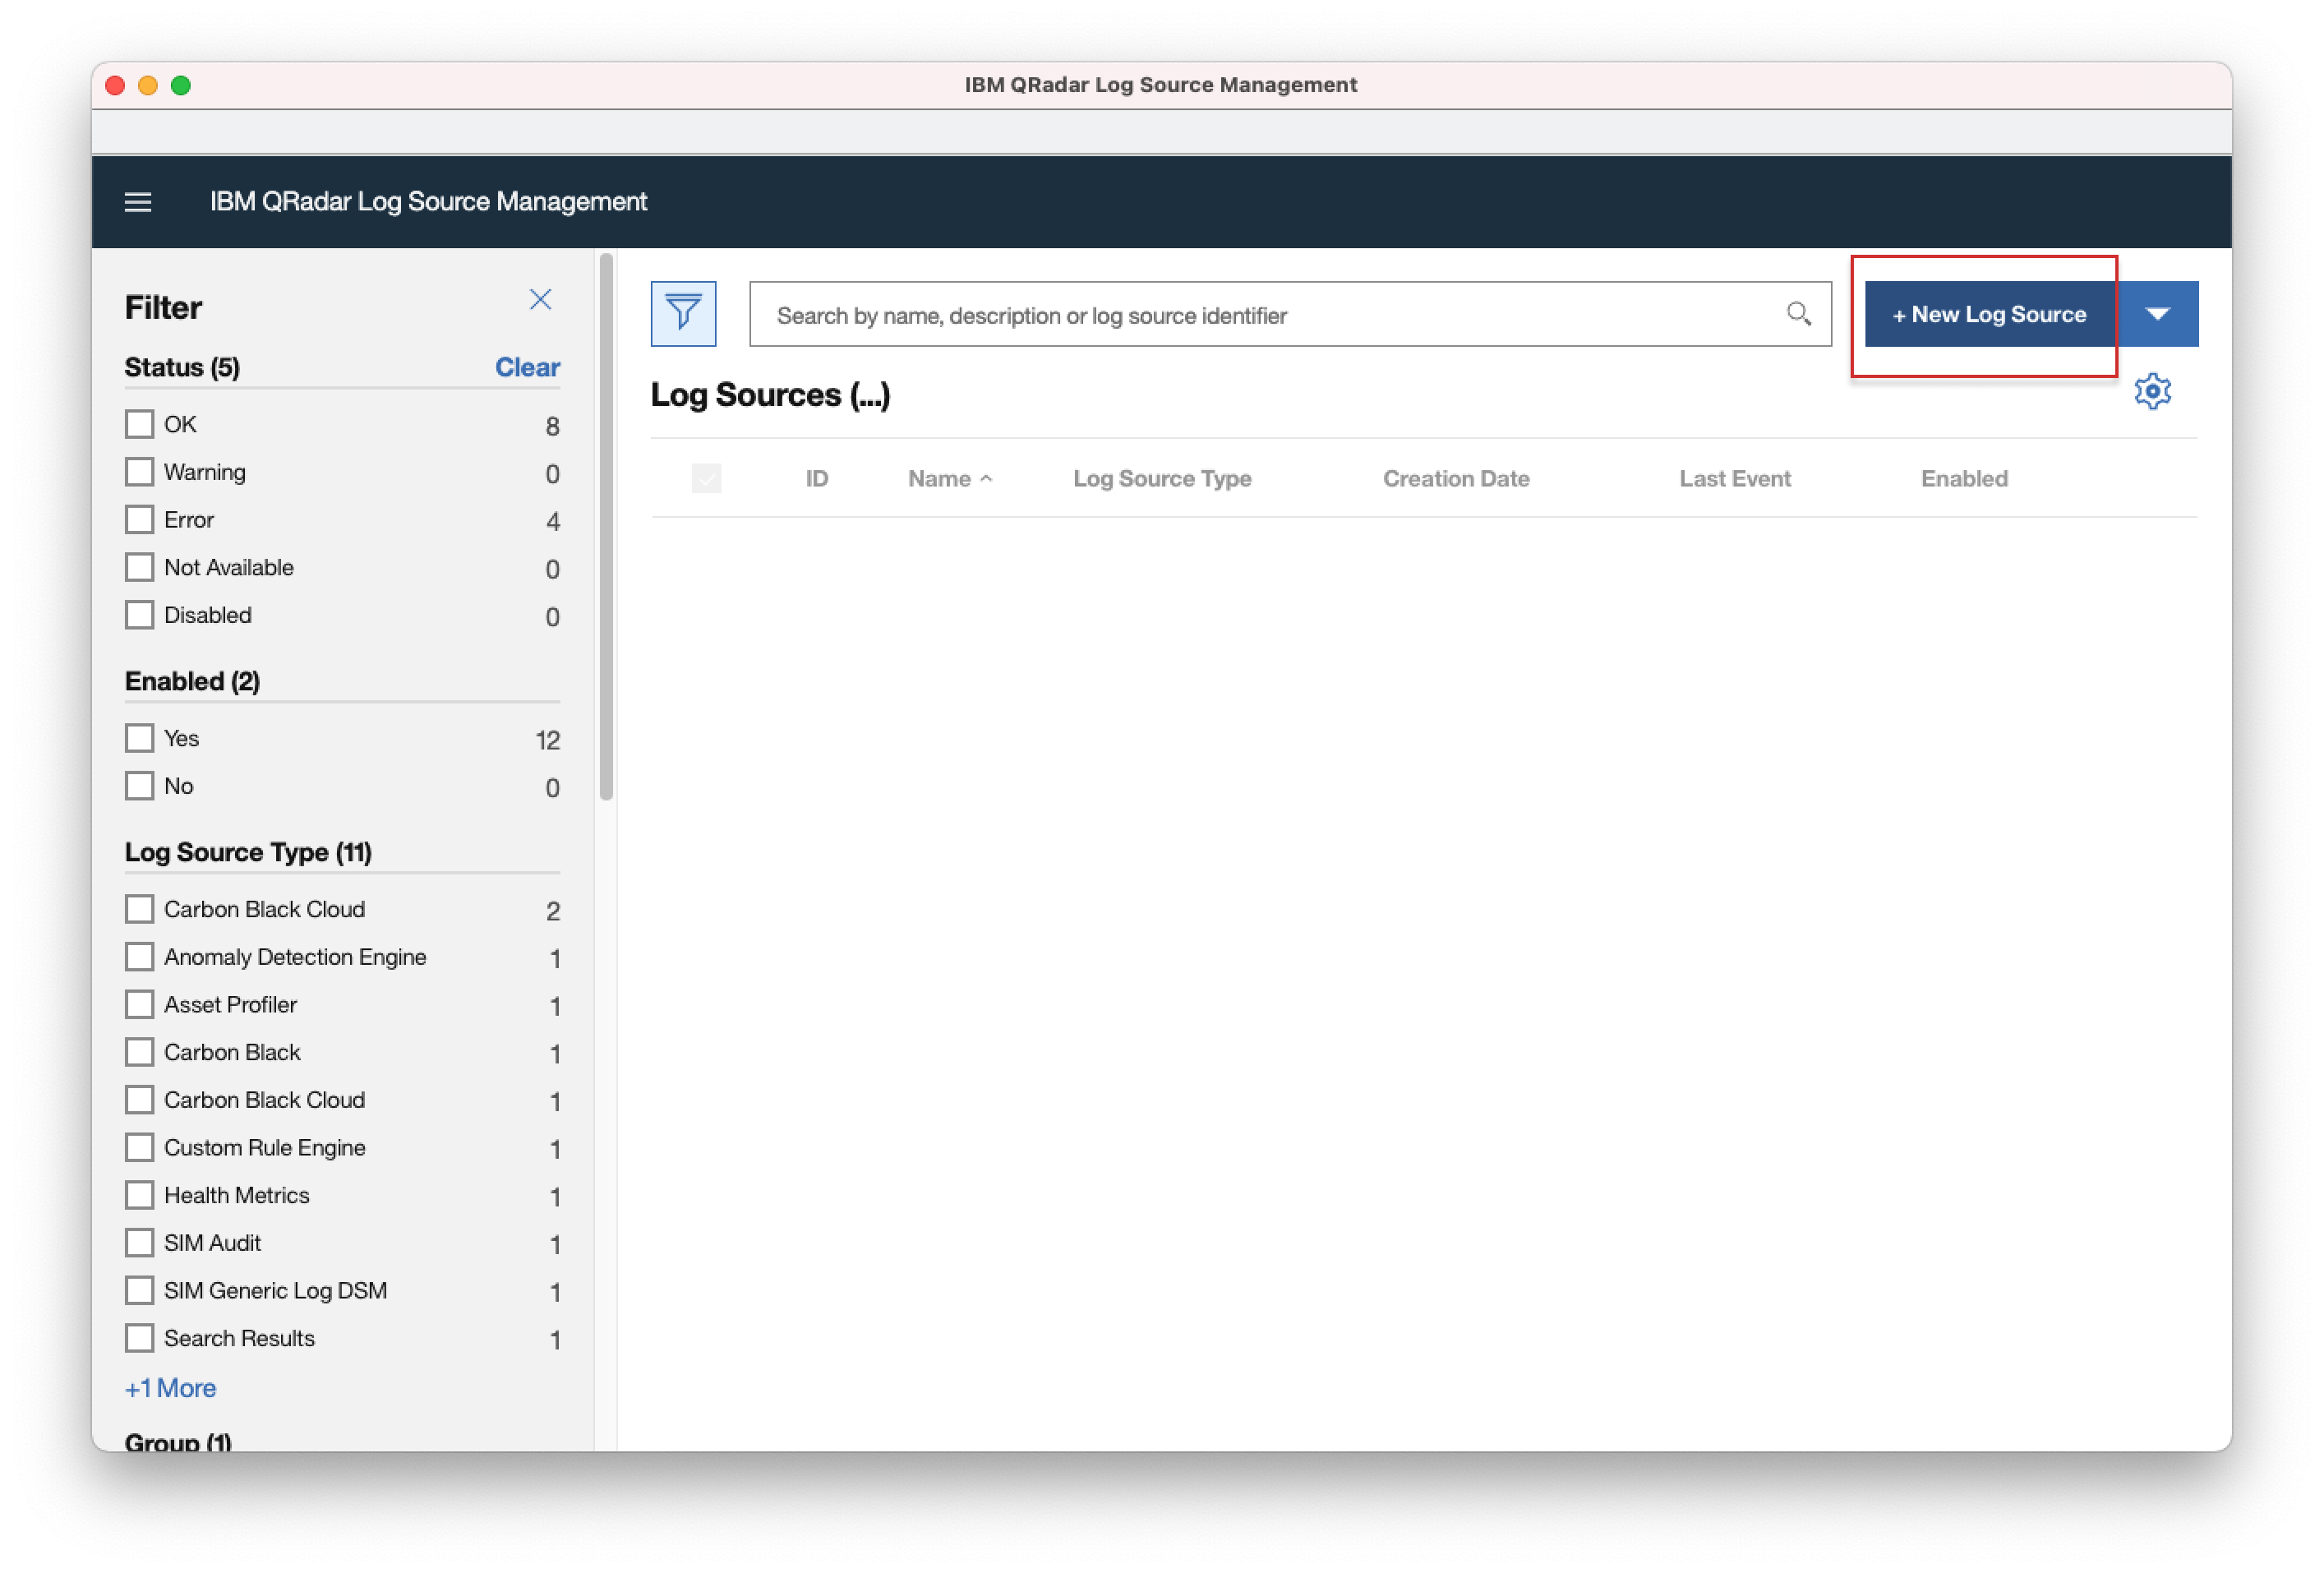
- 3. Click the "+New Log Source" button.
- 4. Select "Single Log Source".
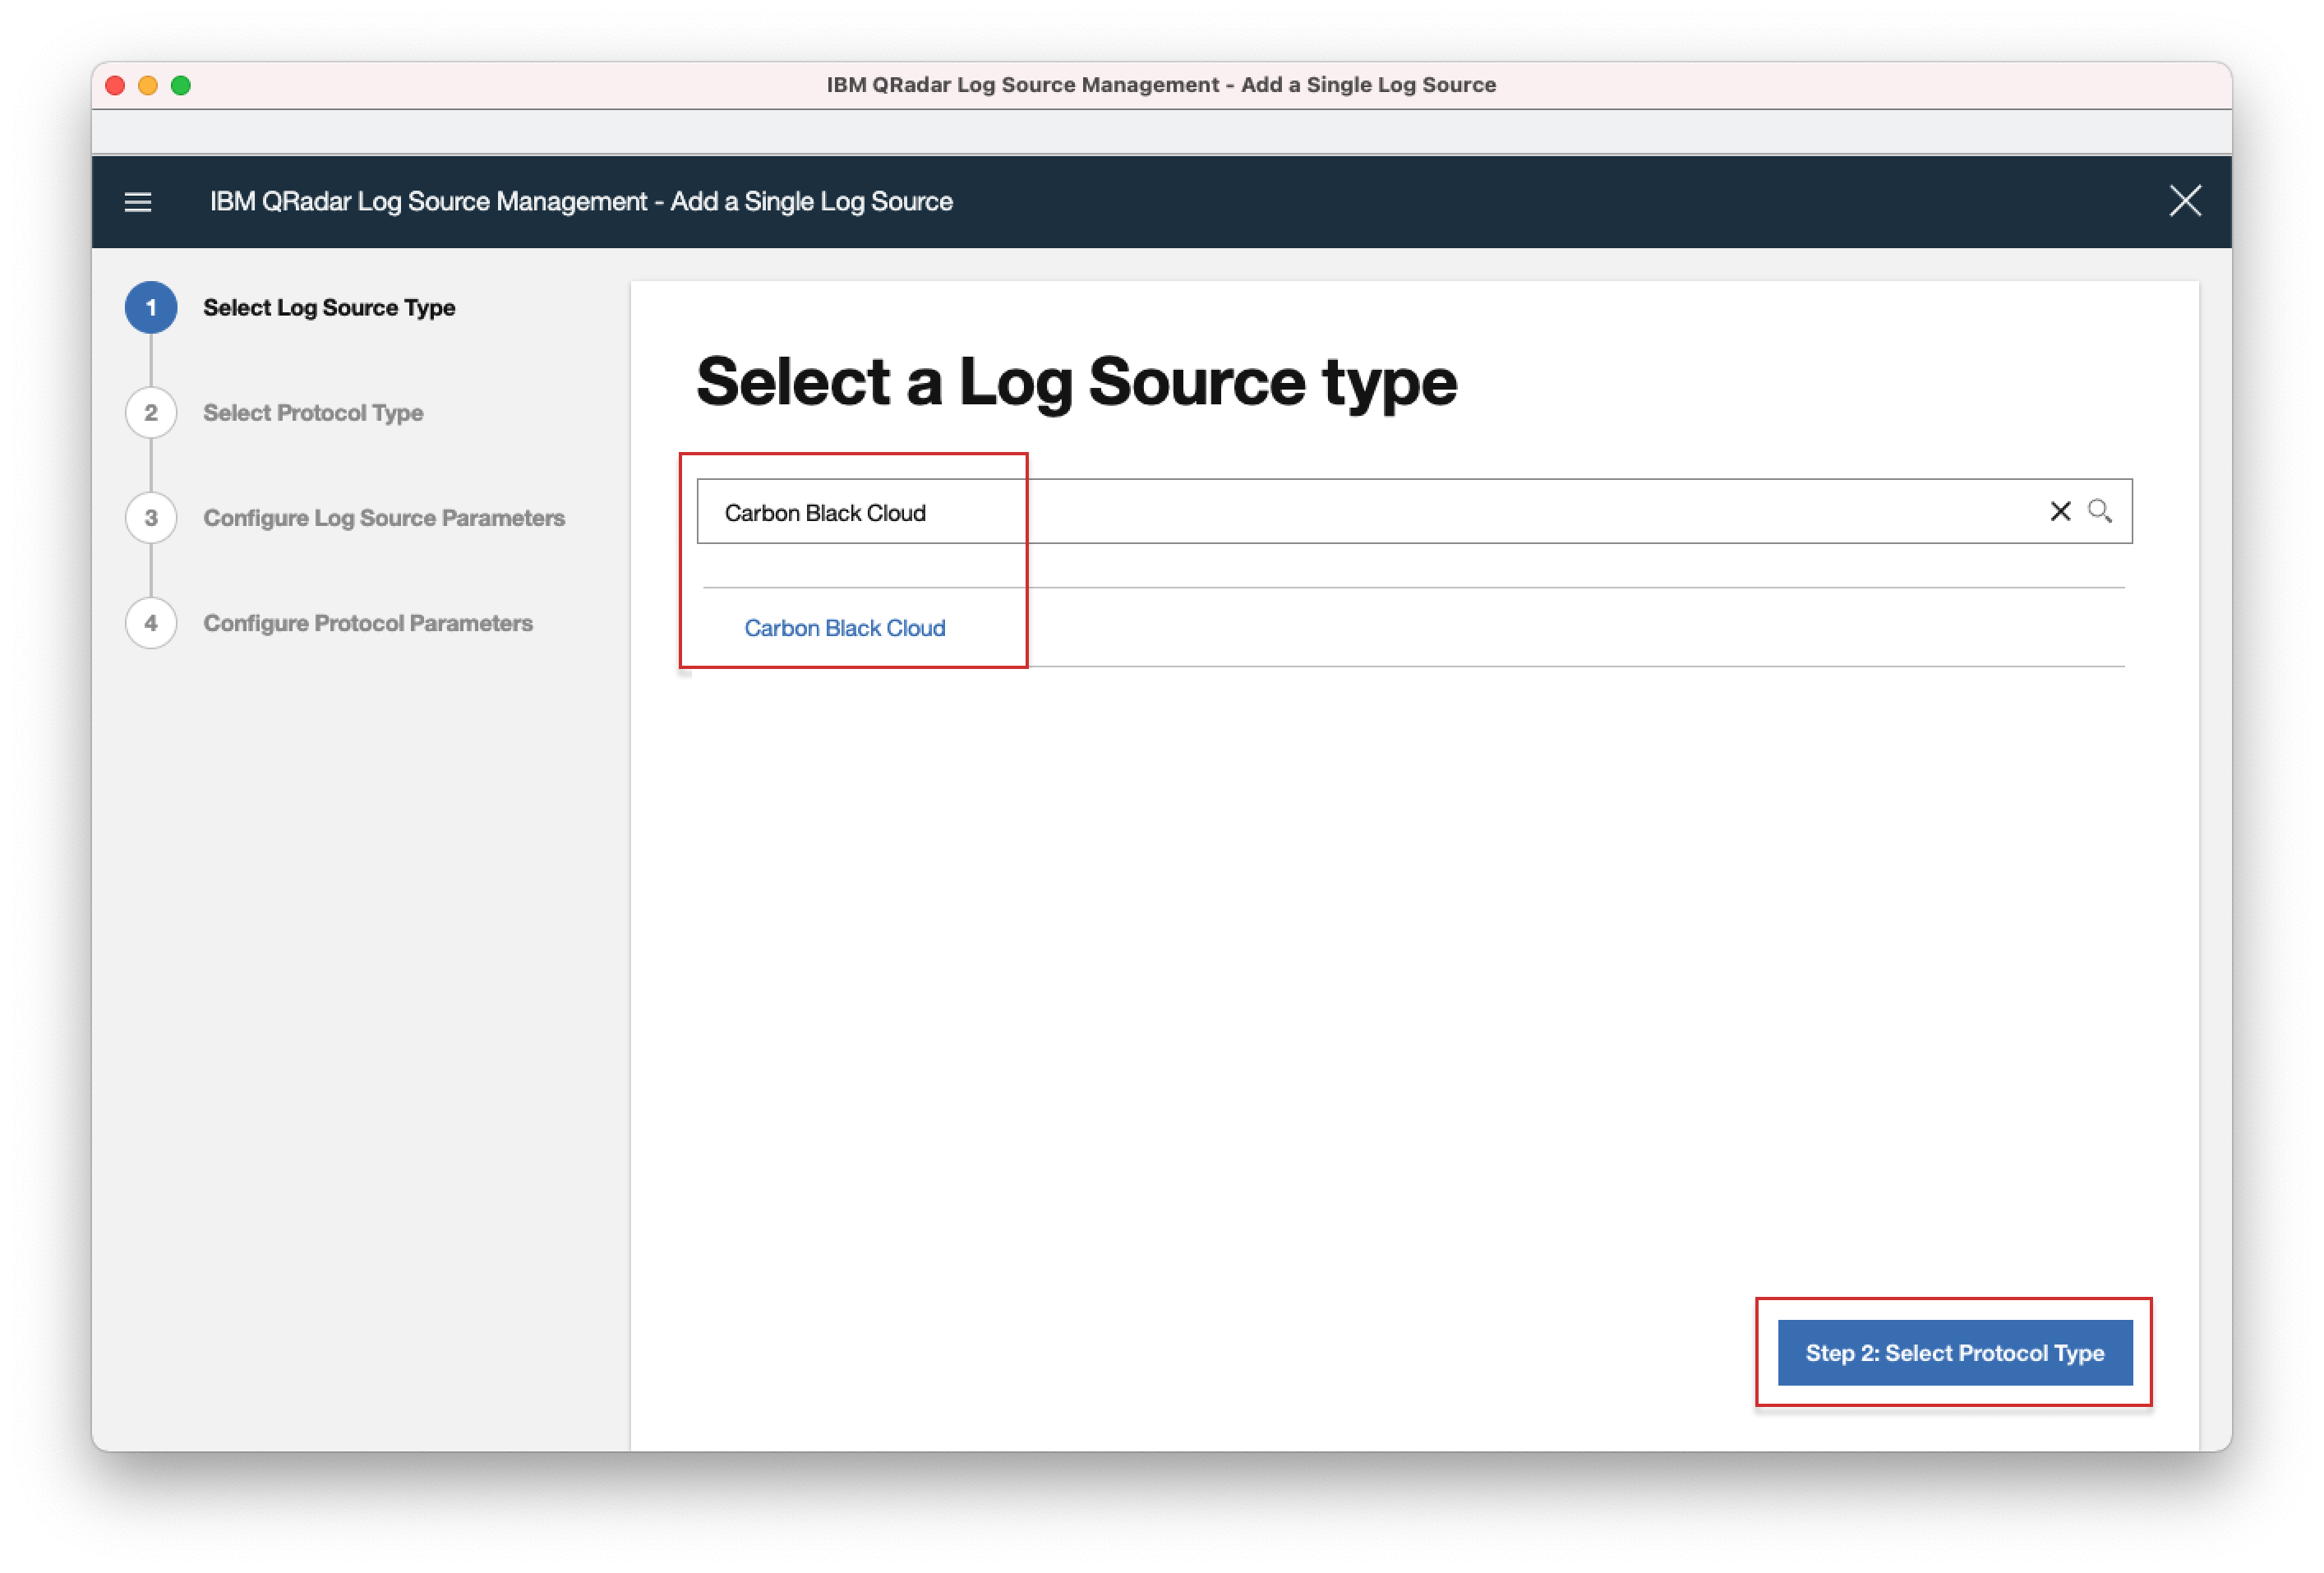
- 5. In the search field, enter "Carbon Black Cloud" and select it, then click "Step2: Select Protocol Type".
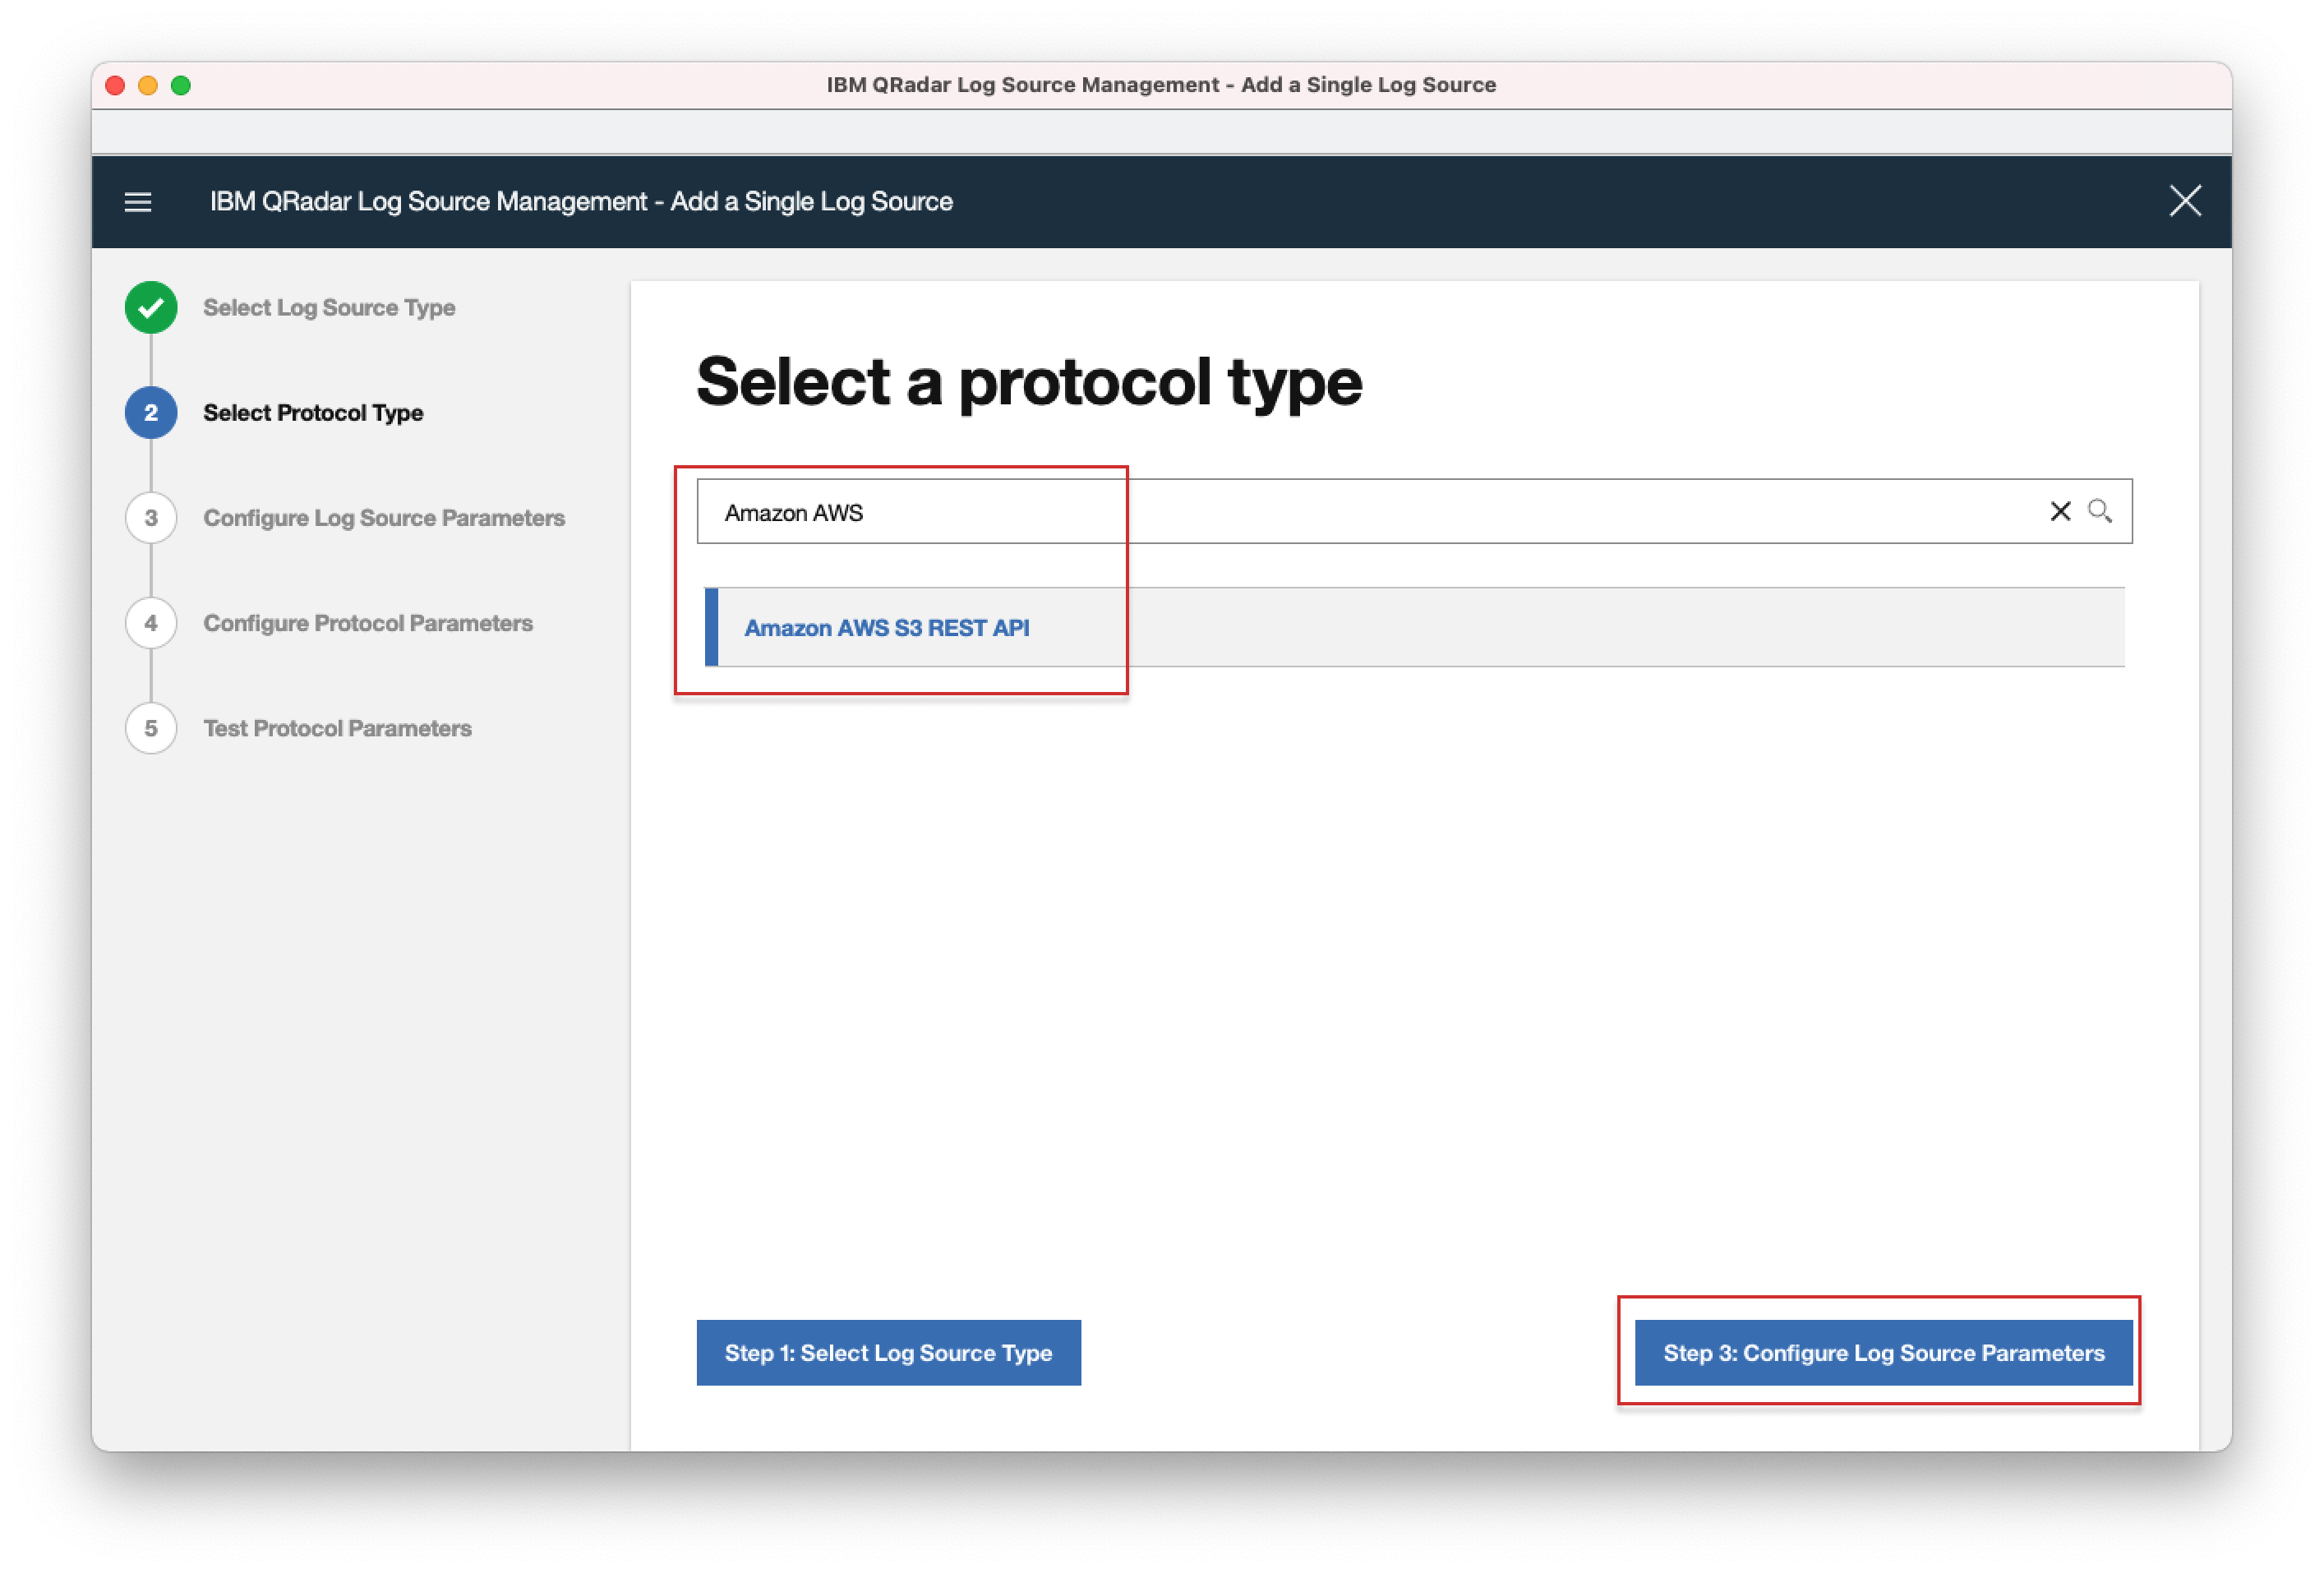
- 6. In the search field, enter "Amazon AWS S3 REST API" and select it, then click "Step3: Configure Log Source Parameters".
- 7. Click "Enable", configure the rest of the Log Source Parameters, then click "Step4: Configure Protocol Parameters":
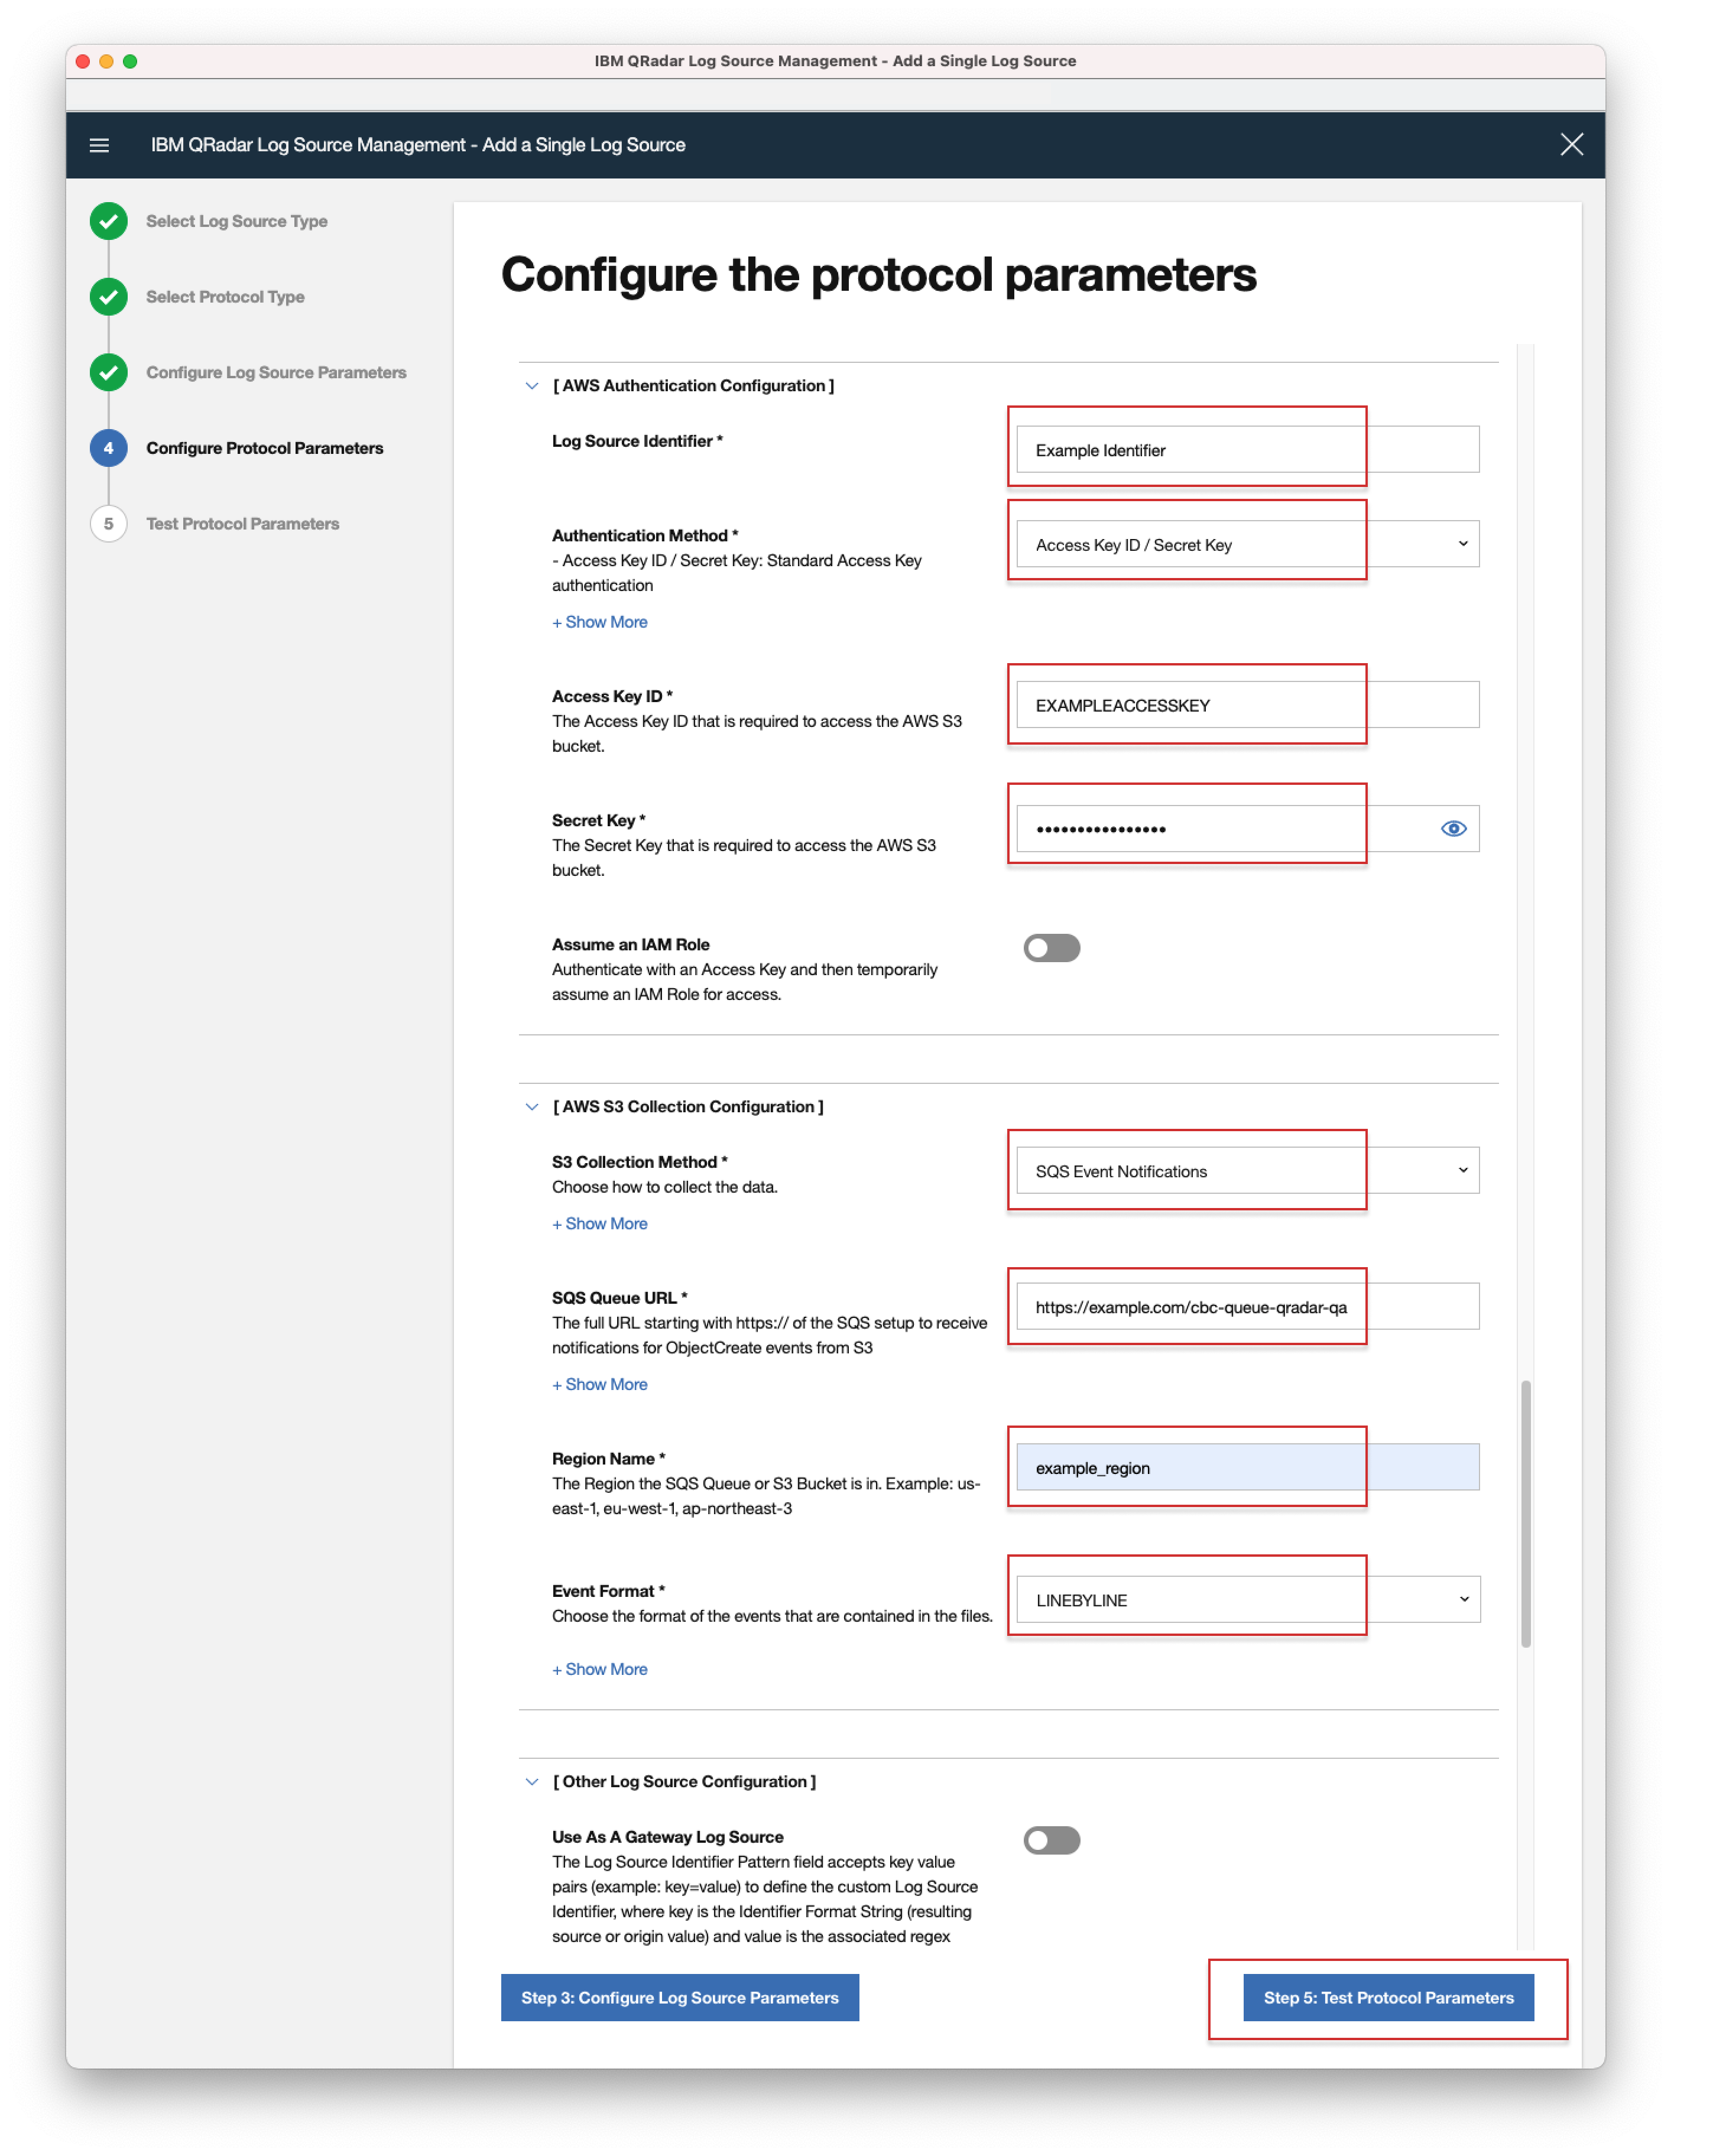
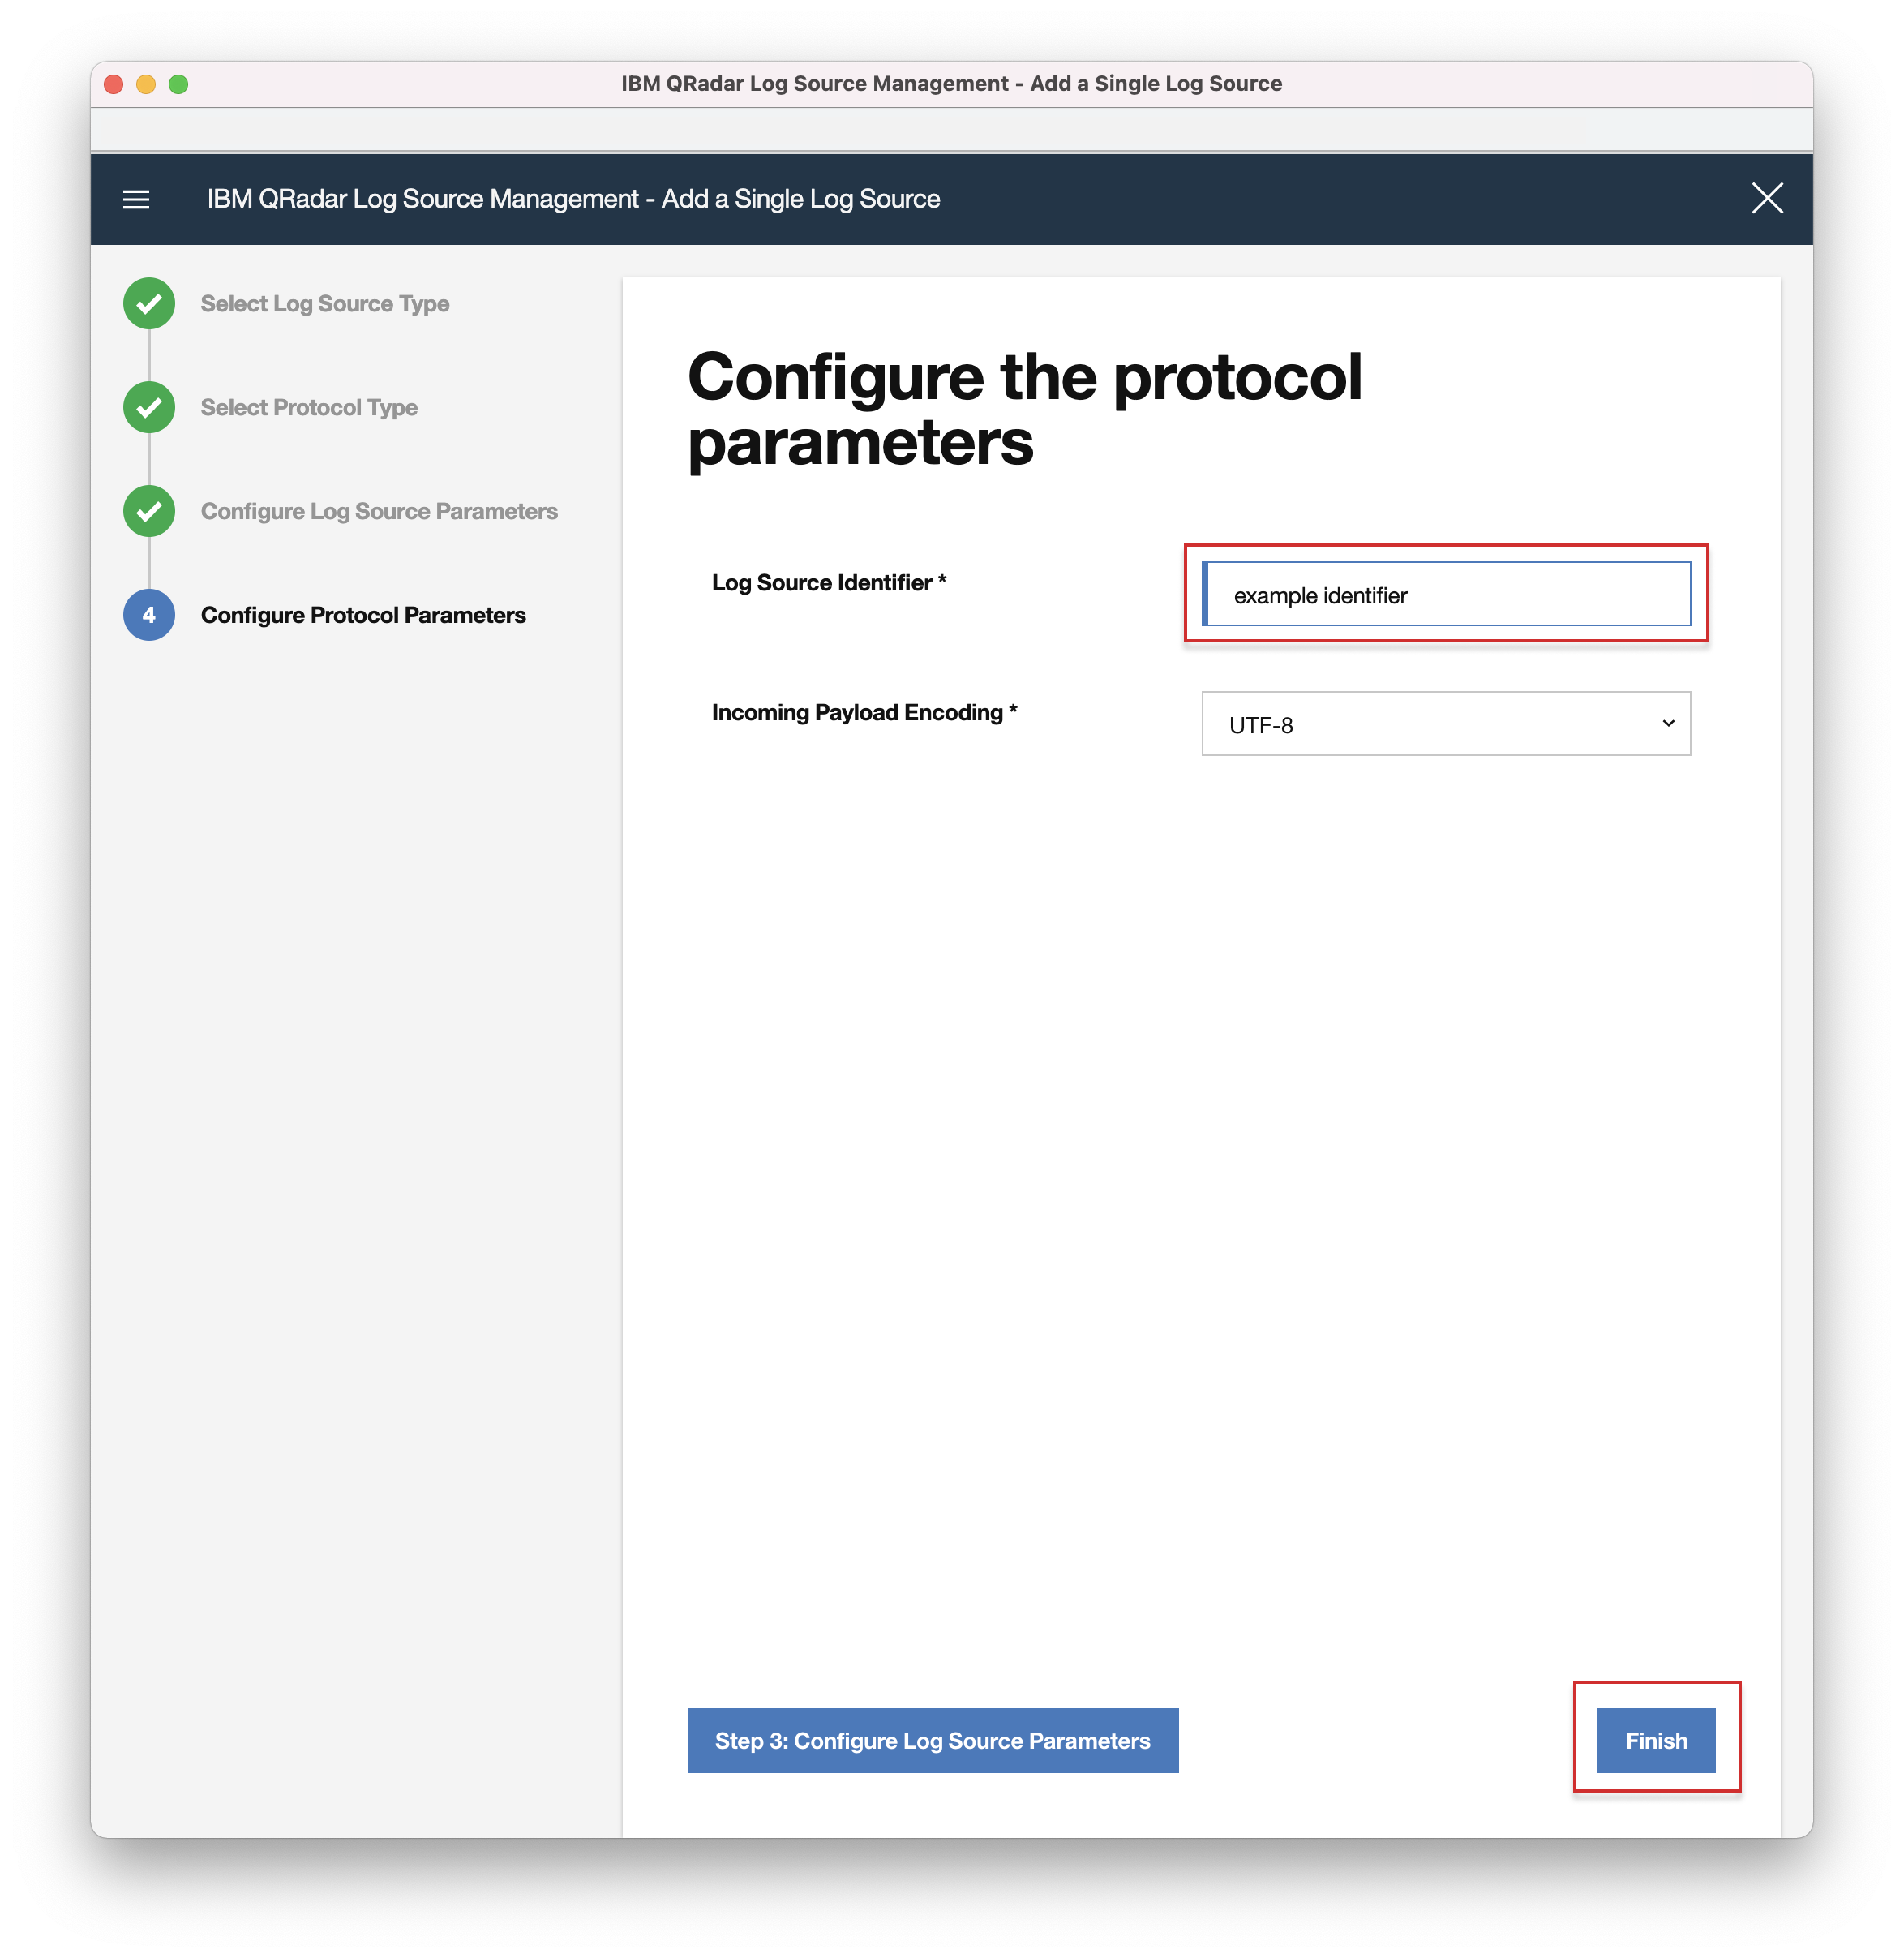
Name - Choose a name for the log source. Note: Pick a different name from the built-in log source 'CarbonBlackCloudCustom' as you will have difficulties filtering events based on log source name. - 8. Configure the Protocol Parameters:
Log Source identifier - Choose a name for your Log Source
Authentication Method - Access Key ID / Secret Key
Access Key ID and Secret Key - The Access Key and ID required to access the AWS S3 Bucket
S3 Collection Method - SQS Event Notification
SQS Queue URL - URL to the queue - can be copied from AWS Management Console
Region Name - Same as the S3 bucket
Event Format - LINEBYLINE - Data Forwarder generates jsonl file - 9. Click "Start Test" to verify the configuration, or "Skip Test and Finish".
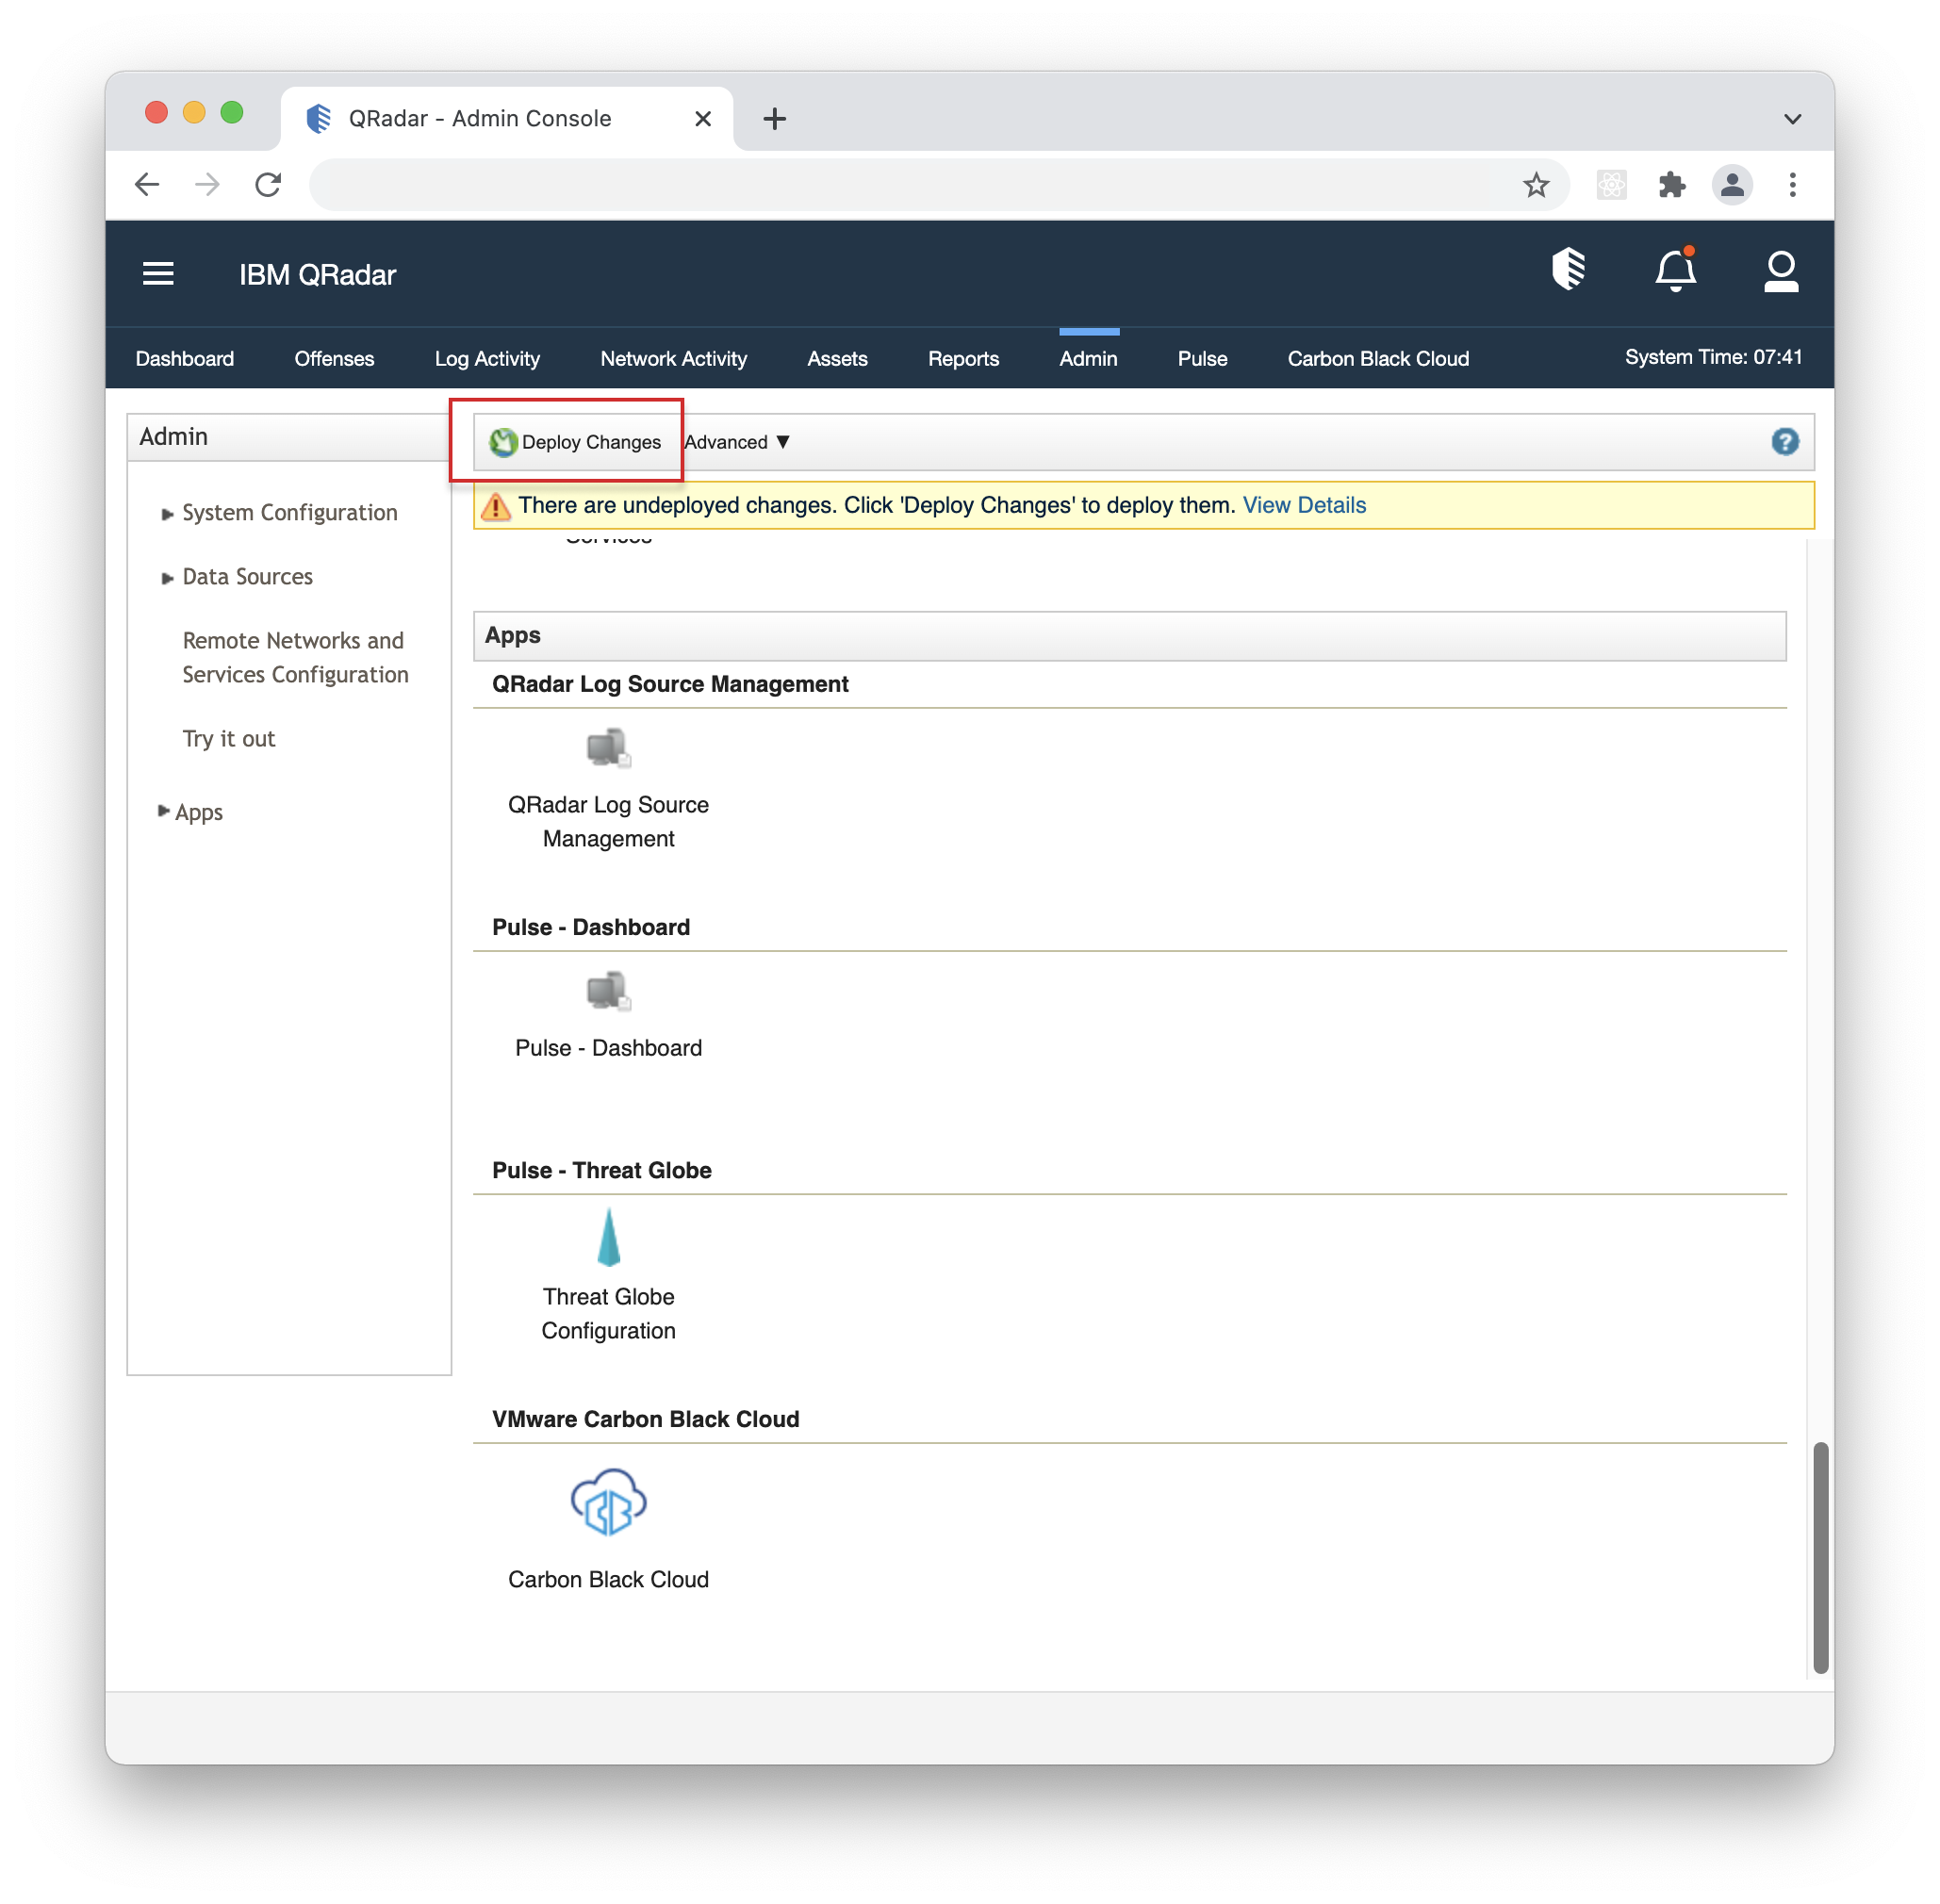
- 10. Click "Deploy Changes" in the notification pop-up under the Admin tab for the changes to take effect.
 1.
1.
 2.
2.
 3.
3.
 4.
4.
 5.
5.
 6.
6.
 7.
7.
 8.
8.
 9.
9.
 10.
10.
Installation and Configuration
Install the Carbon Black Cloud app for IBM QRadar via the IBM X-Force Security App Exchange.
- 1. Open your Carbon Black Cloud console and copy its URL(including the "https://"), and ORG KEY.
- 2. Open the QRadar console, go to Carbon Black Cloud > Settings > App Configuration, click Edit and paste the URL and ORG KEY in their respective fields.
- 3. If you have not filled in the API Credentials in the App Configuration page, do so as explained in the Built-in Input > Keys and Permissions section and click Save.
- 4. OPTIONAL - If you use a proxy, add your Proxy URL(the format is as follows: [http/https]://[ip/hostname]:[port]), Username, and Password under the "Proxy Settings" section, enable the proxy toggle and click Save.
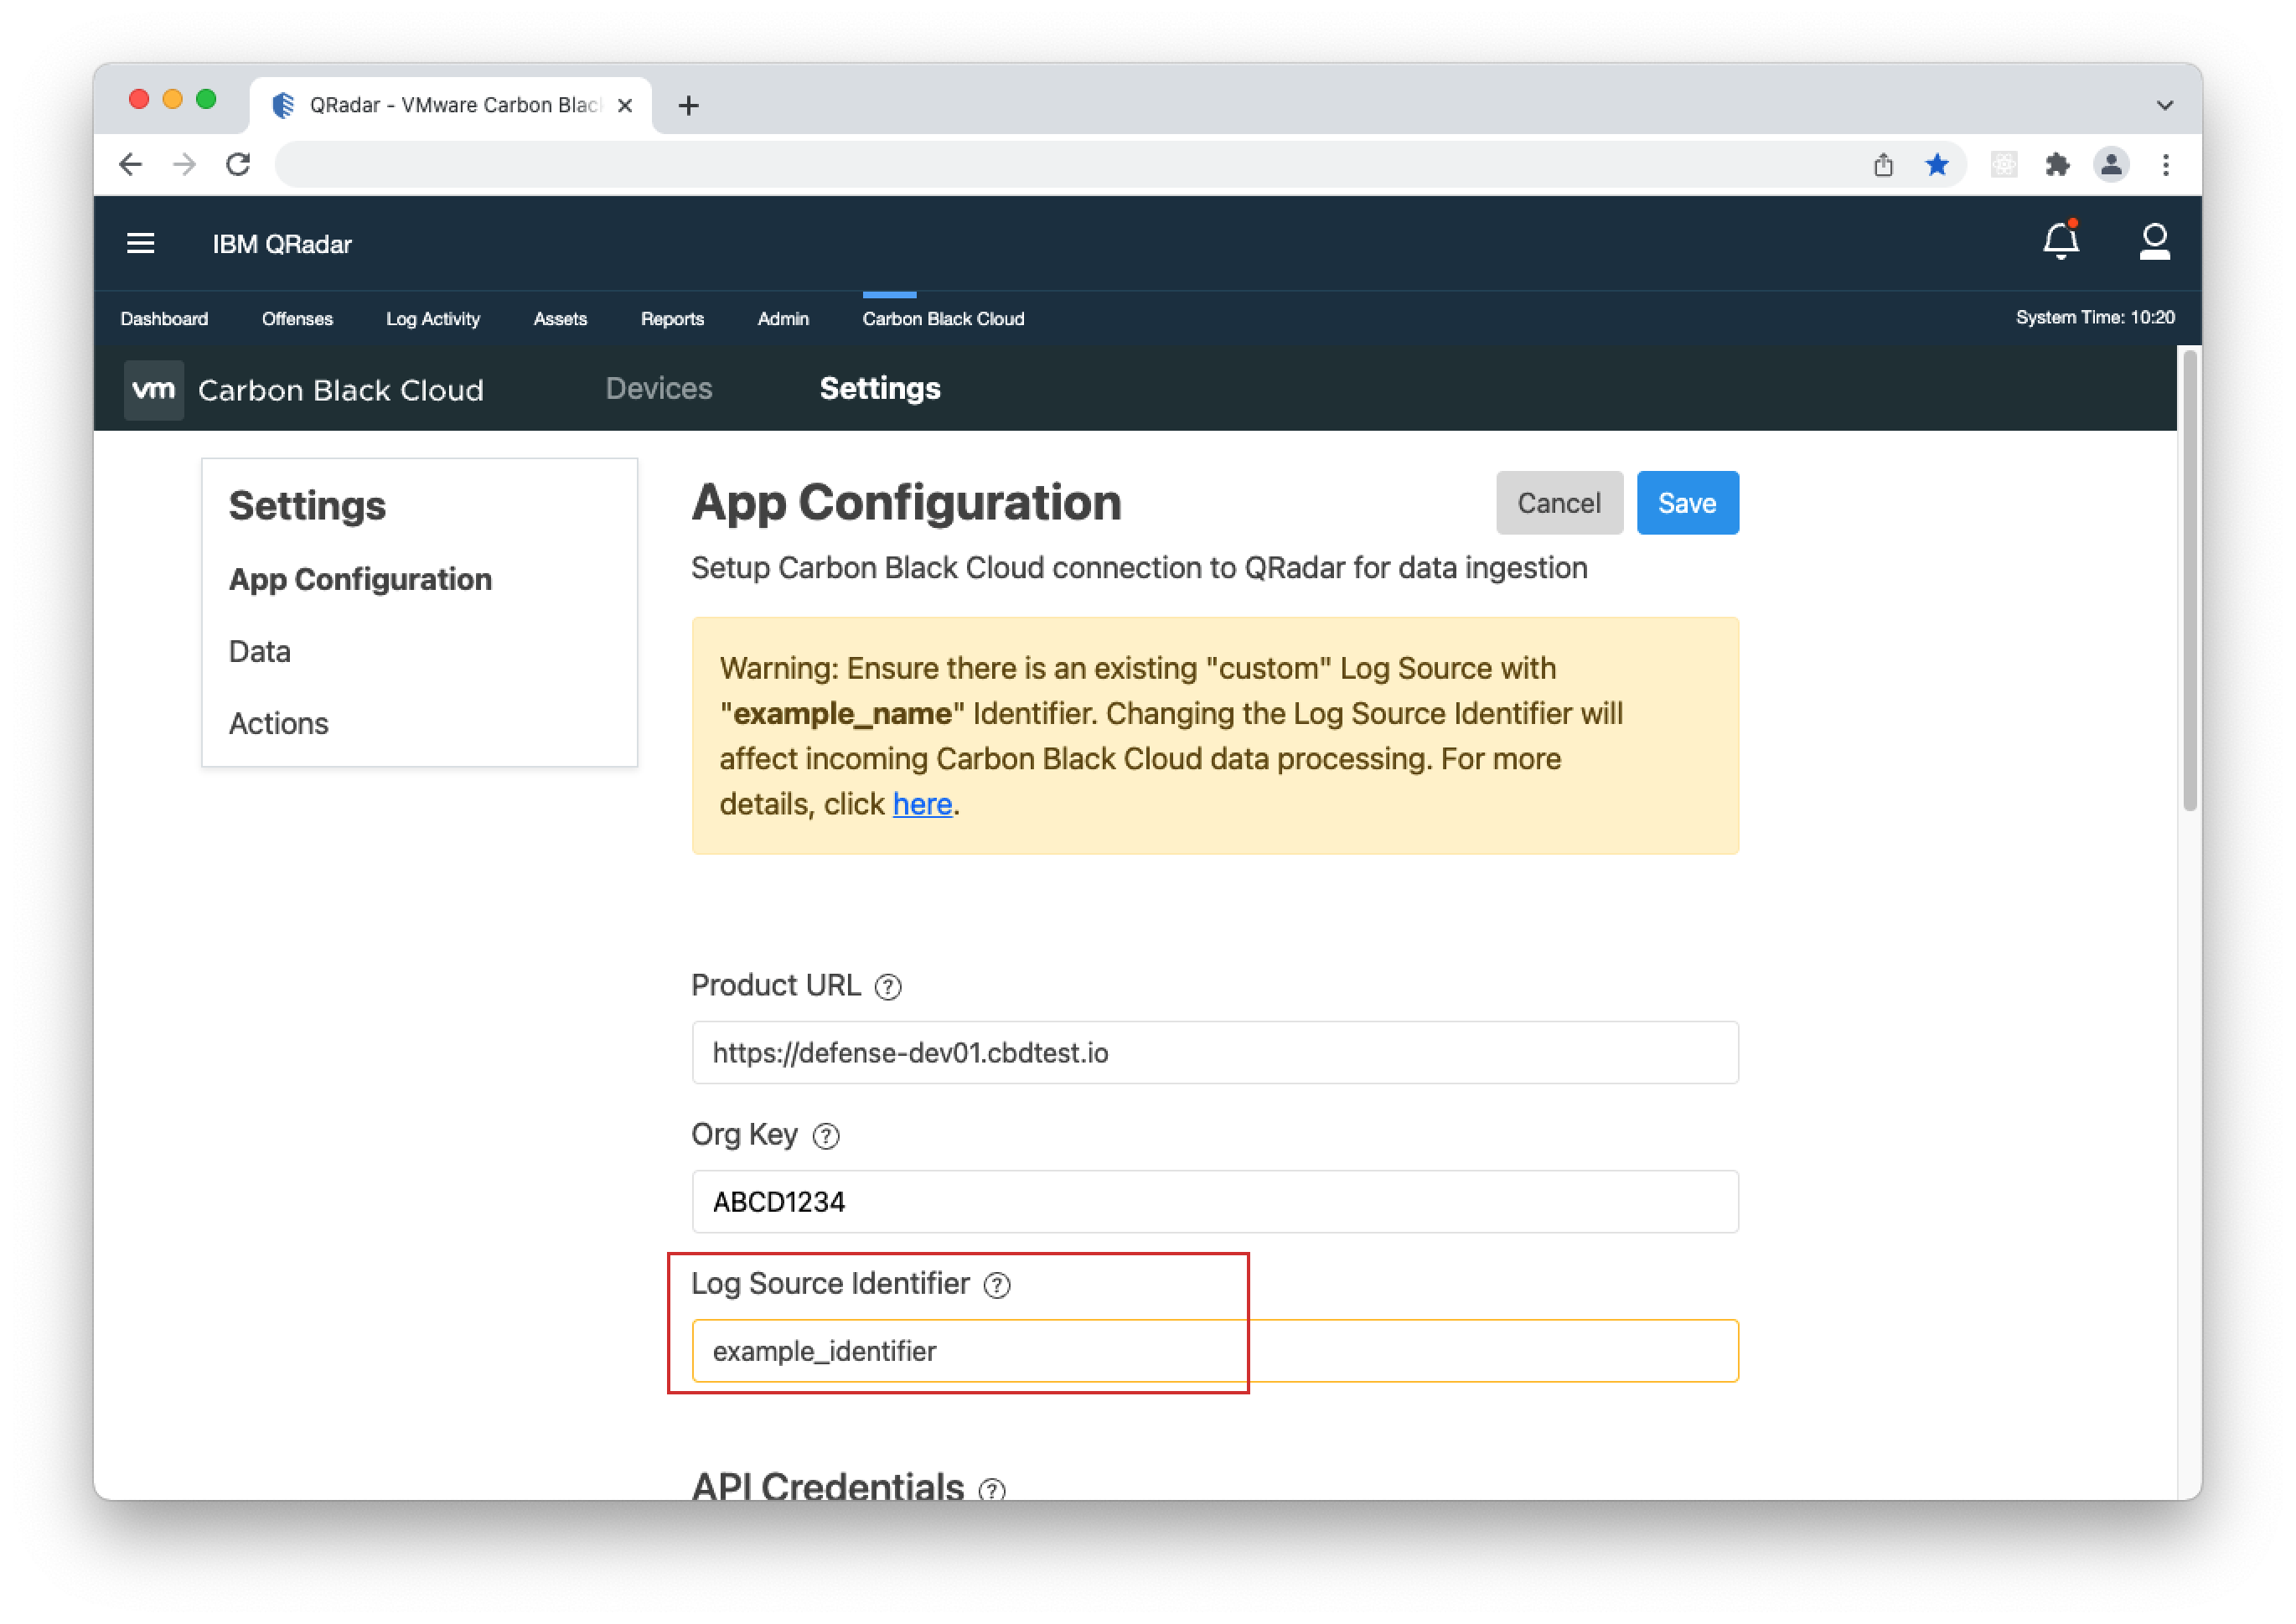
- 5. OPTIONAL - Enter a custom name for the "Log Source Identifier". You will receive a warning message when making the change. Important: Before entering a custom name, you need to create a Custom Log Source, then enter the "Log Source Identifier" from it under Settings > App Configuration > Log Source Identifier. To learn how to create a Syslog Log Source, click here.
- Note: If you are ingesting Alerts, we recommend that you increase the TCP Syslog max payload size of your QRadar app. More information and instructions are available here.
 1.
1.
 2.
2.
 3.
3.
 4.
4.
 5.
5.
If you encounter any errors or need additional information, check out the Troubleshooting page.
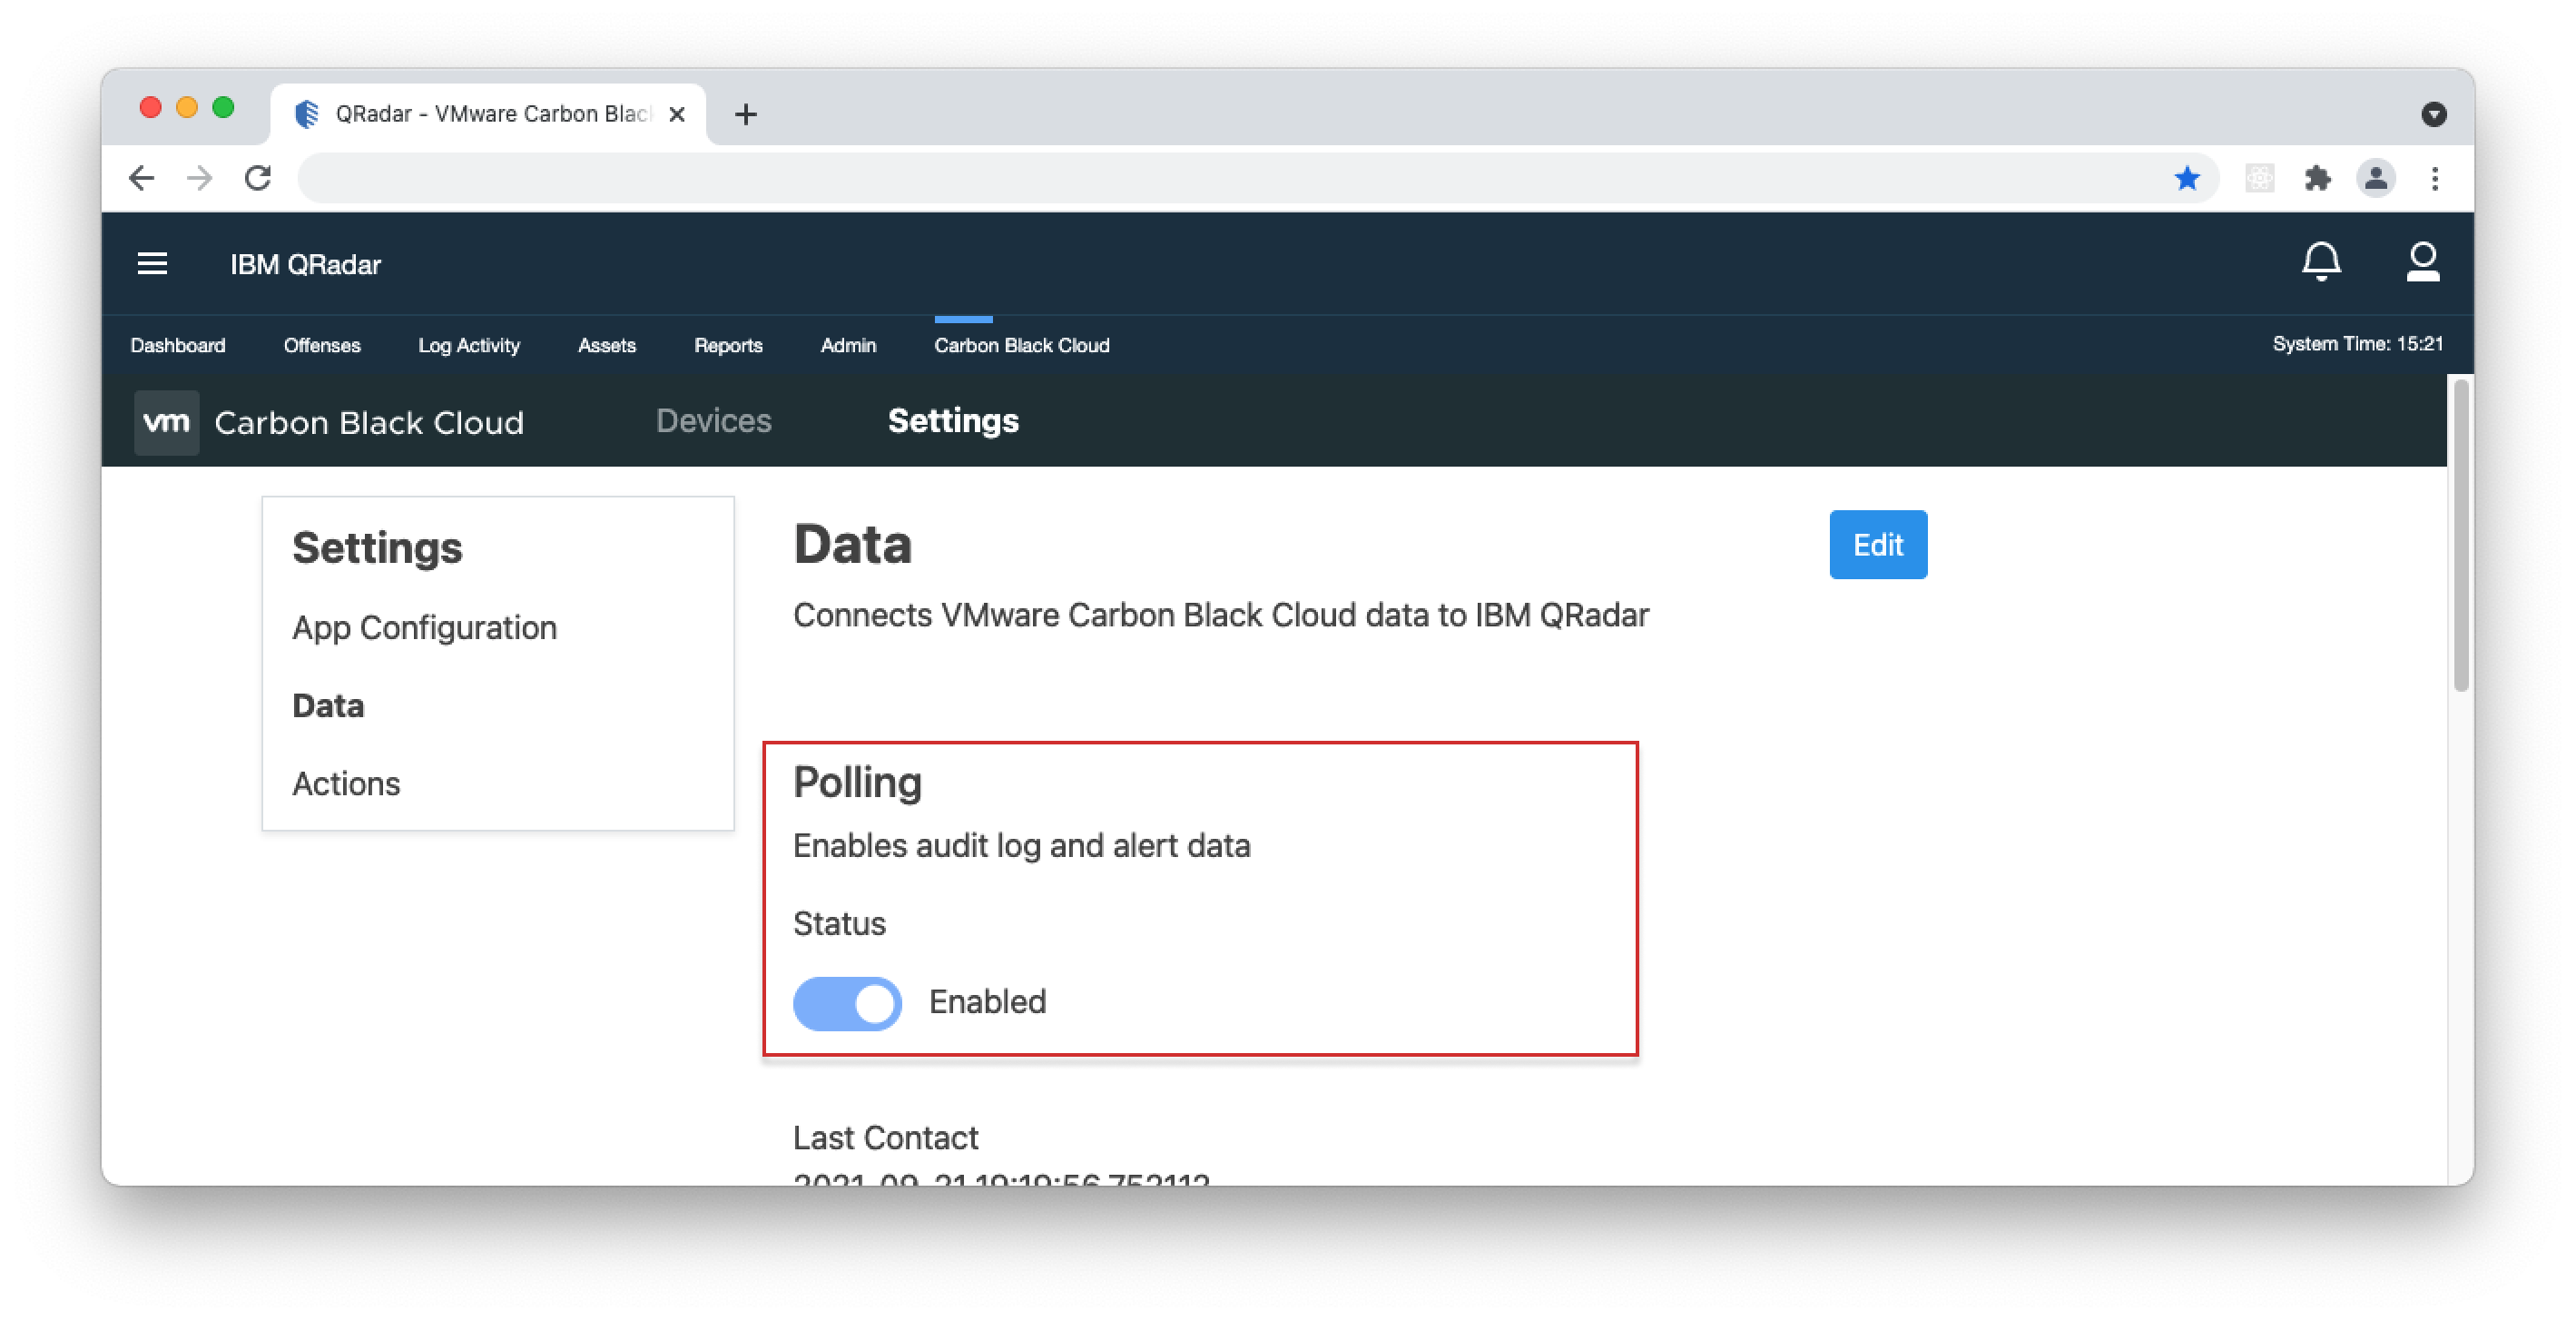
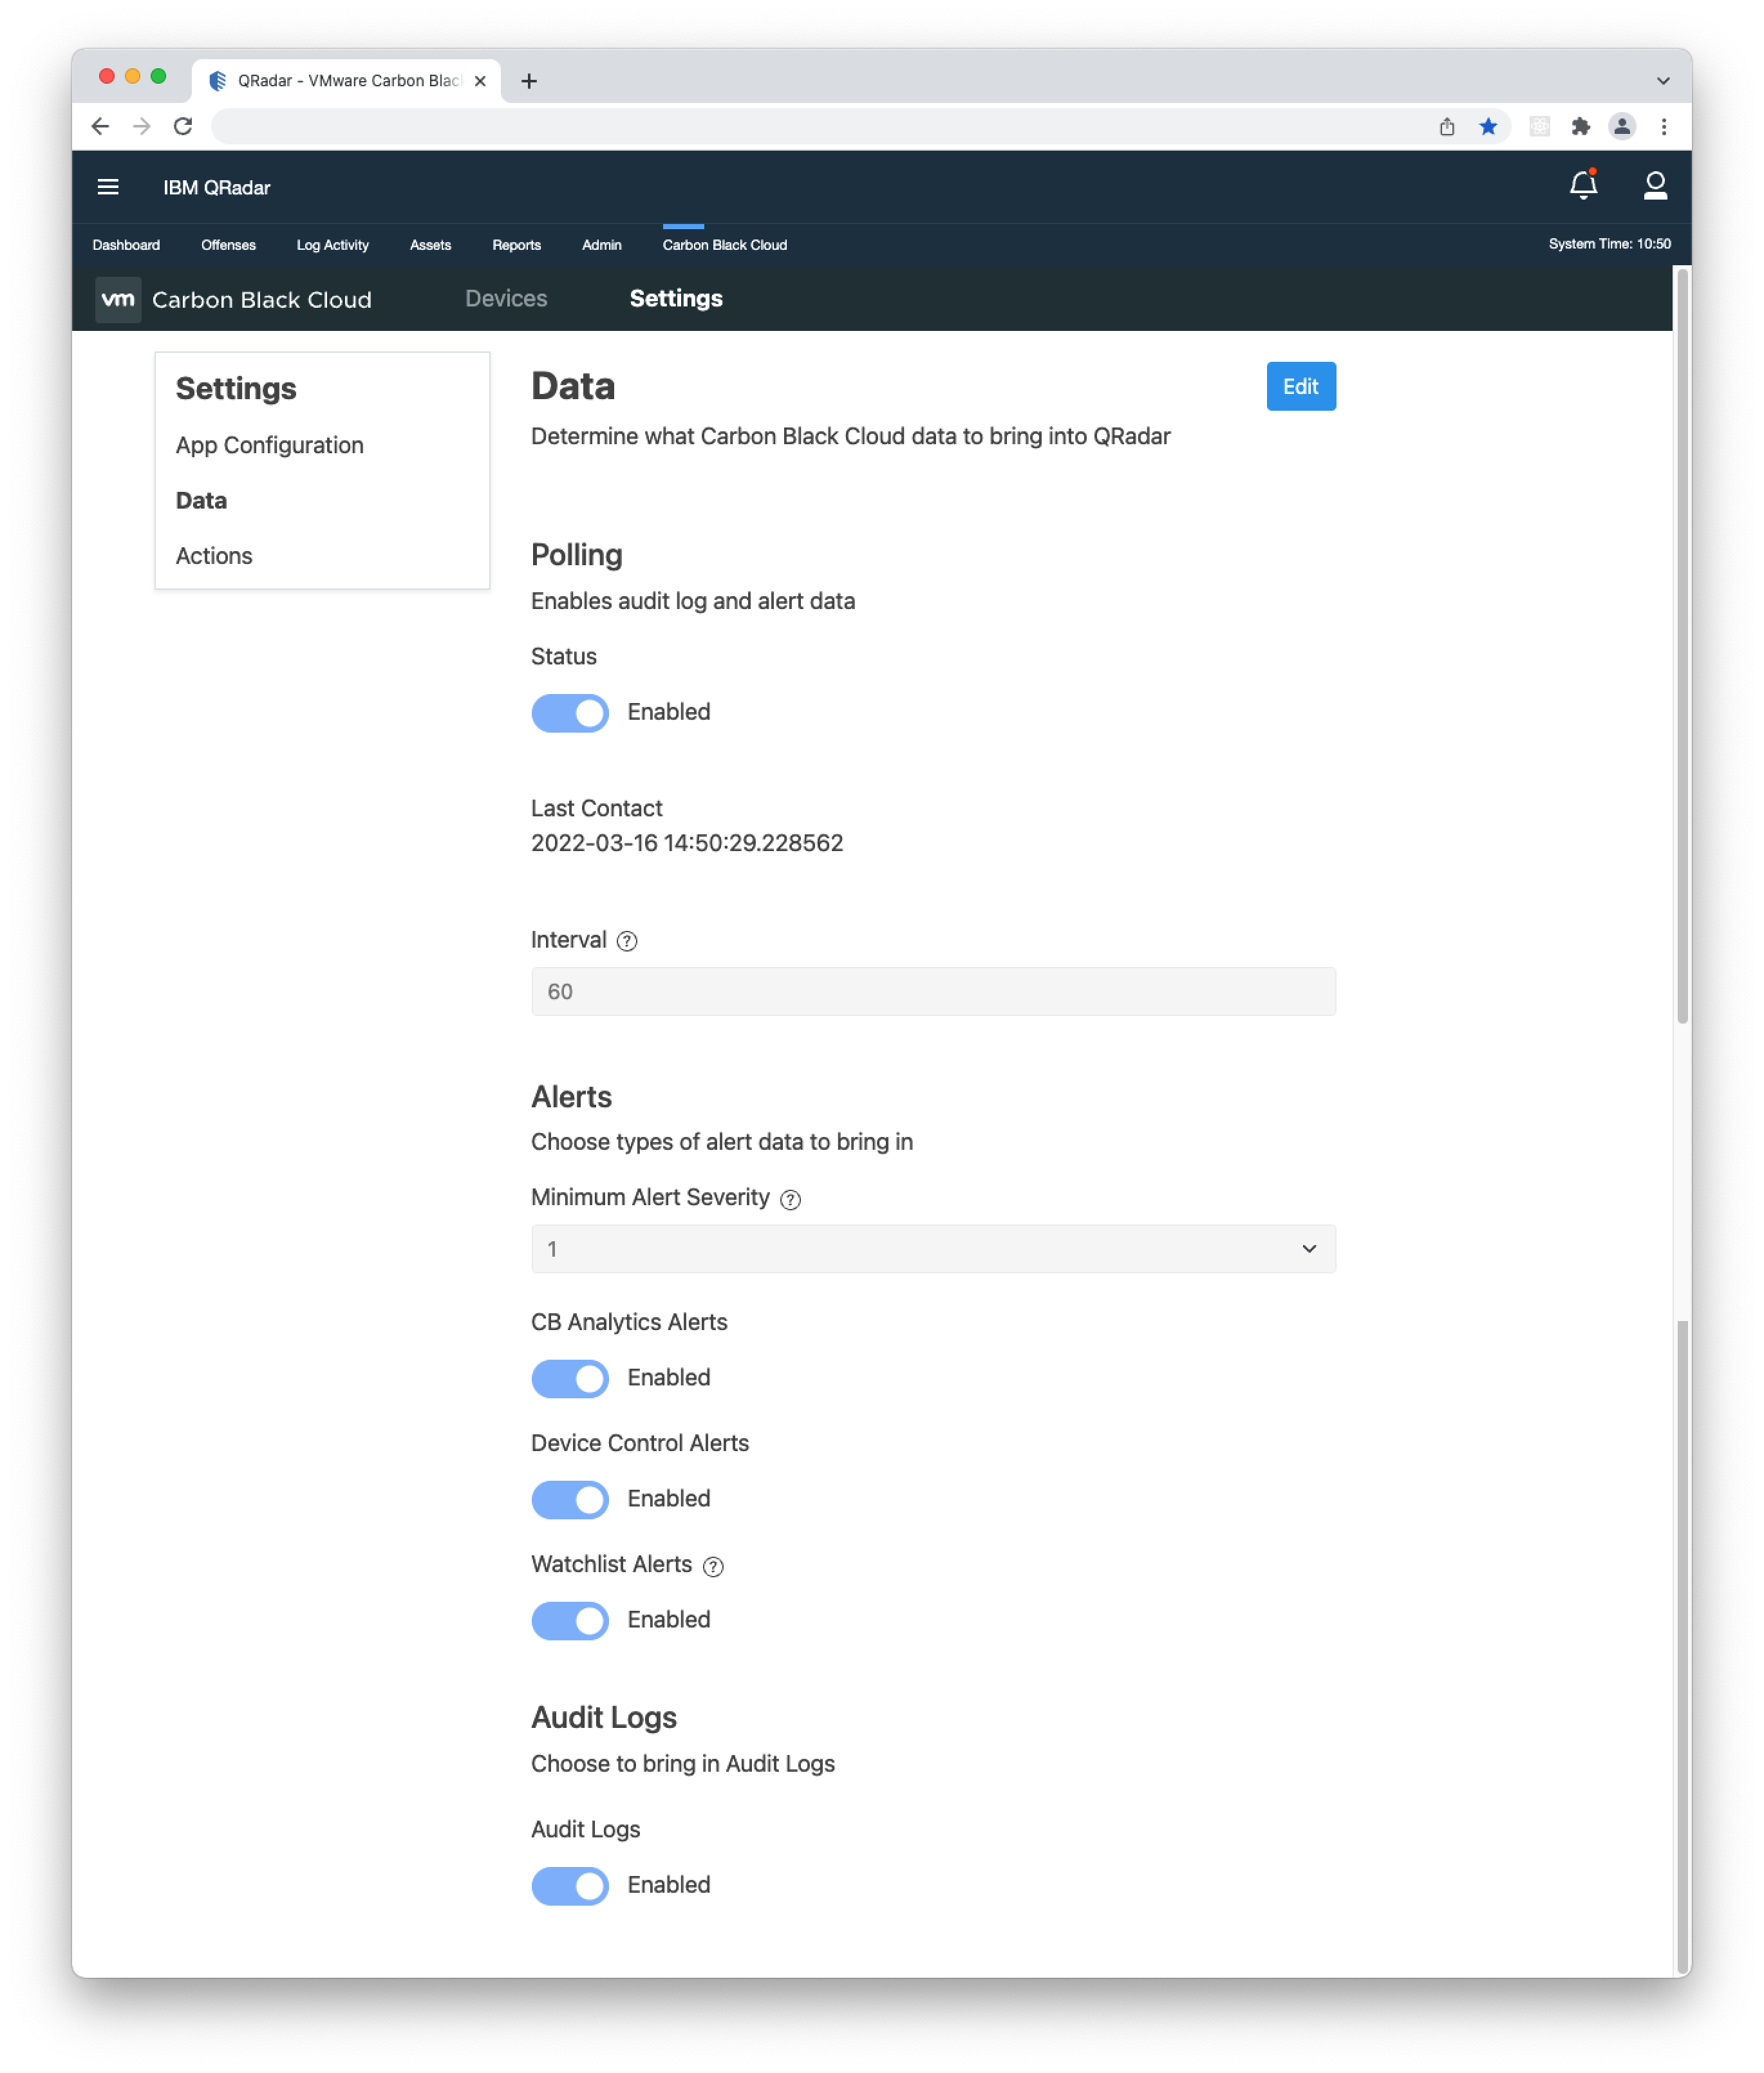
- 1. In the Carbon Black Cloud app, navigate to Settings > Data.
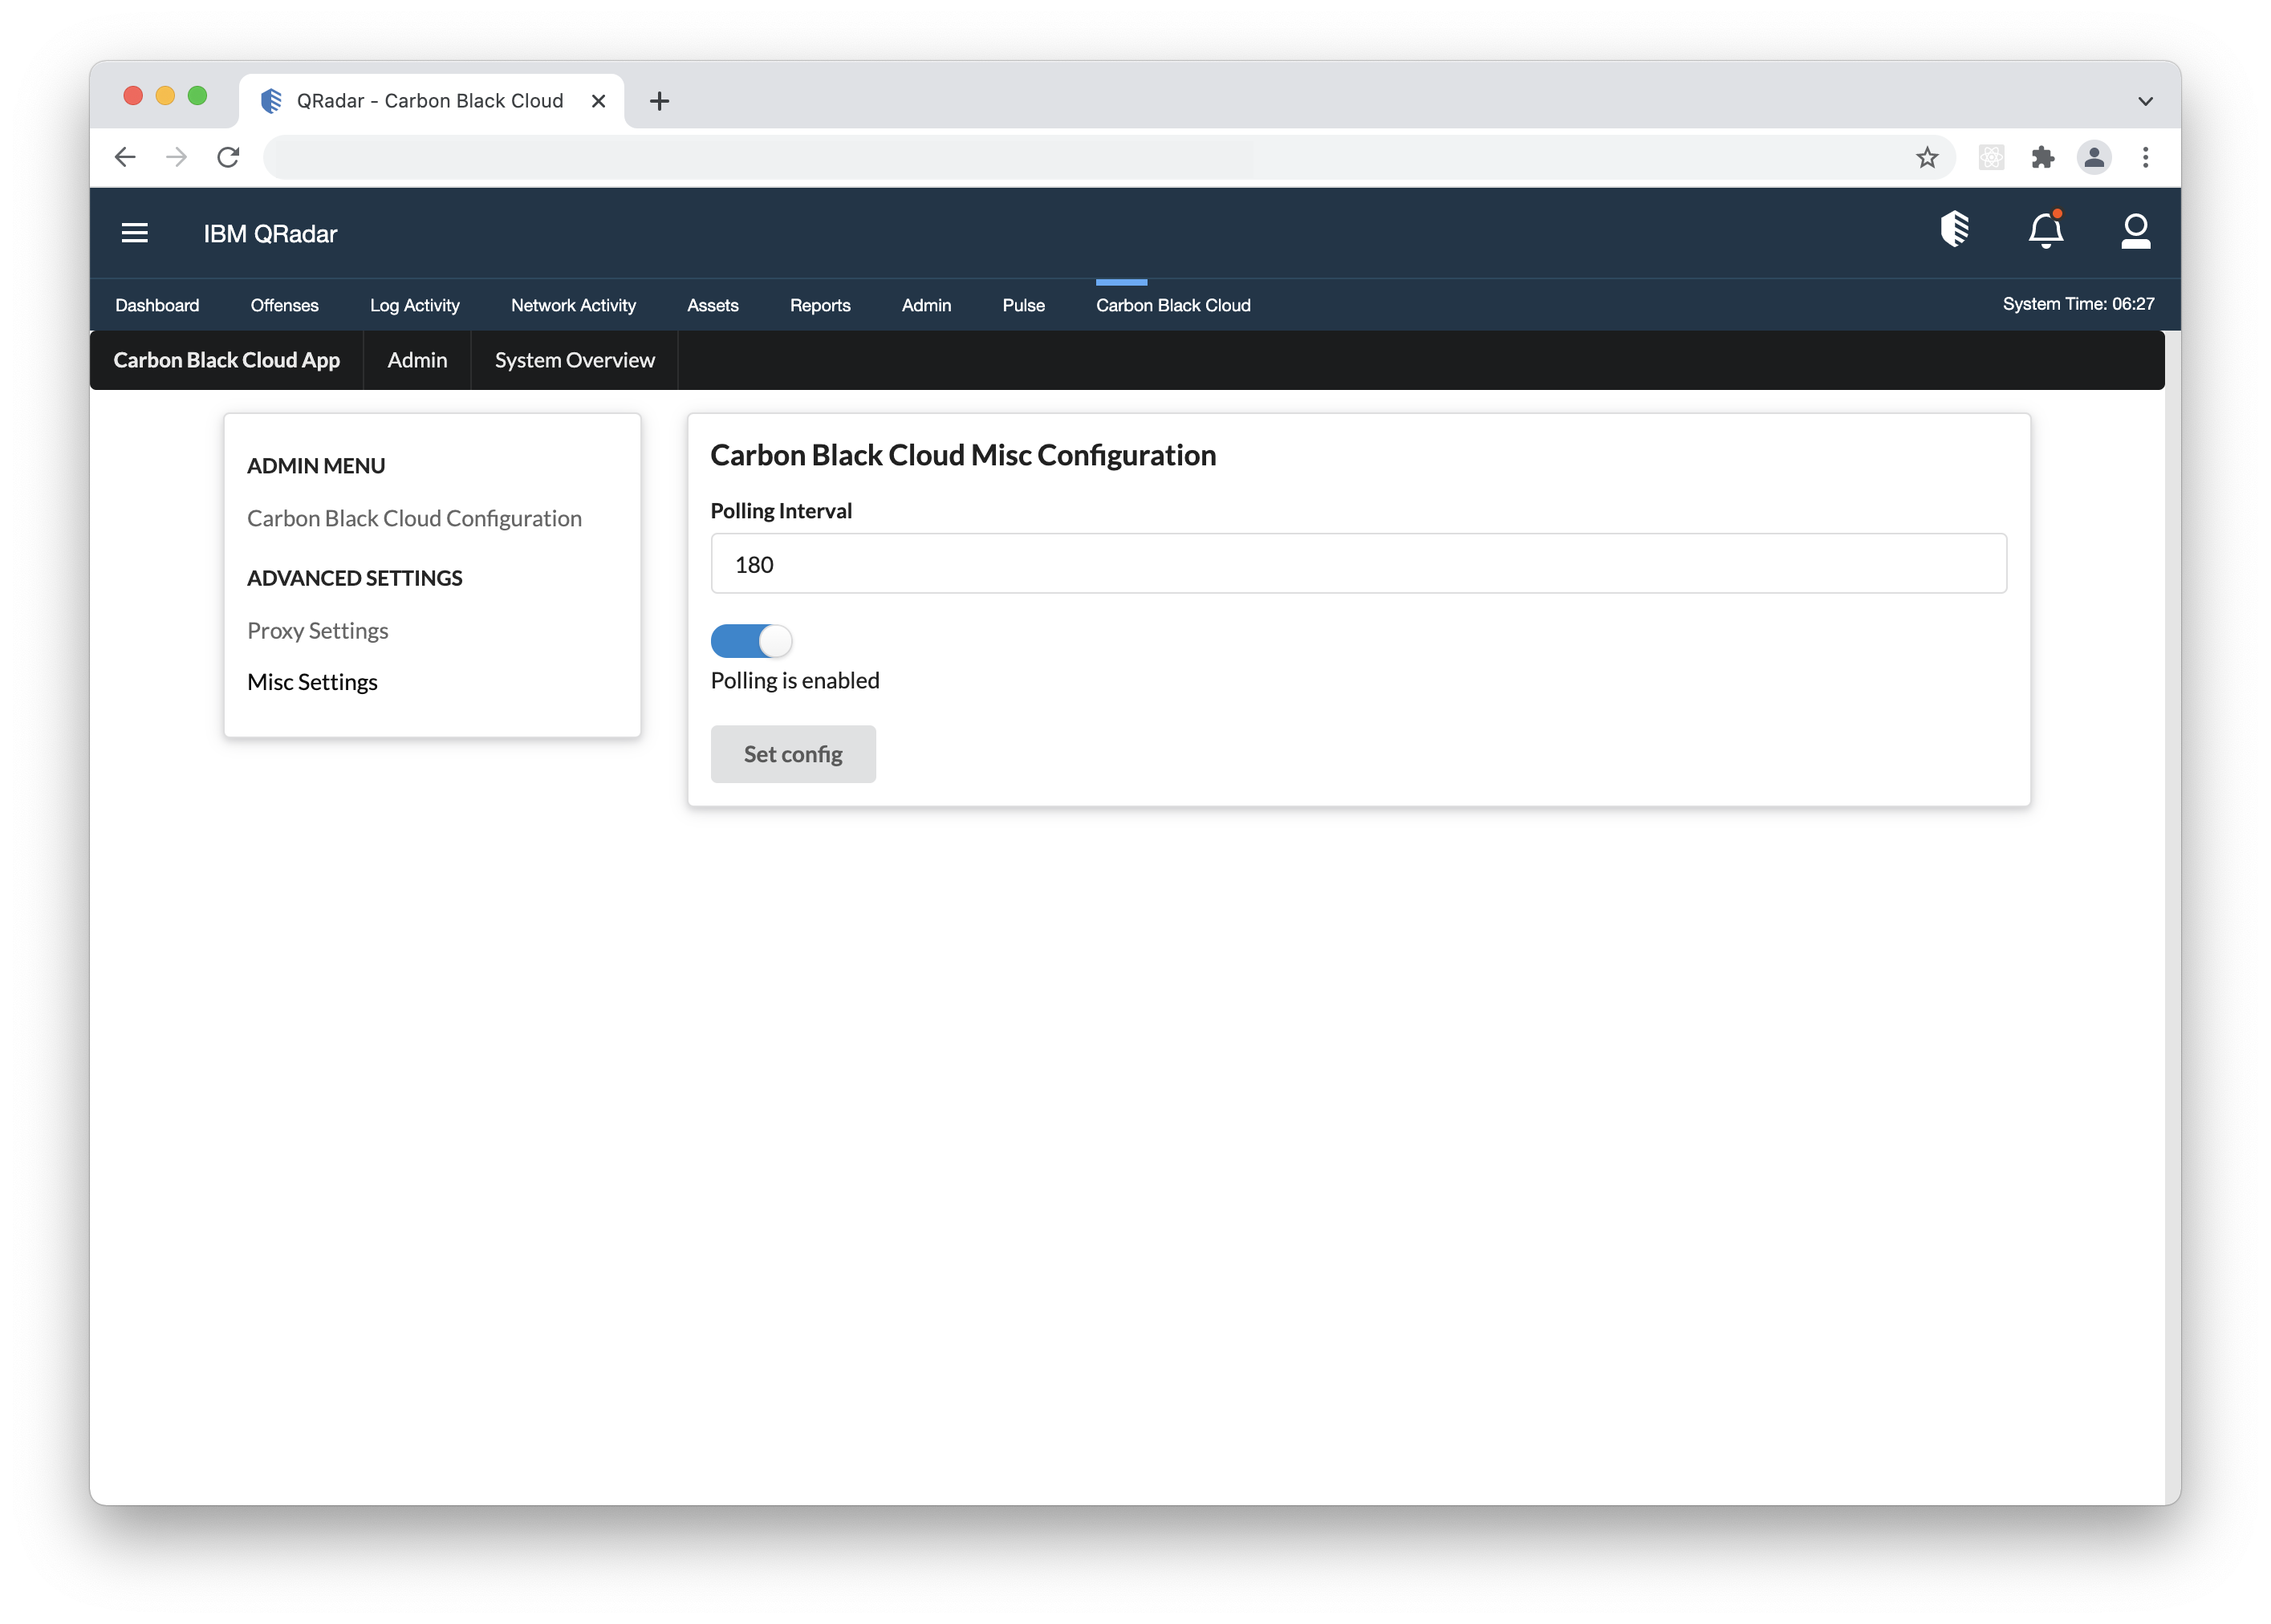
- 2. Click Edit and under Polling, toggle the 'Polling Status' switch to 'Enabled'. Once enabled, 'Last Contact' displays the last time the app polled Carbon Black Cloud for data.
- 3. By default, the app is set to poll Carbon Black Cloud for data at an interval of 180 seconds (3 minutes). You can change the interval by entering another value between 60 and 600 seconds.
- 4. Click Save when you finish editing your Polling and other Data settings.
Note: If you are ingesting alerts via the Built-in API Input(Syslog), we strongly recommend increasing QRadar's Max TCP payload size. Due to its low default value, the app may not ingest some Alerts correctly. A step-by-step guide is available here.
- 1. In the Carbon Black Cloud app, navigate to Settings > Data.
- 2. Click Edit, and under 'Alerts', you can configure the following:
Minimum Alert Severity - control the severity of the alerts being pulled in. For example, choosing '4' will pull alerts with a severity of 4 or higher.
CB Analytics Alerts - change the switch to 'Enabled' to bring in CB_ANALYTICS alerts. Requires Endpoint Standard.
Device Control Alerts - change the switch to 'Enabled' to bring in DEVICE_CONTROL alerts. Requires Endpoint Standard.
Watchlist Alerts - change the switch to 'Enabled' to bring in WATCHLIST alerts. Requires Enterprise EDR. - 3. In the 'Audit Logs' section, you can enable or disable ingesting Audit Logs.
- 4. Click Save when you finish editing your Data settings.
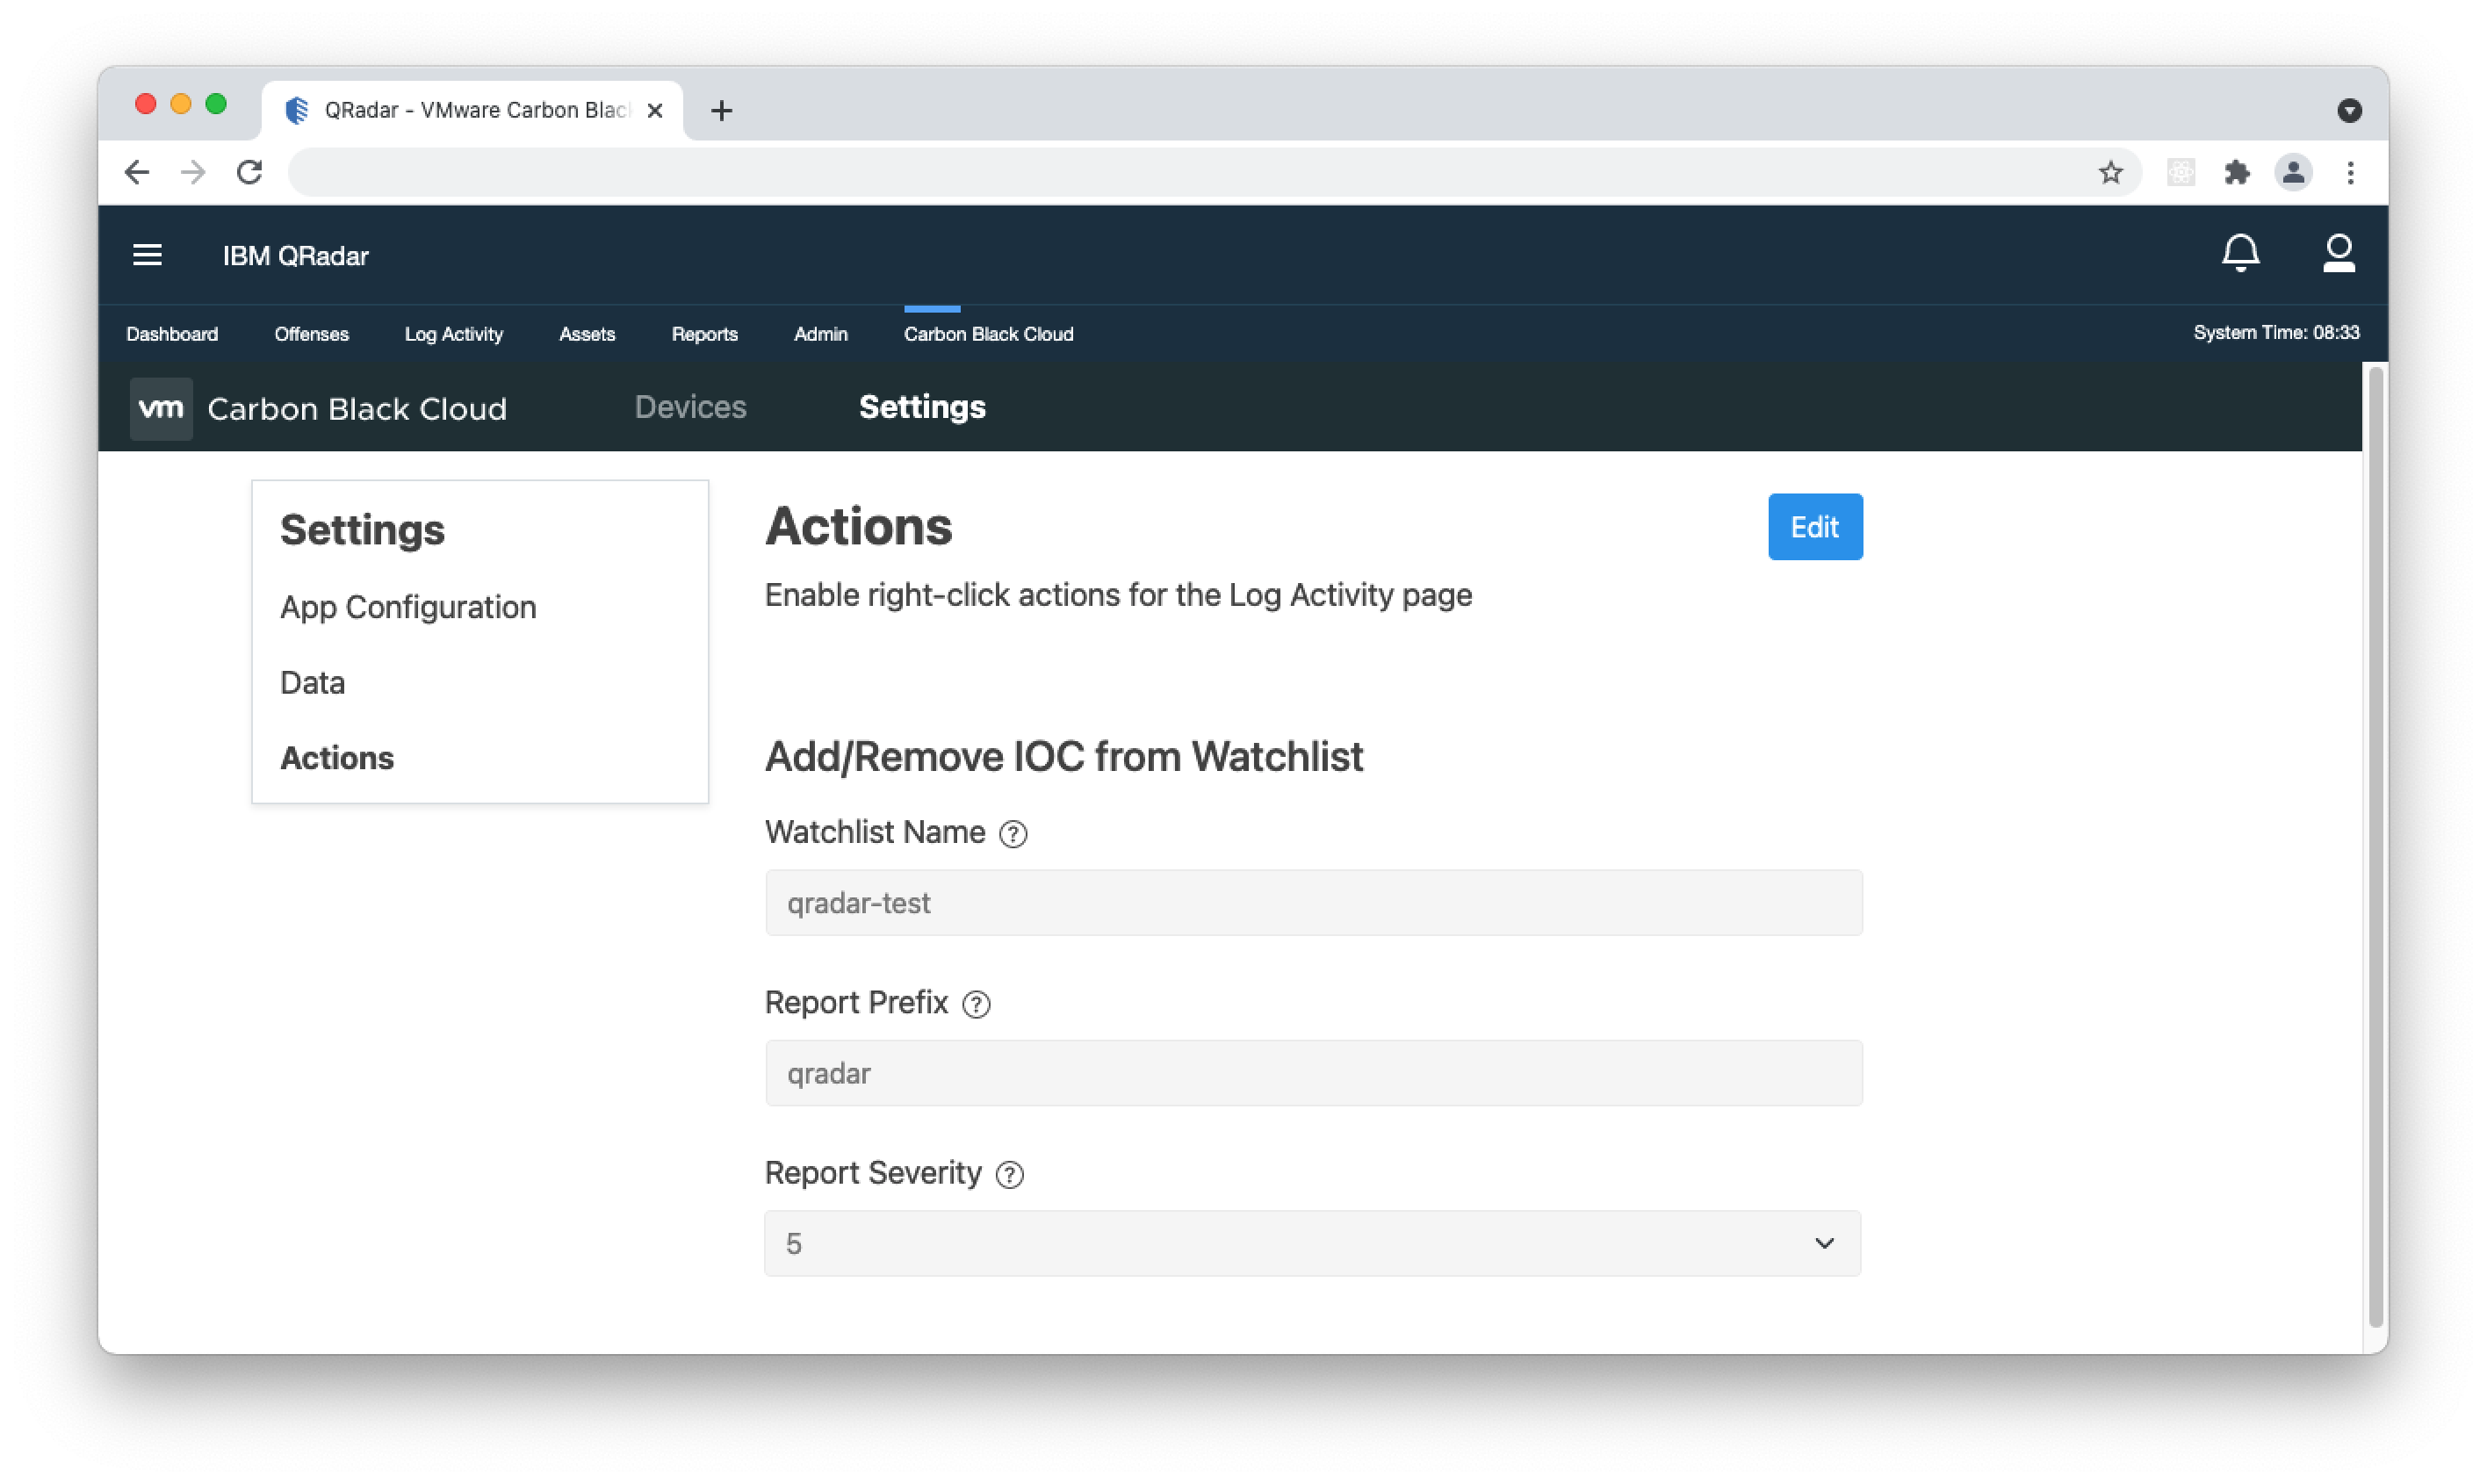
- 1. In the Carbon Black Cloud app, navigate to Settings > Actions.
- 2. Click Edit and in the 'Watchlist Name' input, enter the name of the watchlist in the Carbon Black Cloud console where you want to send IOCs.
- 3. In the 'Report Prefix', enter a prefix to the watchlist report. This is the report where you will find IOCs added from the app in the Carbon Black Cloud console.
- 4. In the 'Report Severity' dropdown, select the severity that you want to apply to the report created in the watchlist.
Using the App
Log Activity Tab
Use the Log Activity tab to view data pulled from the Carbon Black Cloud. The table below lists the different types of data you can access from this page.
| Data Type | Use Case | More Information |
|---|---|---|
| Alerts | Alerts indicate suspicious behavior and known threats in your environment and provide details on the events that led to an alert. Details include metadata about the alert and a list of all the events associated with the alert. | Learn more about the feature or go to the API documentation |
| Audit Logs | Use the Audit Logs to review actions performed by Carbon Black Cloud users, such as log-in attempts, updates to connectors, creation of connectors, liveResponse events, and more. | Learn more about the feature or go to the API documentation |
| Events | Provides overview of endpoint events from the Carbon Black Cloud appliance. | Get the full list of field descriptions |
View Device Information
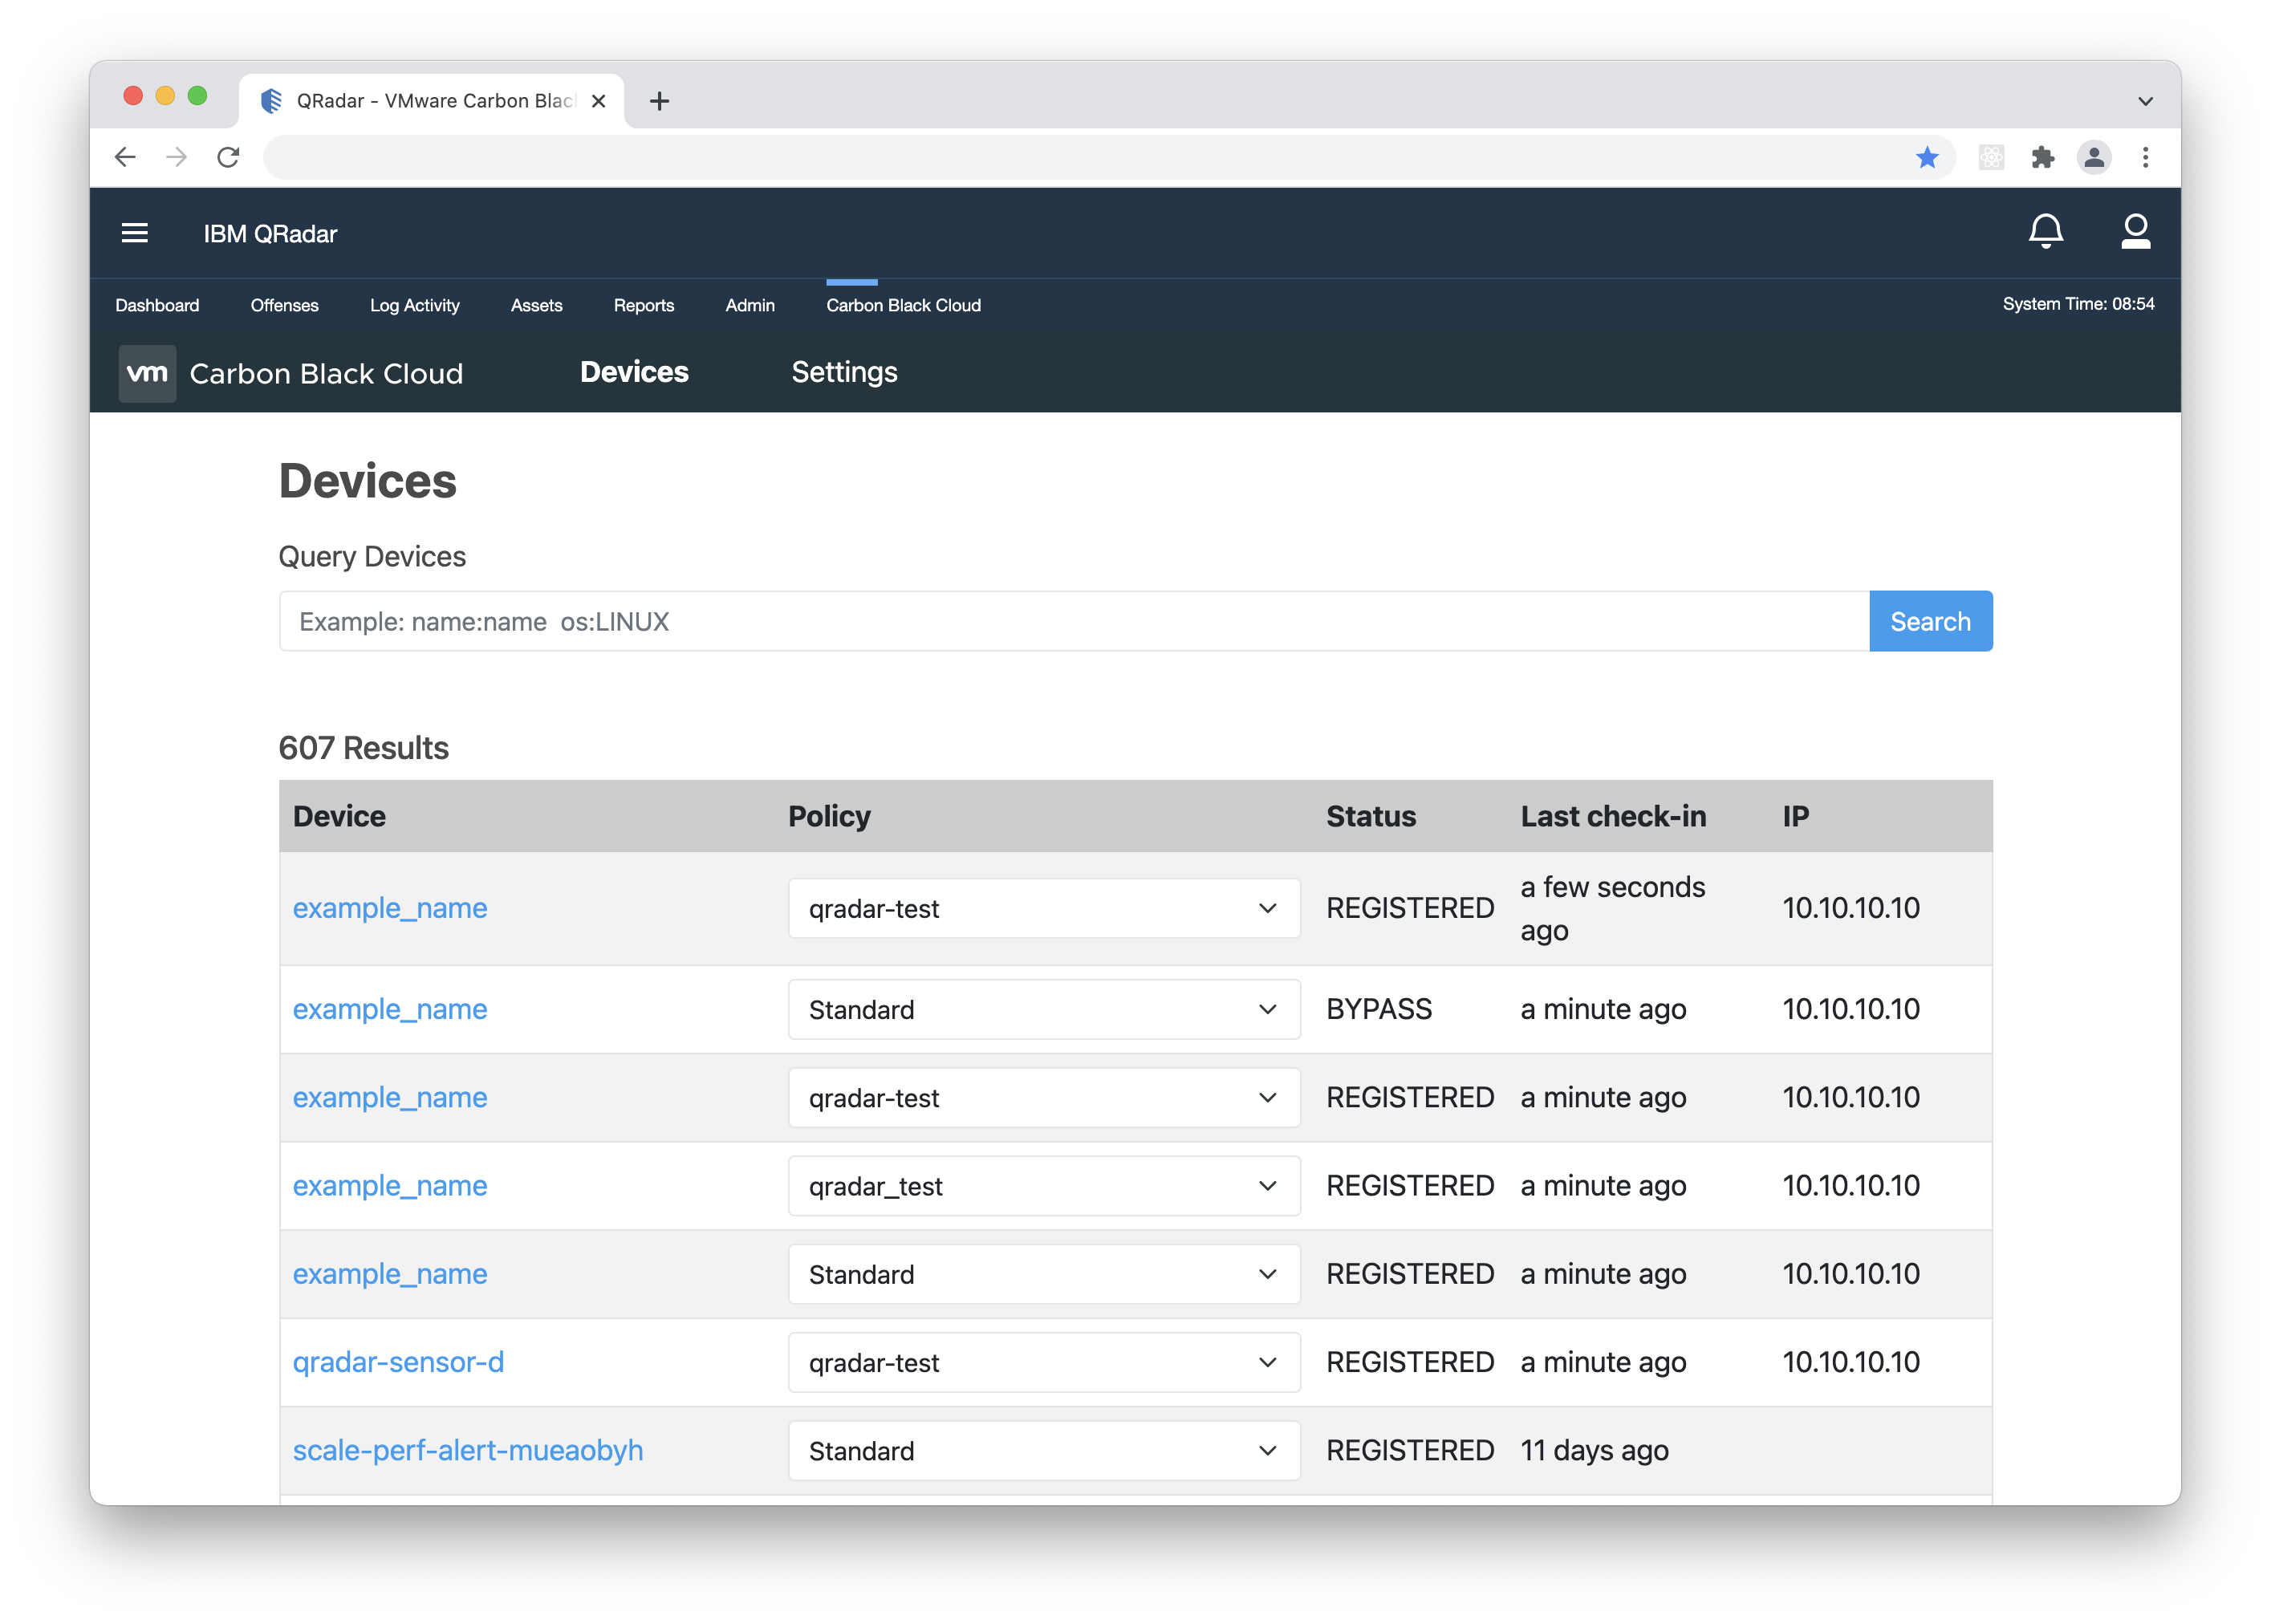
The Devices sub-tab in the Carbon Black Cloud app provides an overview of the active devices reporting event data to the Carbon Black Cloud. View information like OS version, active policy, sensor version and more. You can also use this page to update the policy applied to a device.
To use this feature, you must configure the following fields on the Settings > App Configuration page: Product URL, Org Key, Custom Type Credentials.
You will need a user with admin privileges in order to access the Devices tab.
-
Devices Overview
- The 'Query Devices' search field can be used to narrow the list of devices. It supports key-value and
value-only-based search. The value-based search will look for the desired keyword in all parameters.
Supported keys are: status, os, last_external_ip_address, last_internal_ip_address, name. Multiple space-separated values can be queried within a single search.
Example: 'last_external_ip_address:10.10.10.10' or '10.10.10.10'.
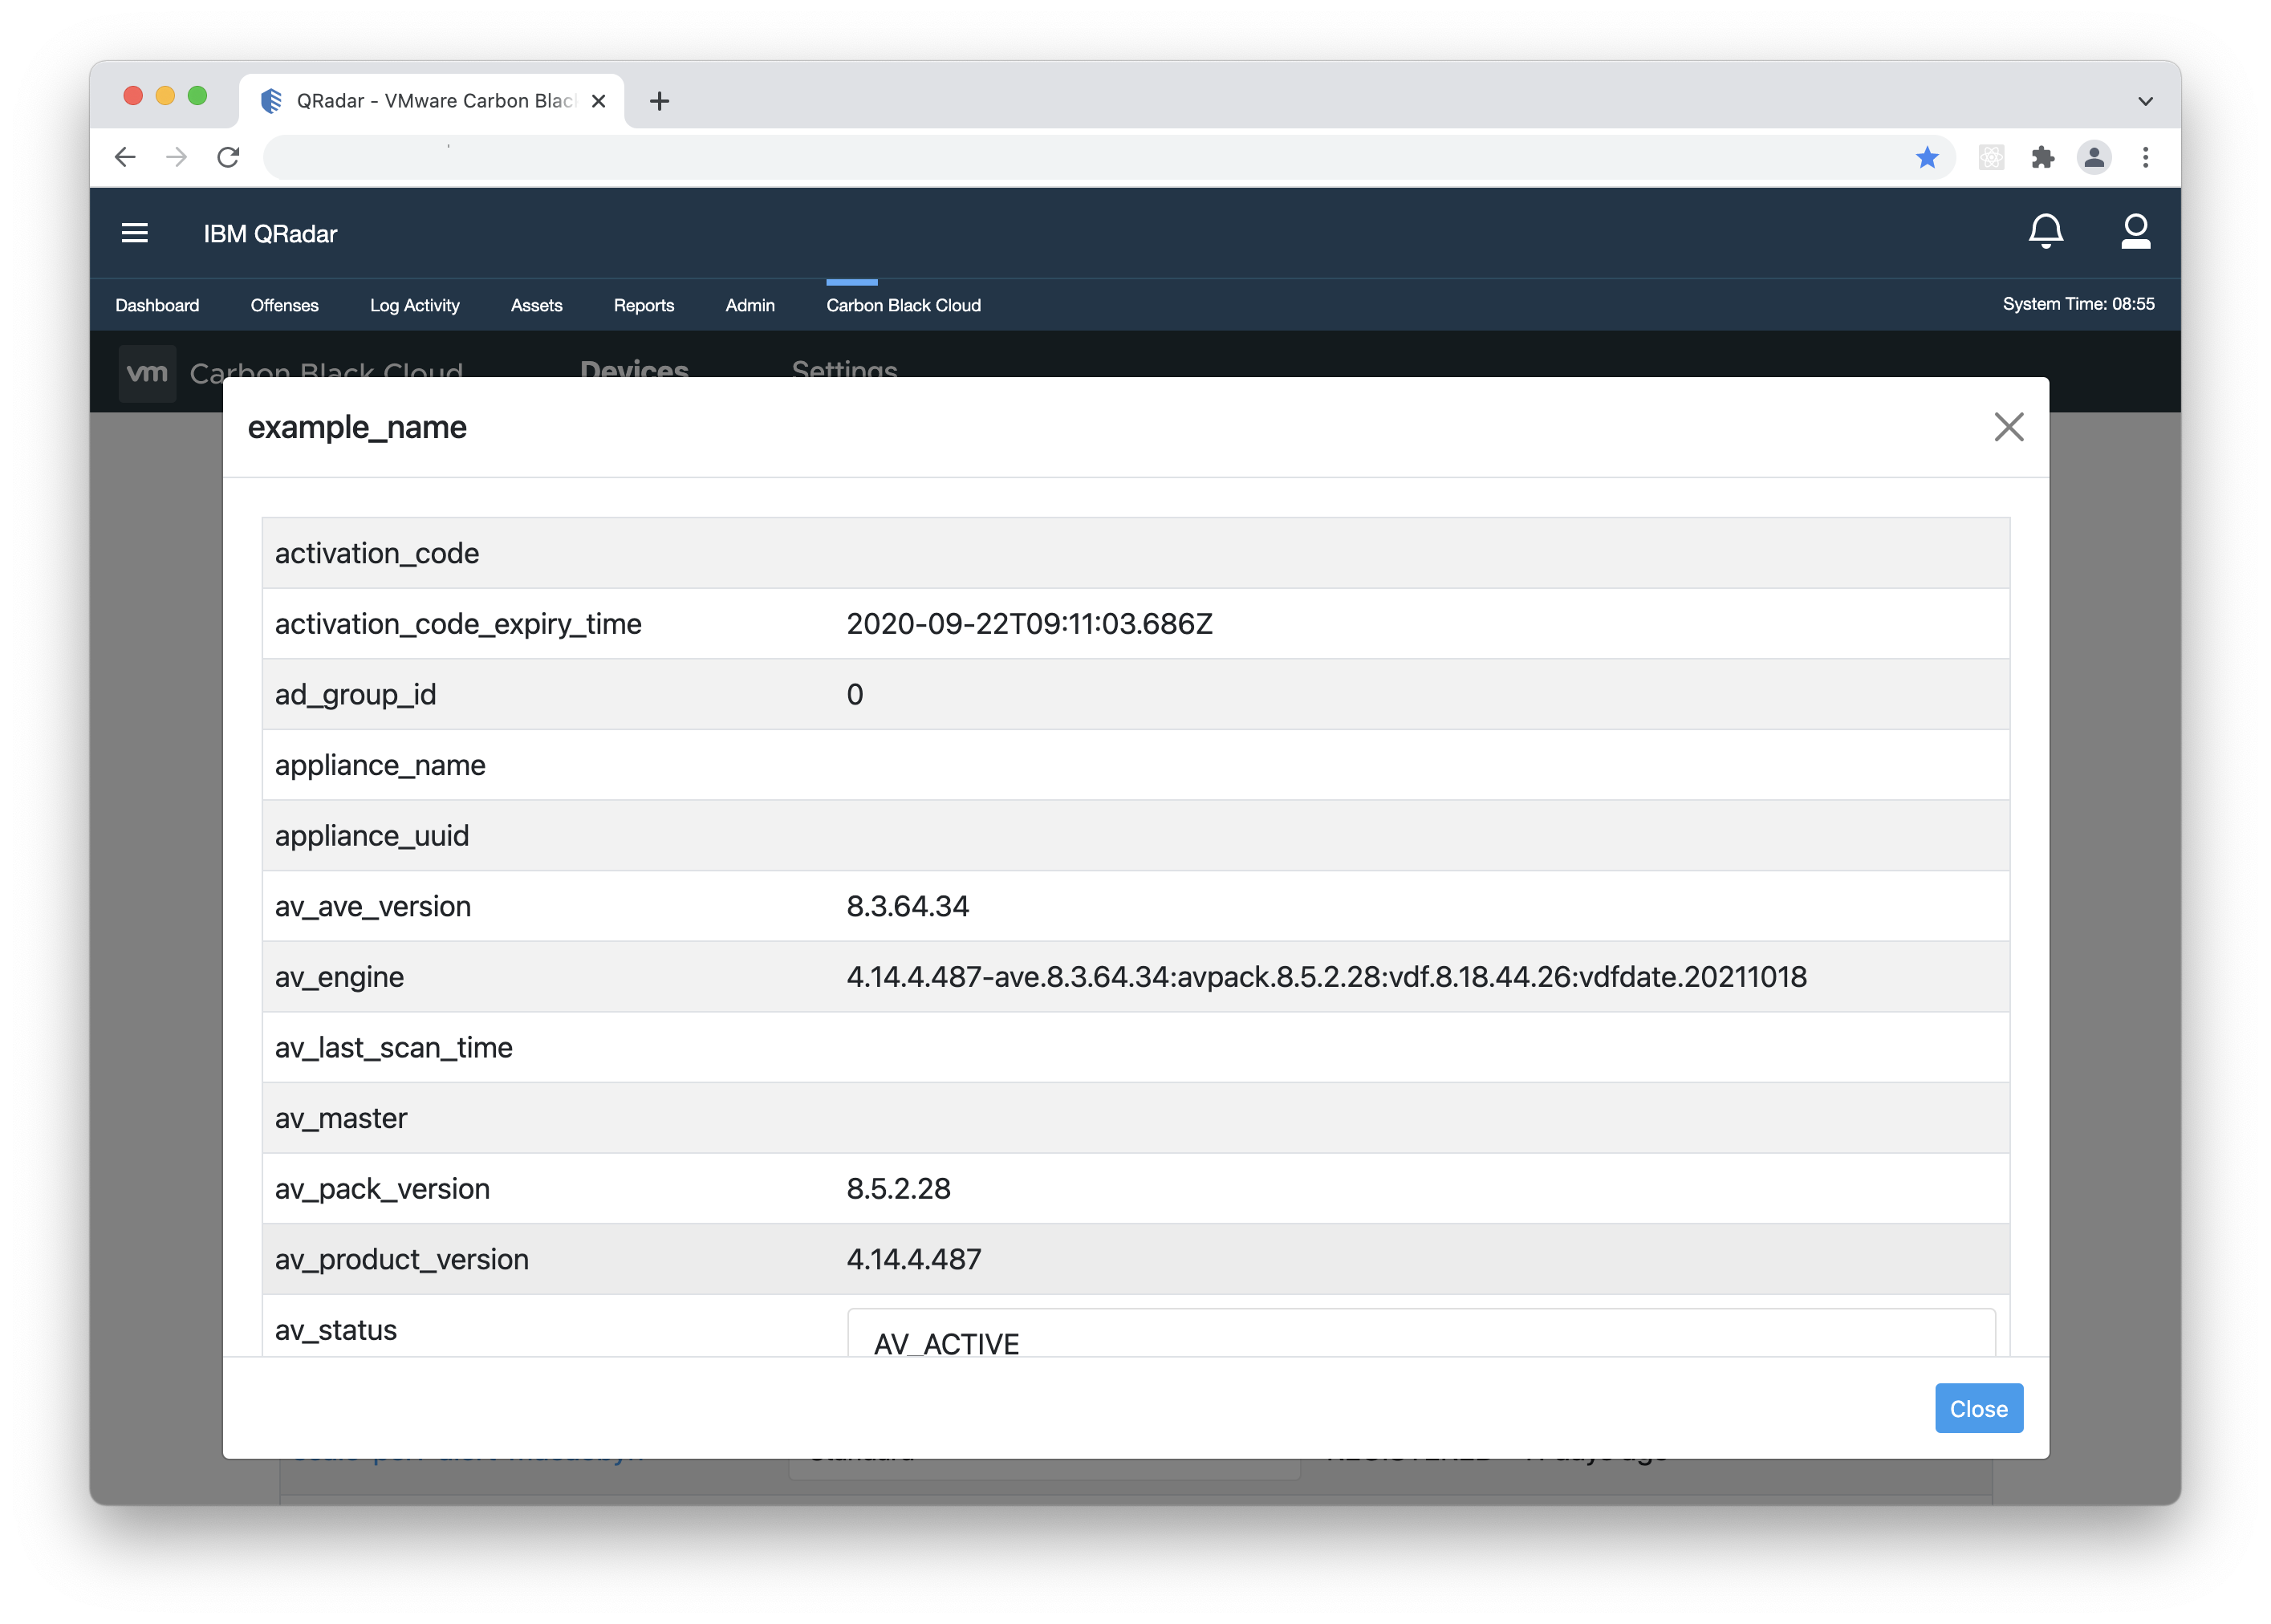
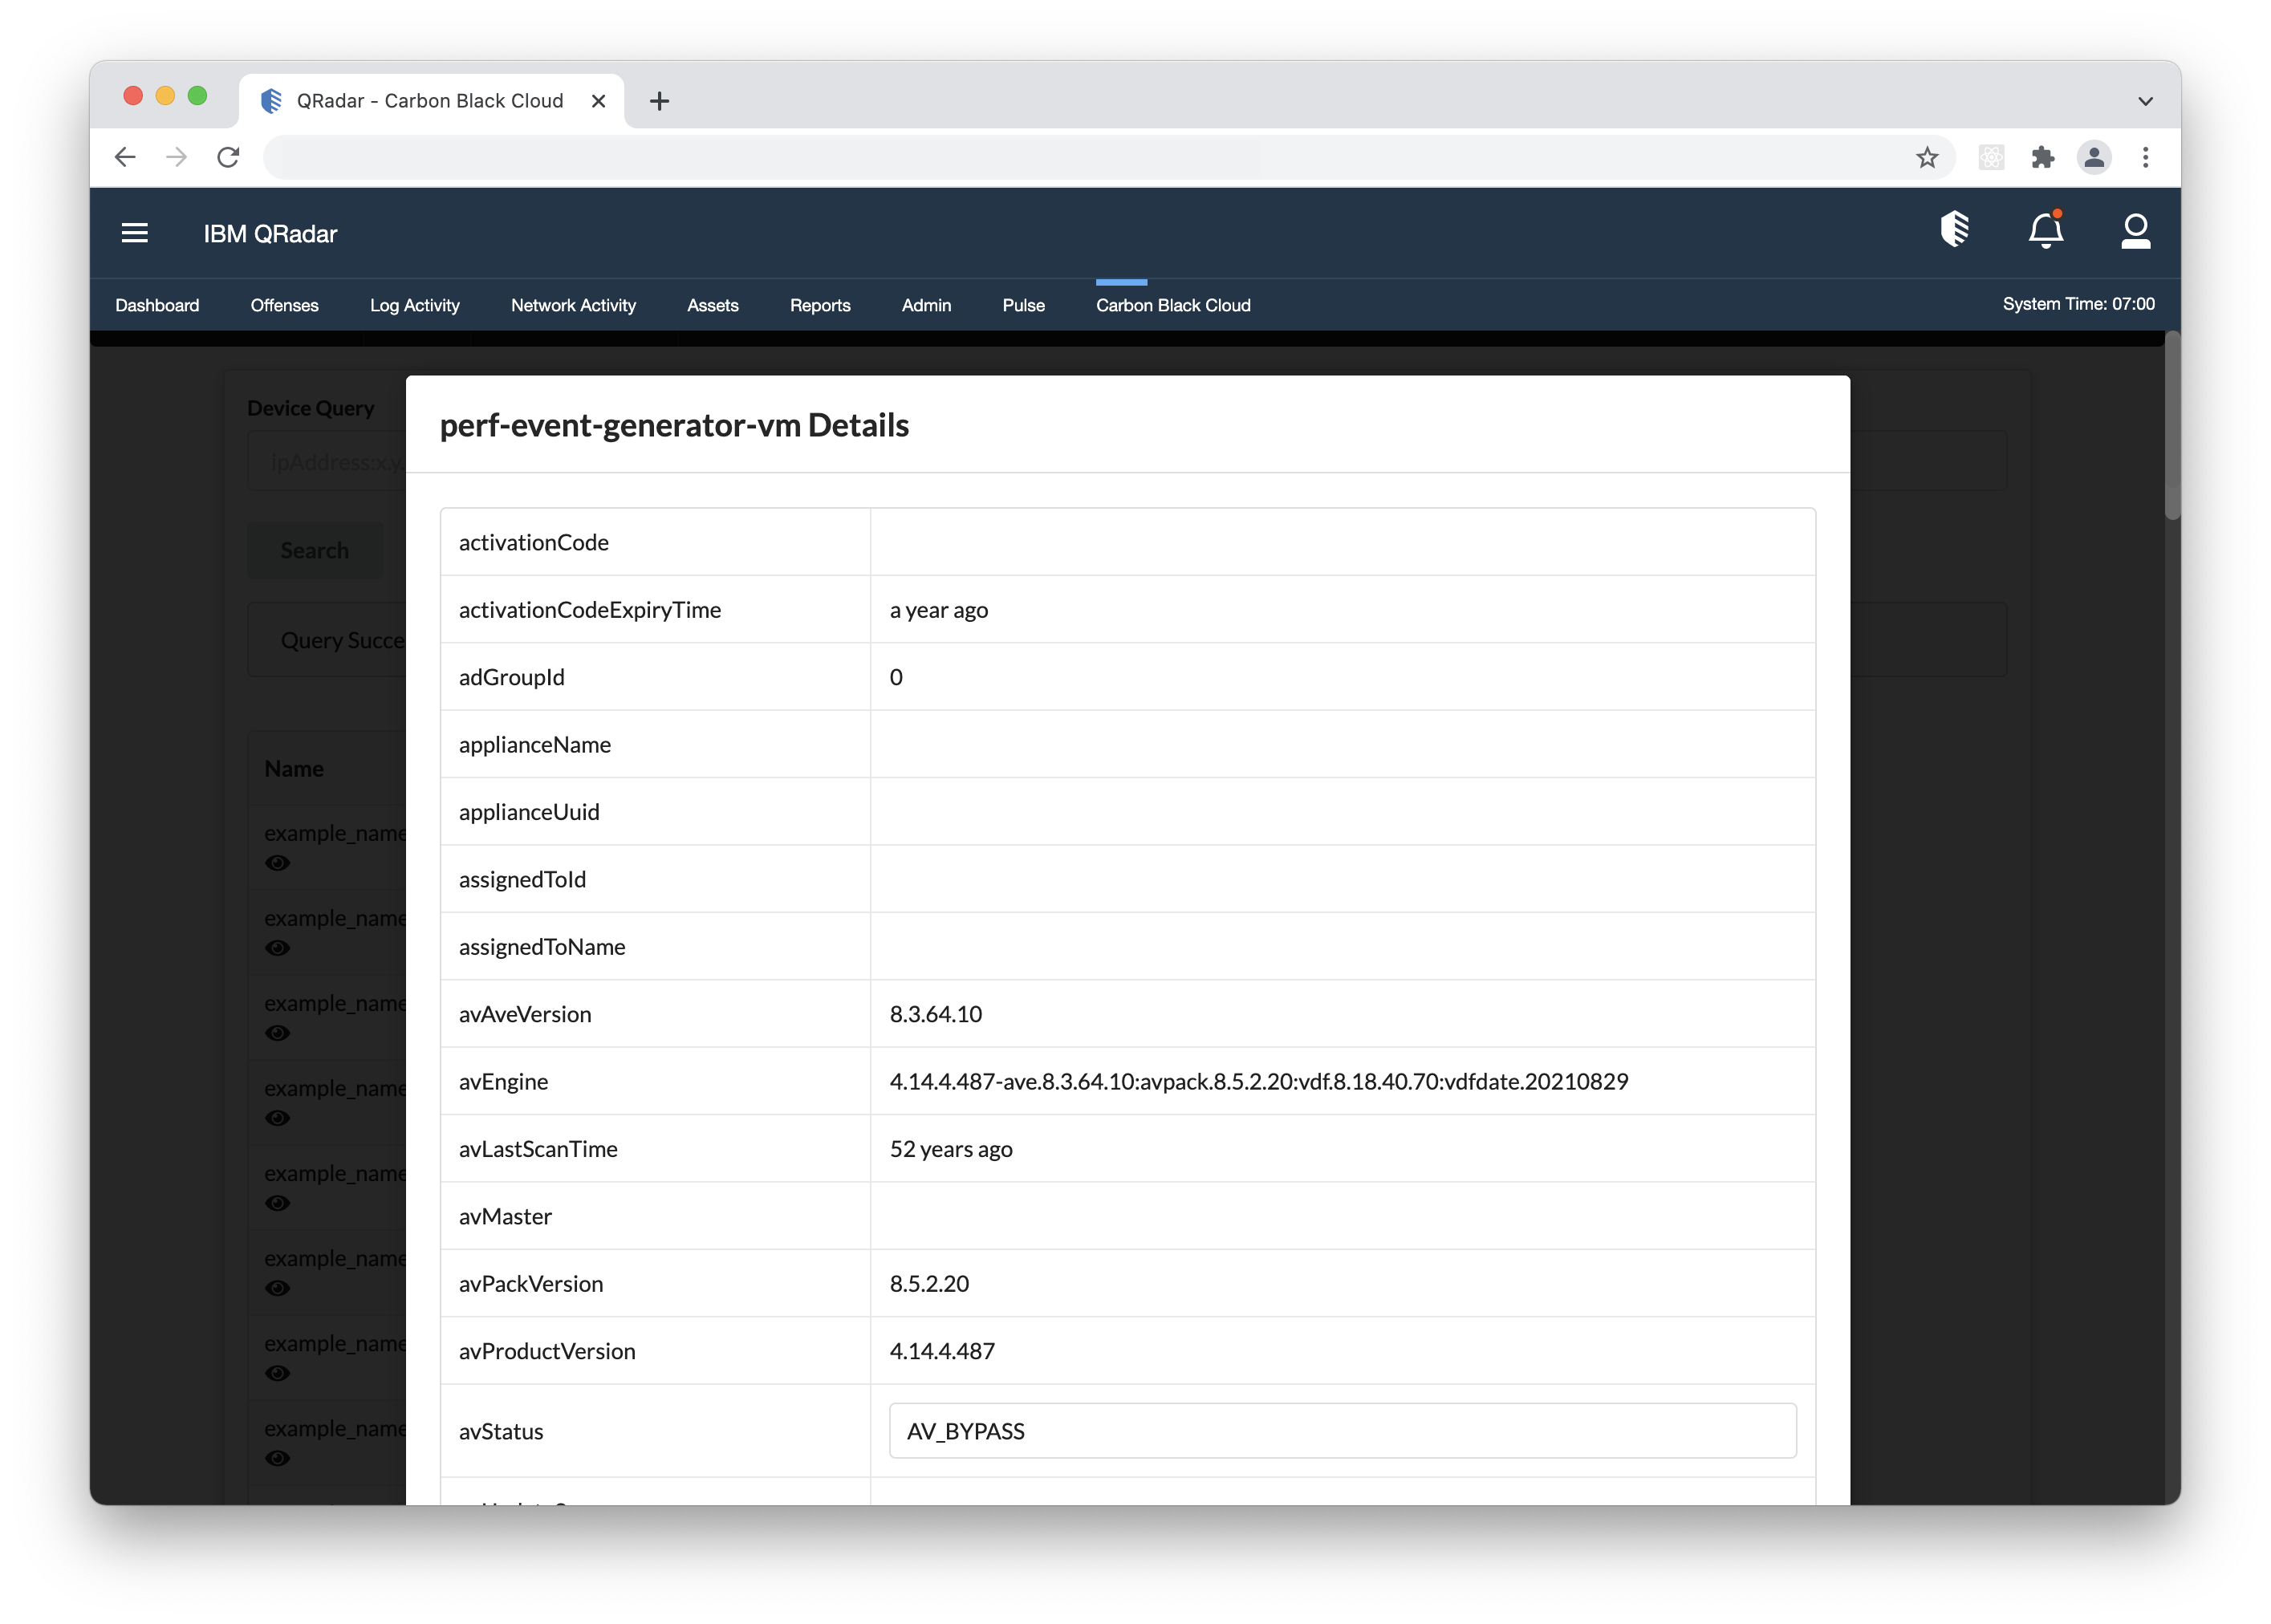
Device Details
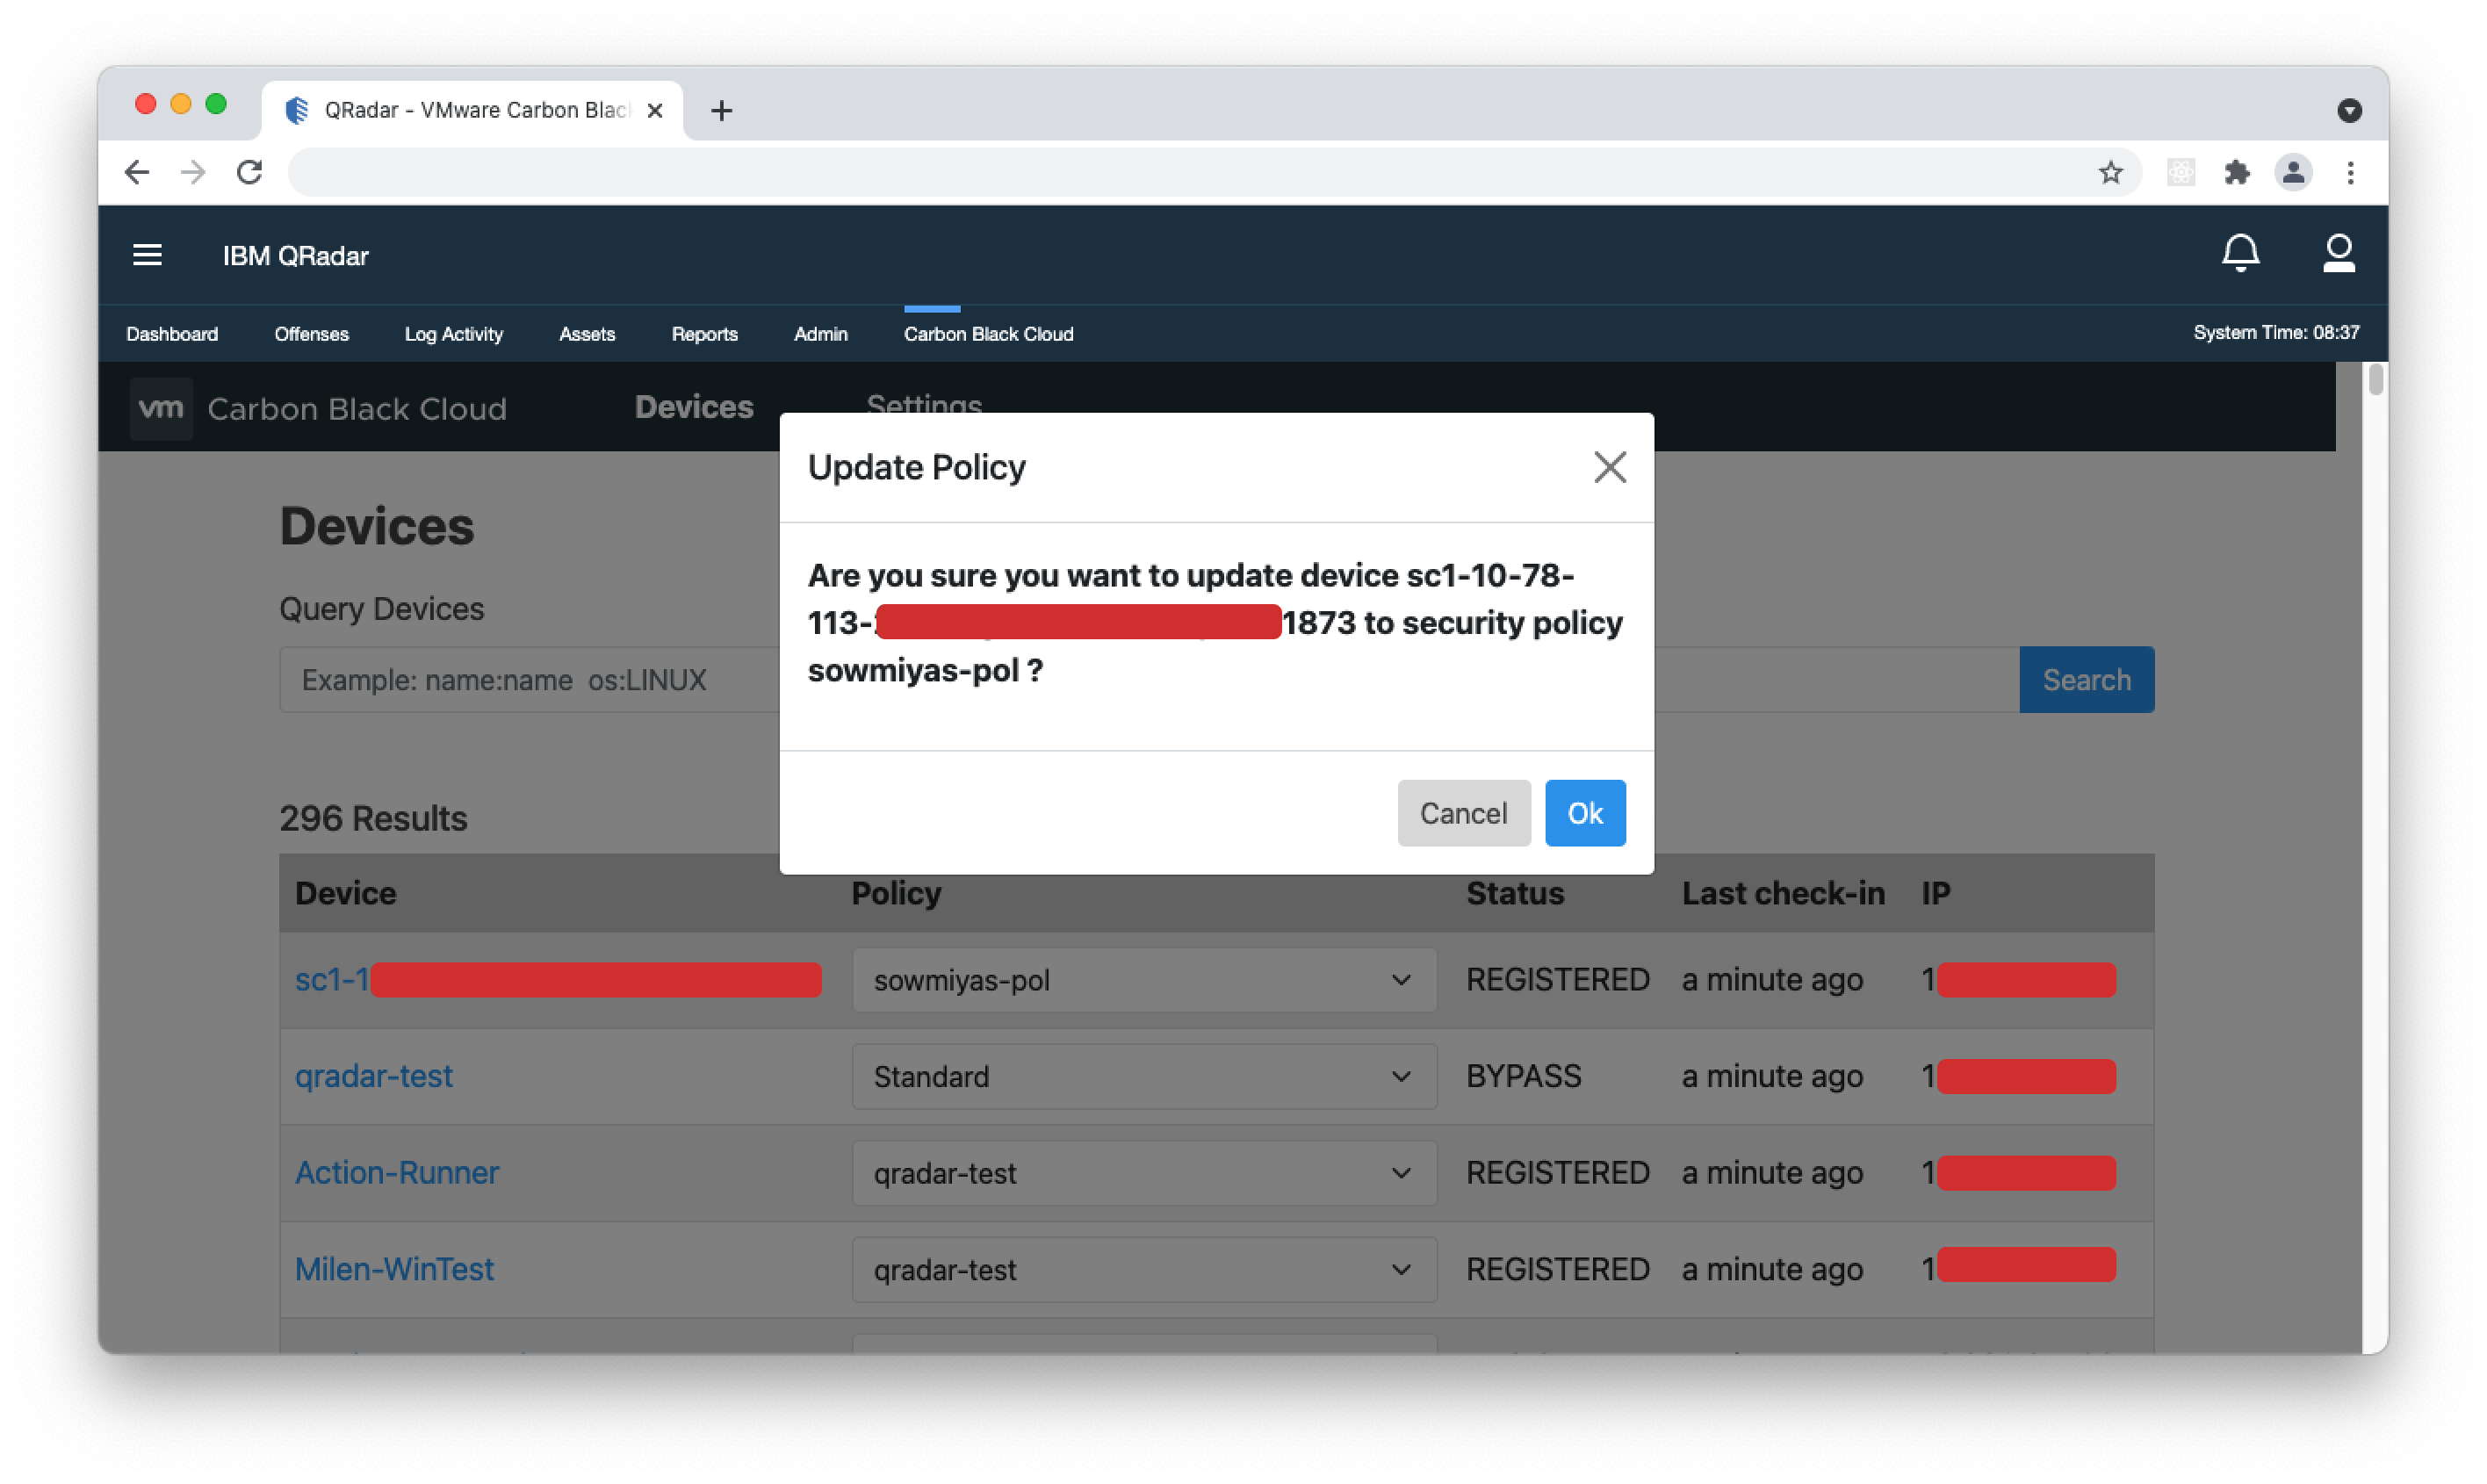
- To access details about each sensor's configuration, click the 'Device' name on each row. Change Device Security Policy
- To change the security policy applied to the device, click the Policy dropdown and select the desired policy from the list. A dialogue box will open to confirm the change. Click Ok to verify the change. It may take a few minutes for the change to be applied throughout both systems.
 Devices Overview
 Device Details
 Change Device Security Policy
Learn more about the Devices API here.
Mapping Carbon Black Cloud Data
The “Carbon Black Cloud” Log Source Type normalizes Carbon Black Cloud data into a format that QRadar can index. The table below provides the full CBC to QRadar field mapping.
| QRadar Field | CBC Field |
|---|---|
| Action | action |
| Alert Blocked Threat Category | blocked_threat_category |
| Alert C2 Involved | threat_activity_c2 |
| Alert Category | category |
| Alert DLP Involved | threat_activity_dlp |
| Alert First Event Time | first_event_time |
| Alert ID | id, alert_id |
| Alert Last Event Time | last_event_time |
| Alert Last Update Time | last_update_time |
| Alert Not Blocked Threat Category | not_blocked_threat_category |
| Alert Notes Present | notes_present |
| Alert Phishing Involved | threat_activity_phish |
| Alert Policy Applied | policy_applied |
| Alert Reason Code | reason_code |
| Alert Status | status |
| Alert Threat Cause Actor Name | threat_cause_actor_name |
| Alert Threat Cause Category | threat_cause_threat_category |
| Alert Threat Caused By Event ID | threat_cause_cause_event_id |
| Alert Threat Cause Reputation | threat_cause_reputation |
| Alert Threat Cause Vector | threat_cause_vector |
| Alert URL | alert_url |
| API Call | crossproc_api |
| Audit Log Event Timestamp | eventTime |
| Audit Log Flagged | flagged |
| CBC Event Count | scriptload_count, modload_count |
| Command Line | process_cmdline |
| Cross-process Event Target | crossproc_target |
| Date Time | backend_timestamp, create_time, syslog_create_time |
| Destination FQDN | netconn_domain |
| Destination IP | remote_ip |
| Destination MAC | [no field specified] |
| Destination Port | remote_port |
| Device Group | device_group |
| Device ID | device_id |
| Device Name | device_name |
| Device Priority | target_value |
| Device Timestamp | device_timestamp |
| Duration Seconds | process_duration |
| Event Category | severity, type, cat |
| Event ID | type, cat |
| Event ID (custom) | created_by_event_id, eventId, event_id |
| Event Origin | event_origin |
| Event Summary | event_description, description, reason |
| File Hash | filemod_hash[1], modload_hash[1], scriptload_hash[1], fileless_scriptload_hash[1], modload_sha256 |
| Fileless Script Load Command Line | fileless_scriptload_cmdline |
| File Path | filemod_name, regmod_name, modload_name, scriptload_name |
| Identity Extended Field | [no field specified] |
| Identity Group Name | device_group |
| Identity Host Name | device_name |
| Identity IP | device_internal_ip |
| Identity IPv6 | [no field specified] |
| Identity MAC | [no field specified] |
| Identity Net BIOS Name | [no field specified] |
| IOC Field | ioc_field |
| IOC ID | ioc_id |
| IOC Value | ioc_hit |
| IPv6 Destination | [no field specified] |
| IPv6 Source | [no field specified] |
| Legacy Alert ID | legacy_alert_id |
| Location | device_location |
| Log Source Time | create_time - yyyy-MM-dd'T'HH:mm:ss'Z', eventTime - yyyy-MM-dd'T'HH:mm:ss'Z', syslog_create_time - yyyy-MM-dd'T'HH:mm:ss.SSS'Z', device_timestamp - yyyy-MM-dd HH:mm:ss.SSS +0000 'UTC' |
| Network Connection Inbound | netconn_inbound |
| Network Protocol | netconn_protocol |
| Org Key | org_key |
| Organisation Name | orgName |
| OS Name | device_os |
| OS Version | device_os_version |
| Parent Command | parent_cmdline |
| Parent GUID | parent_guid, threat_cause_parent_guid |
| Parent Hash | parent_hash[1] |
| Parent Path | parent_path |
| Parent Process ID | parent_pid |
| Parent Process Reputation | parent_reputation |
| Policy ID | policy_id |
| Policy Name | policy_name |
| Post NAT Destination IP | [no field specified] |
| Post NAT Destination Port | [no field specified] |
| Post NAT Source IP | device_external_ip |
| Post NAT Source Port | [no field specified] |
| Pre NAT Destination IP | [no field specified] |
| Pre NAT Destination Port | [no field specified] |
| Pre NAT Source IP | device_internal_ip |
| Pre NAT Source Port | [no field specified] |
| Process Fork PID | process_fork_pid |
| Process GUID | process_guid, threat_cause_process_guid |
| Process Hash | threat_cause_actor_sha256, process_hash[1] |
| Process ID | threat_cause_actor_process_pid, process_pid |
| Process Name | process_name |
| Process Path | process_path |
| Process Reputation | process_reputation |
| Process Terminated | process_terminated |
| Protocol | [no field specified] |
| Proxy Hostname | netconn_proxy_domain |
| Proxy IP | netconn_proxy_ip |
| Proxy Port | netconn_proxy_port |
| Report ID | report_id |
| Report Name | report_name |
| Run State | run_state |
| Sensor Action | sensor_action |
| Source IP | local_ip, clientIp |
| Source MAC | [no field specified] |
| Source Port | local_port |
| Target Command Line | target_cmdline |
| Target GUID | childproc_guid, crossproc_guid |
| Target Hash | childproc_hash[1], crossproc_hash[1], fileless_scriptload_hash[1], scriptload_hash[1] |
| Target Name | crossproc_name, childproc_name |
| Target Process ID | childproc_pid |
| Target Reputation | crossproc_reputation, childproc_reputation, modload_effective_reputation |
| Target Username | childproc_username, crossproc_username |
| Threat ID | threat_id |
| Threat Indicators | threat_indicators |
| USB Device Friendly Name | external_device_friendly_name |
| USB Product ID | product_id |
| USB Product Name | product_name |
| USB Serial Number | serial_number |
| Username | process_username, device_username, loginName |
| Vendor ID | vendor_id |
| Vendor Name | vendor_name |
| Watchlists Content | watchlists[] |
Right-Click Actions
Access the following actions by right-clicking certain columns in the “Log Activity” page. Each action may require additional configuration in the Carbon Black Cloud app under Settings > App Configuration or Settings > Actions. Details and requirements are listed below for each of the actions.
Note: Some right-click actions are available from “Custom” columns which are not displayed by default. Read below on how to add a custom column.
| Data type | Description | Available on columns | Requirements |
|---|---|---|---|
| Add or remove IOC from watchlist | Add or remove specified IOC(s) to/from a specified report in a watchlist (may take a few minutes to apply across both systems). | All IP/Port columns File Hash (custom), Parent Hash (custom), Process Hash (custom), Target Hash (custom), | API-type credentials, Custom-type credentials, Org key, Product URL, Report prefix, Watchlist name |
| Ban process hash | Prevents a sha256 hash from being executed in Carbon Black Cloud. | File Hash (custom), Process Hash (custom), Parent Hash (custom), Target Hash (custom) |
Custom-type credentials, Org key, Product URL |
| Carbon Black Cloud Investigate - Events | Redirects you to the Carbon Black Cloud console “Investigate” page and filters events by the selected id. | Event ID (custom) |
Product URL, Carbon Black Cloud access |
| Carbon Black Cloud Search - Devices | Redirects you to the Carbon Black Cloud console "Inventory > Endpoints" or "Inventory > VM Workload" page and filters devices by the specified criteria. | All IP columns, Device ID (custom) |
Product URL, Carbon Black Cloud access |
| Enable or disable bypass | Enable or disable all policy enforcement on the device and enable/disable sending data from the sensor to the Carbon Black Cloud. | Device ID (custom) |
Custom Type Credentials, Org Key, Product URL |
| Dismiss alert | Dismisses (closes) the specified alert in Carbon Black Cloud. | Alert ID (custom) |
Custom Type Credentials, Org Key, Product URL |
| Quarantine or unquarantine a device | Quarantines or unquarantines the specified device. When quarantined, it prevents suspicious activity and malware from affecting the rest of your network. The device can only communicate with Carbon Black Cloud until unquarantined. | Device ID (custom) |
Custom Type Credentials, Org Key, Product URL |
| Search events by this IP on Carbon Black Cloud | Redirects you to the Carbon Black Cloud console ”Investigate” page and filters events by the selected IP address. | All IP columns |
Product URL, Carbon Black Cloud access |
| View device | Redirects you to the app's Devices tab and filters devices by the specified criteria. |
Device ID (custom), All IP columns |
Custom Type Credentials, Org Key, Product URL, QRadar User with admin privileges |
Add a Custom Column
The steps below explain how to add a custom column for accessing right-click actions in the “Log Activity” page.
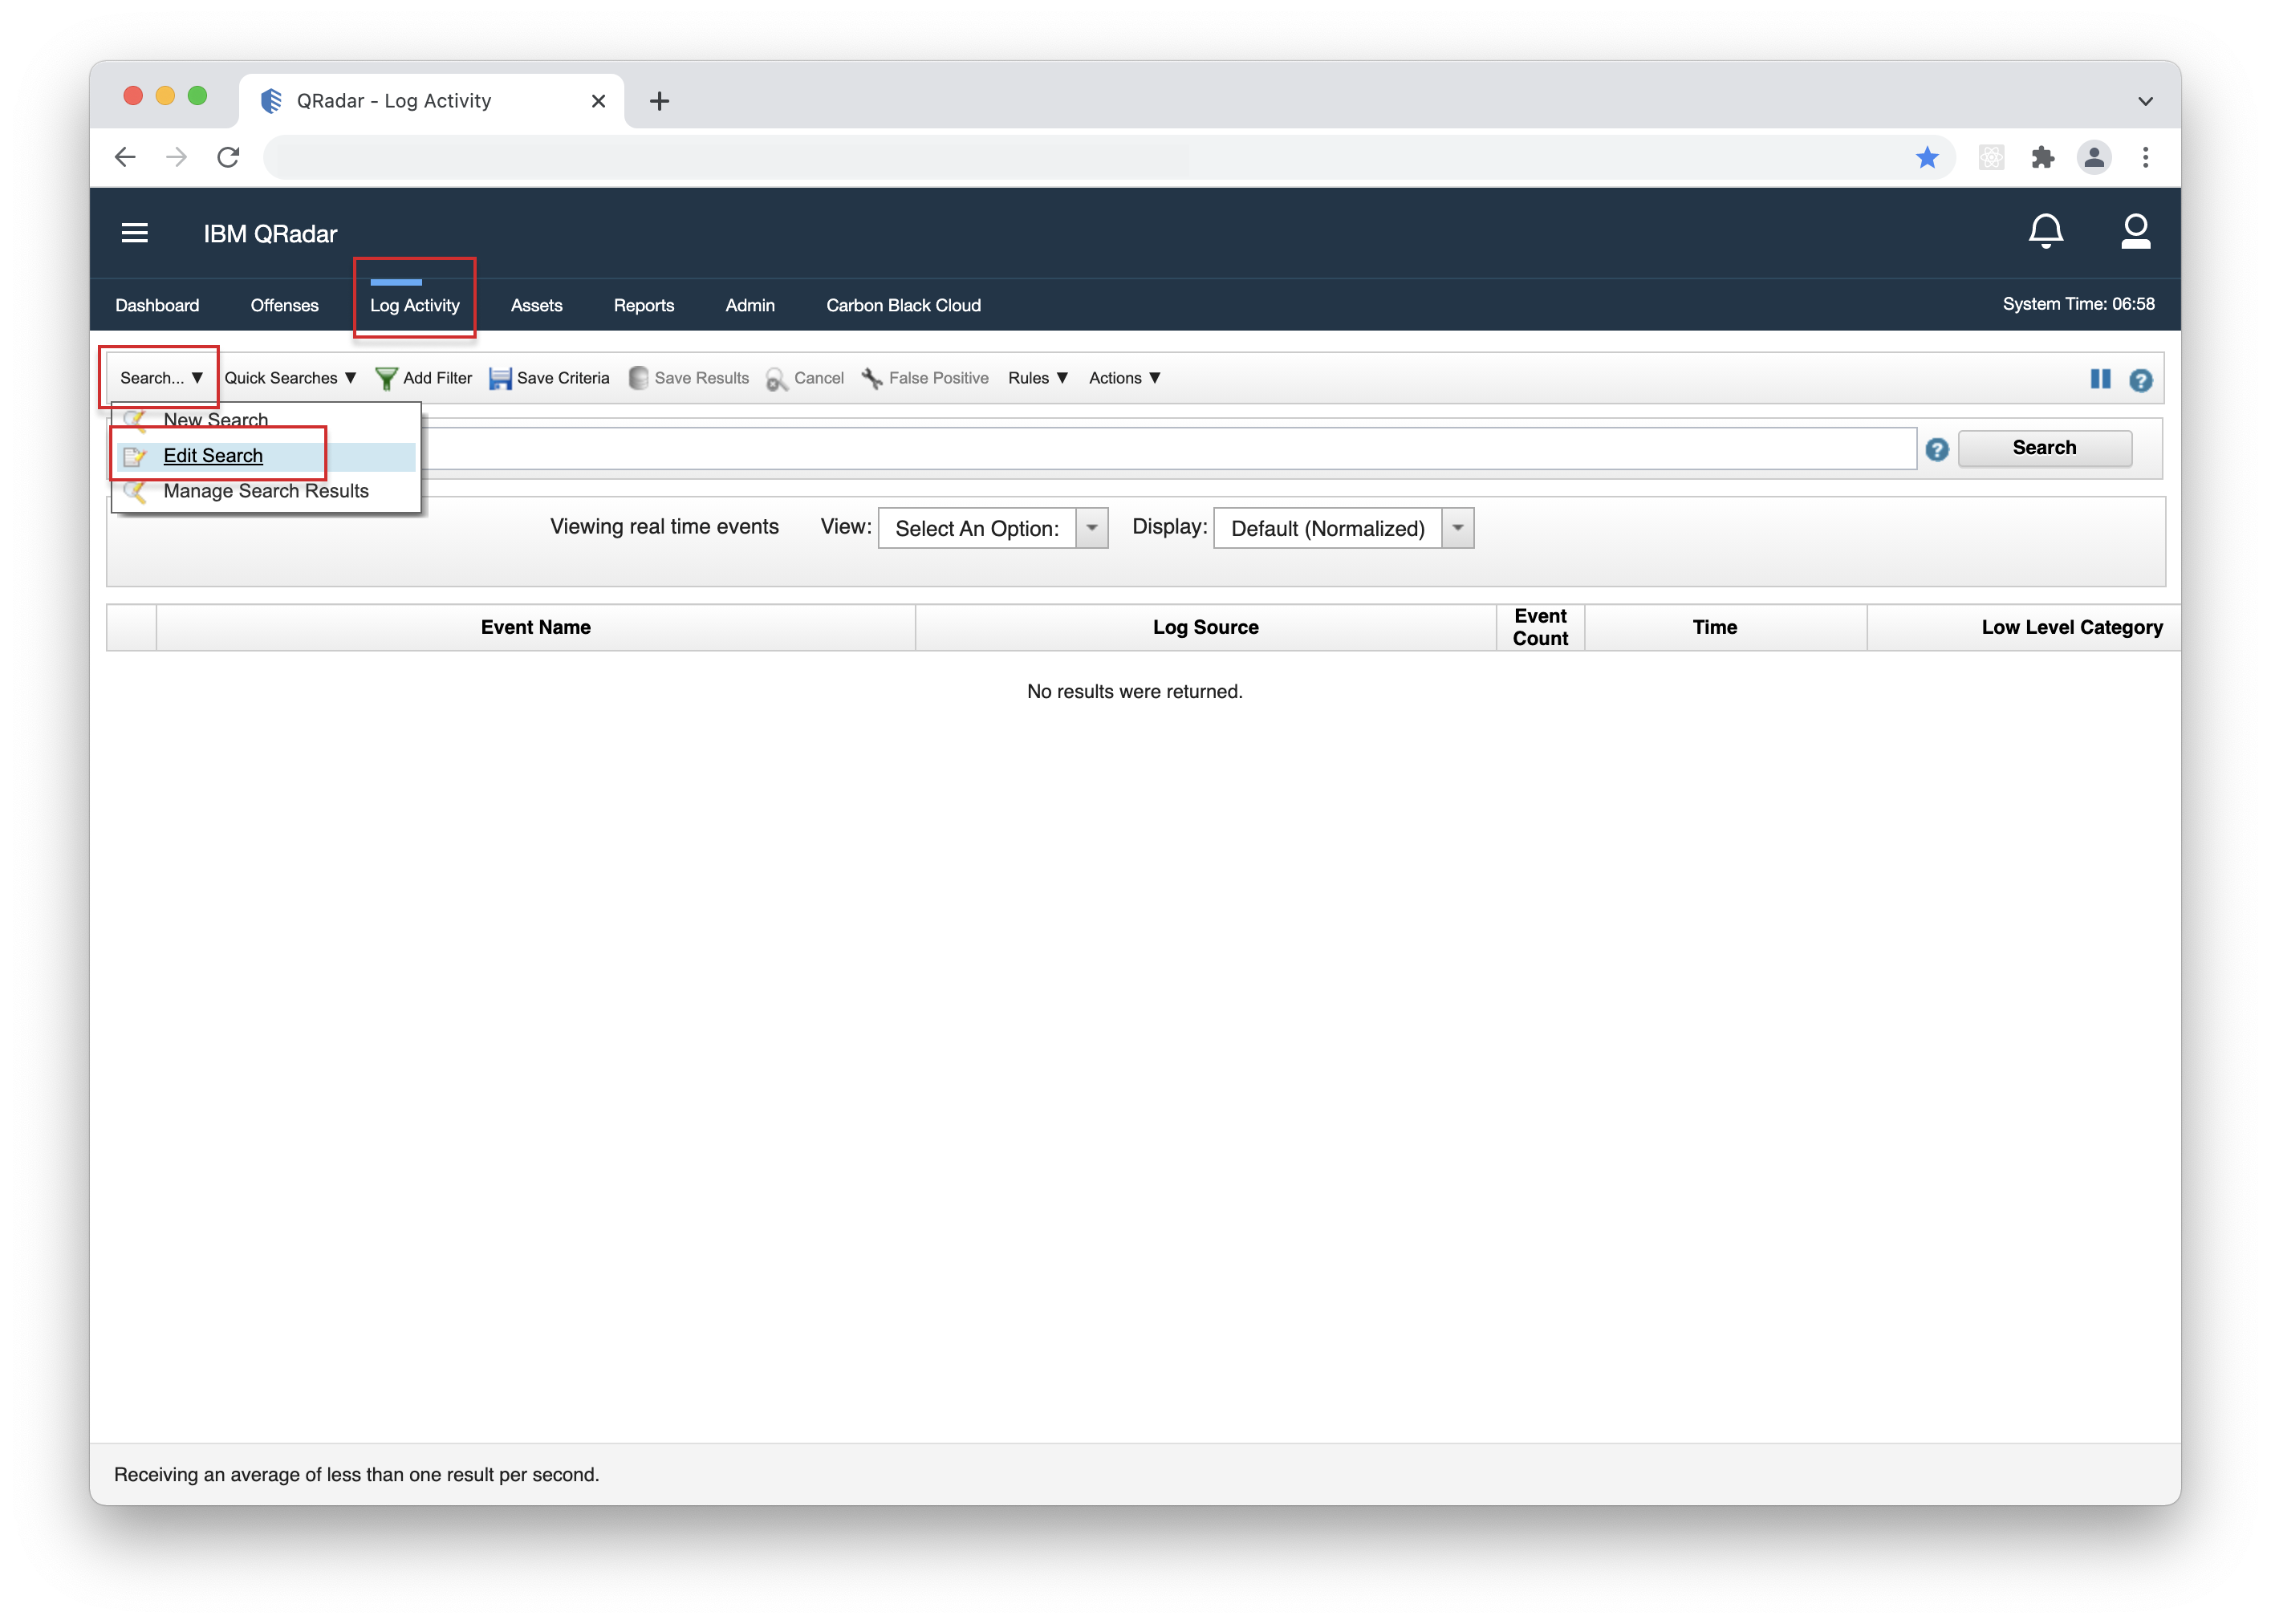
- 1. Open your QRadar console, navigate to the "Log Activity" page, click "Search", then "Edit Search".
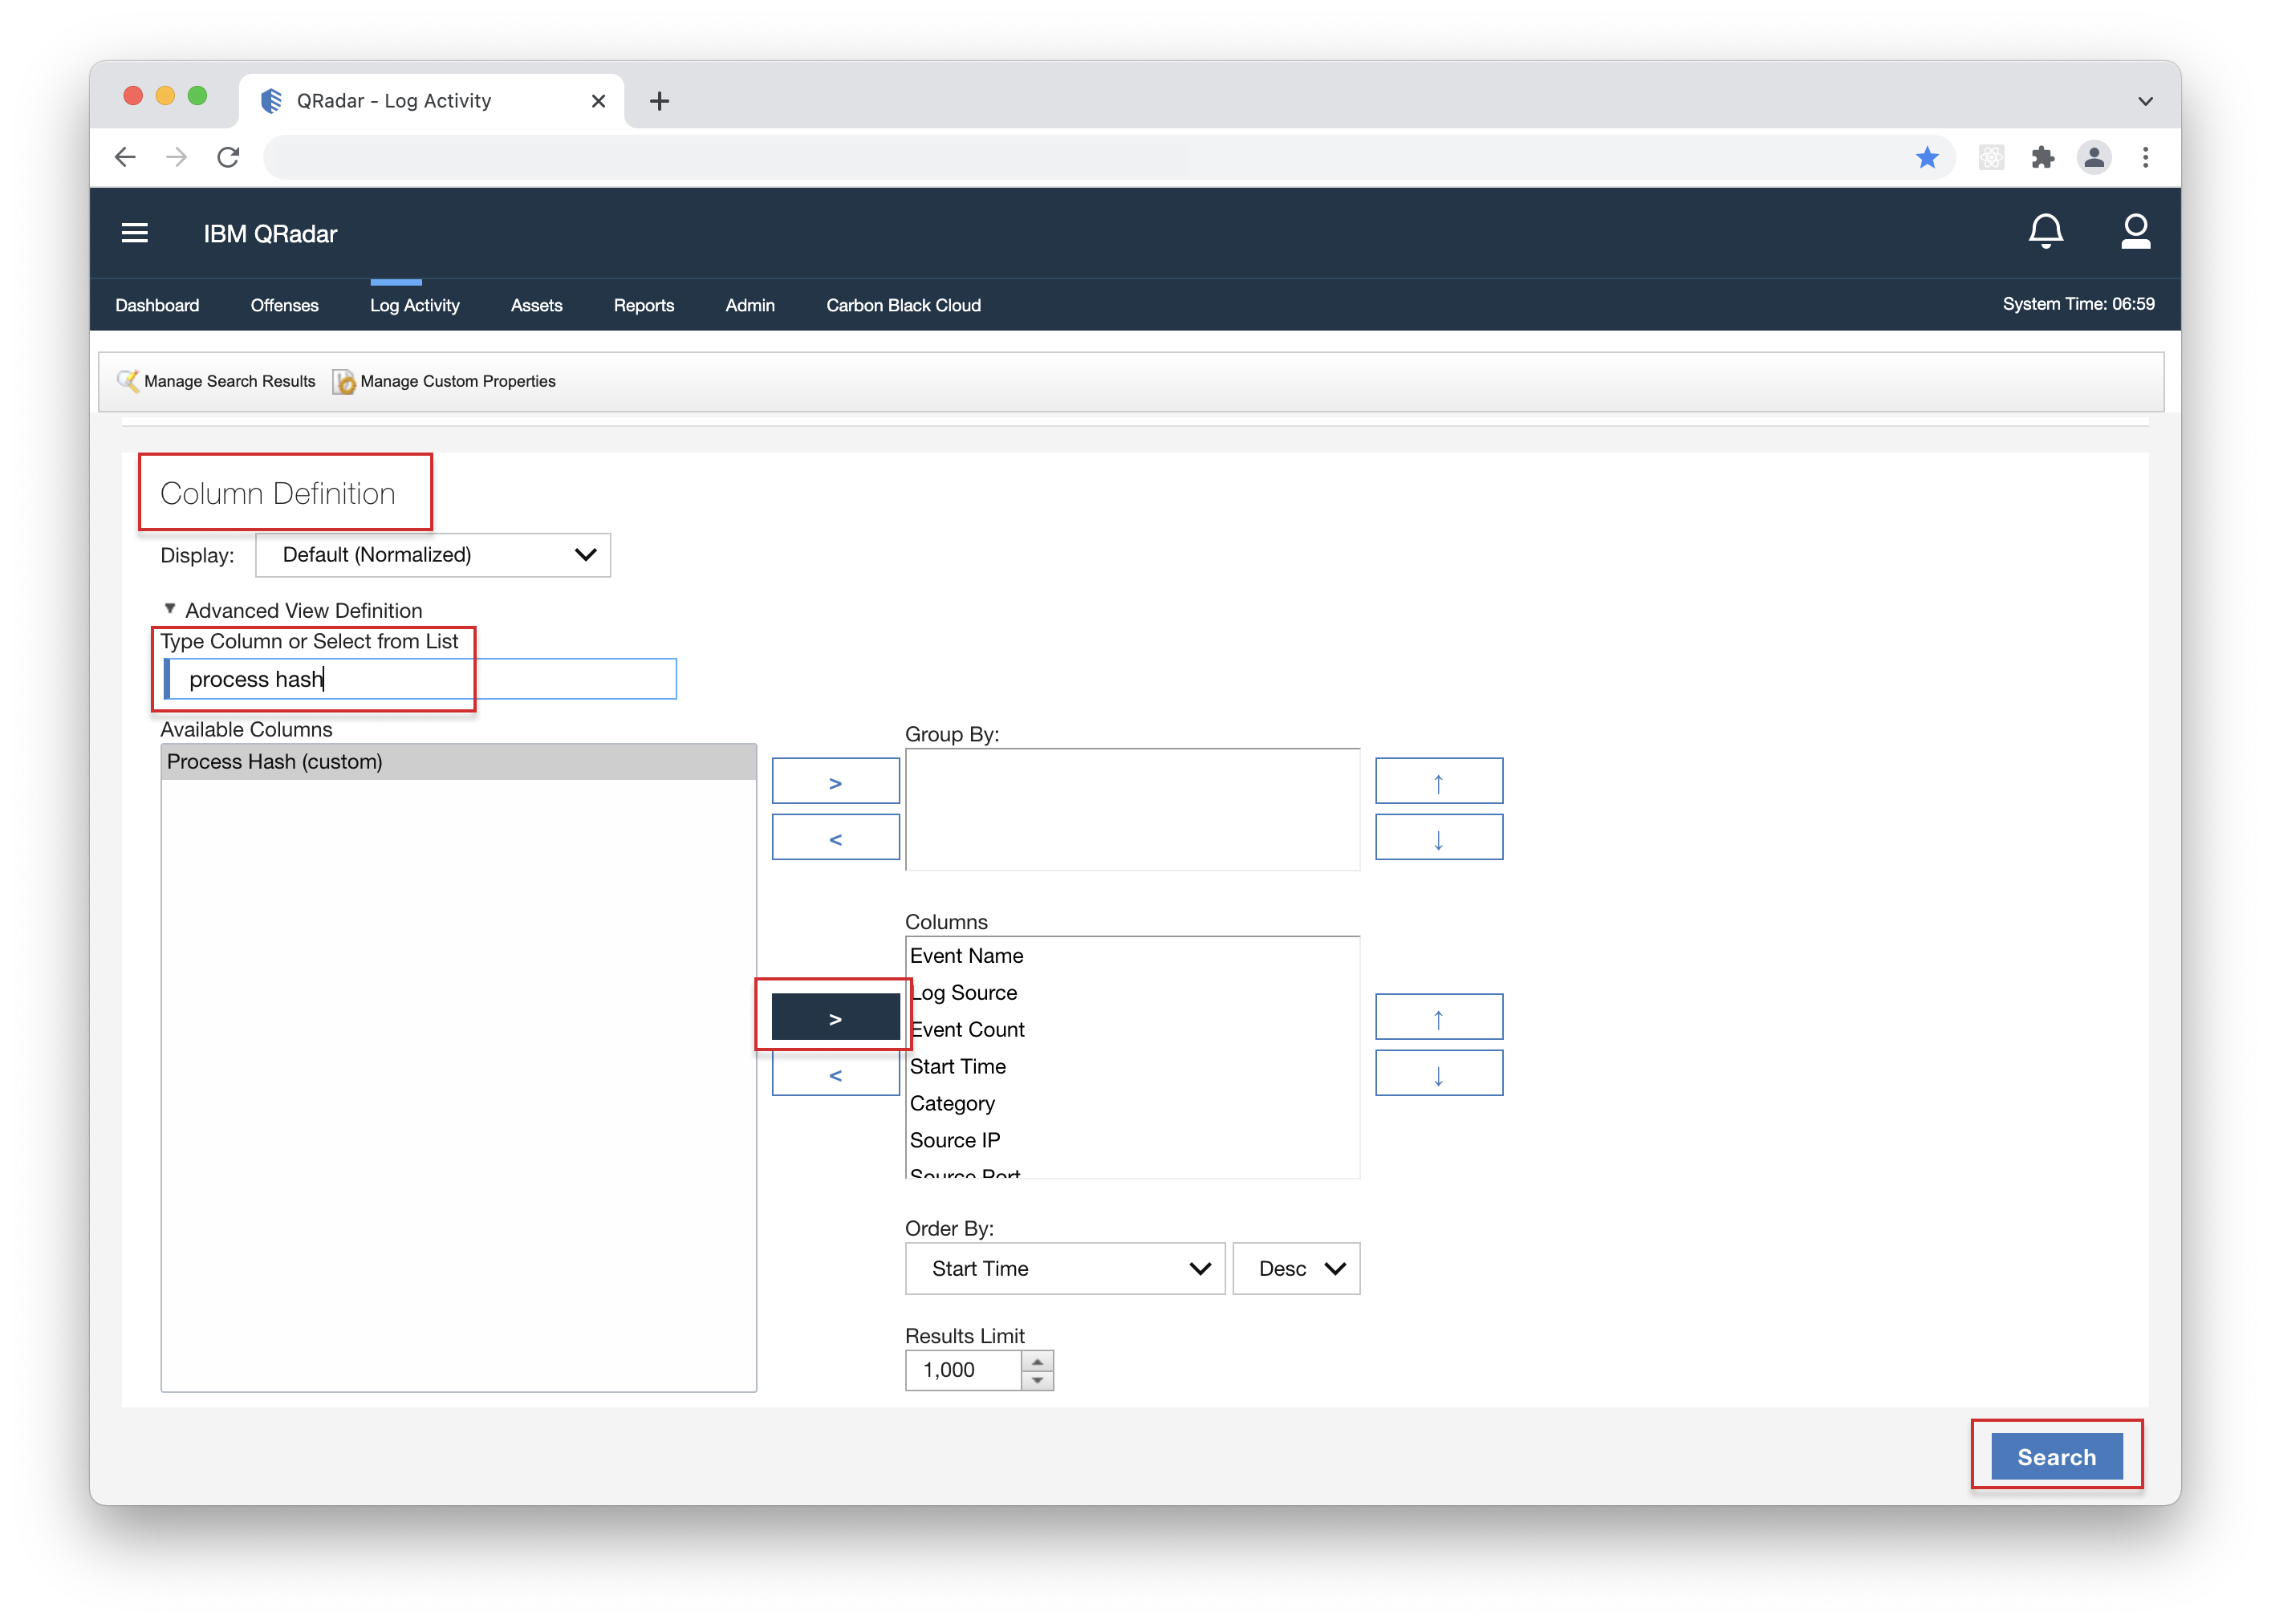
- 2. Scroll down to the "Column Definition" section and type or find the desired column. Select it, then click the arrow button to add it, and finally click "Search".
- 3. The new column will now be available in the Log Activity page.
 1.
1.
 2.
2.
 3.
3.
Viewing App Logs
The app lives in a docker container with its own logs separate from QRadar. For specific app issues (can’t connect, specific app broken etc), log into the shell for each app container to inspect the logs. | For details about logging, go to IBM’s Troubleshooting Guide.
Additional Guides
Create Syslog Log Source
- 1. Open your QRadar console and navigate to Admin > QRadar Log Source Management.
- 2. In the popup window, click "Log Sources".
- 3. Click "+New Log Source" button.
- 4. Select "Single Log Source".
- 5. In the search field, enter "Carbon Black Cloud" and select it, then click "Step2: Select Protocol Type".
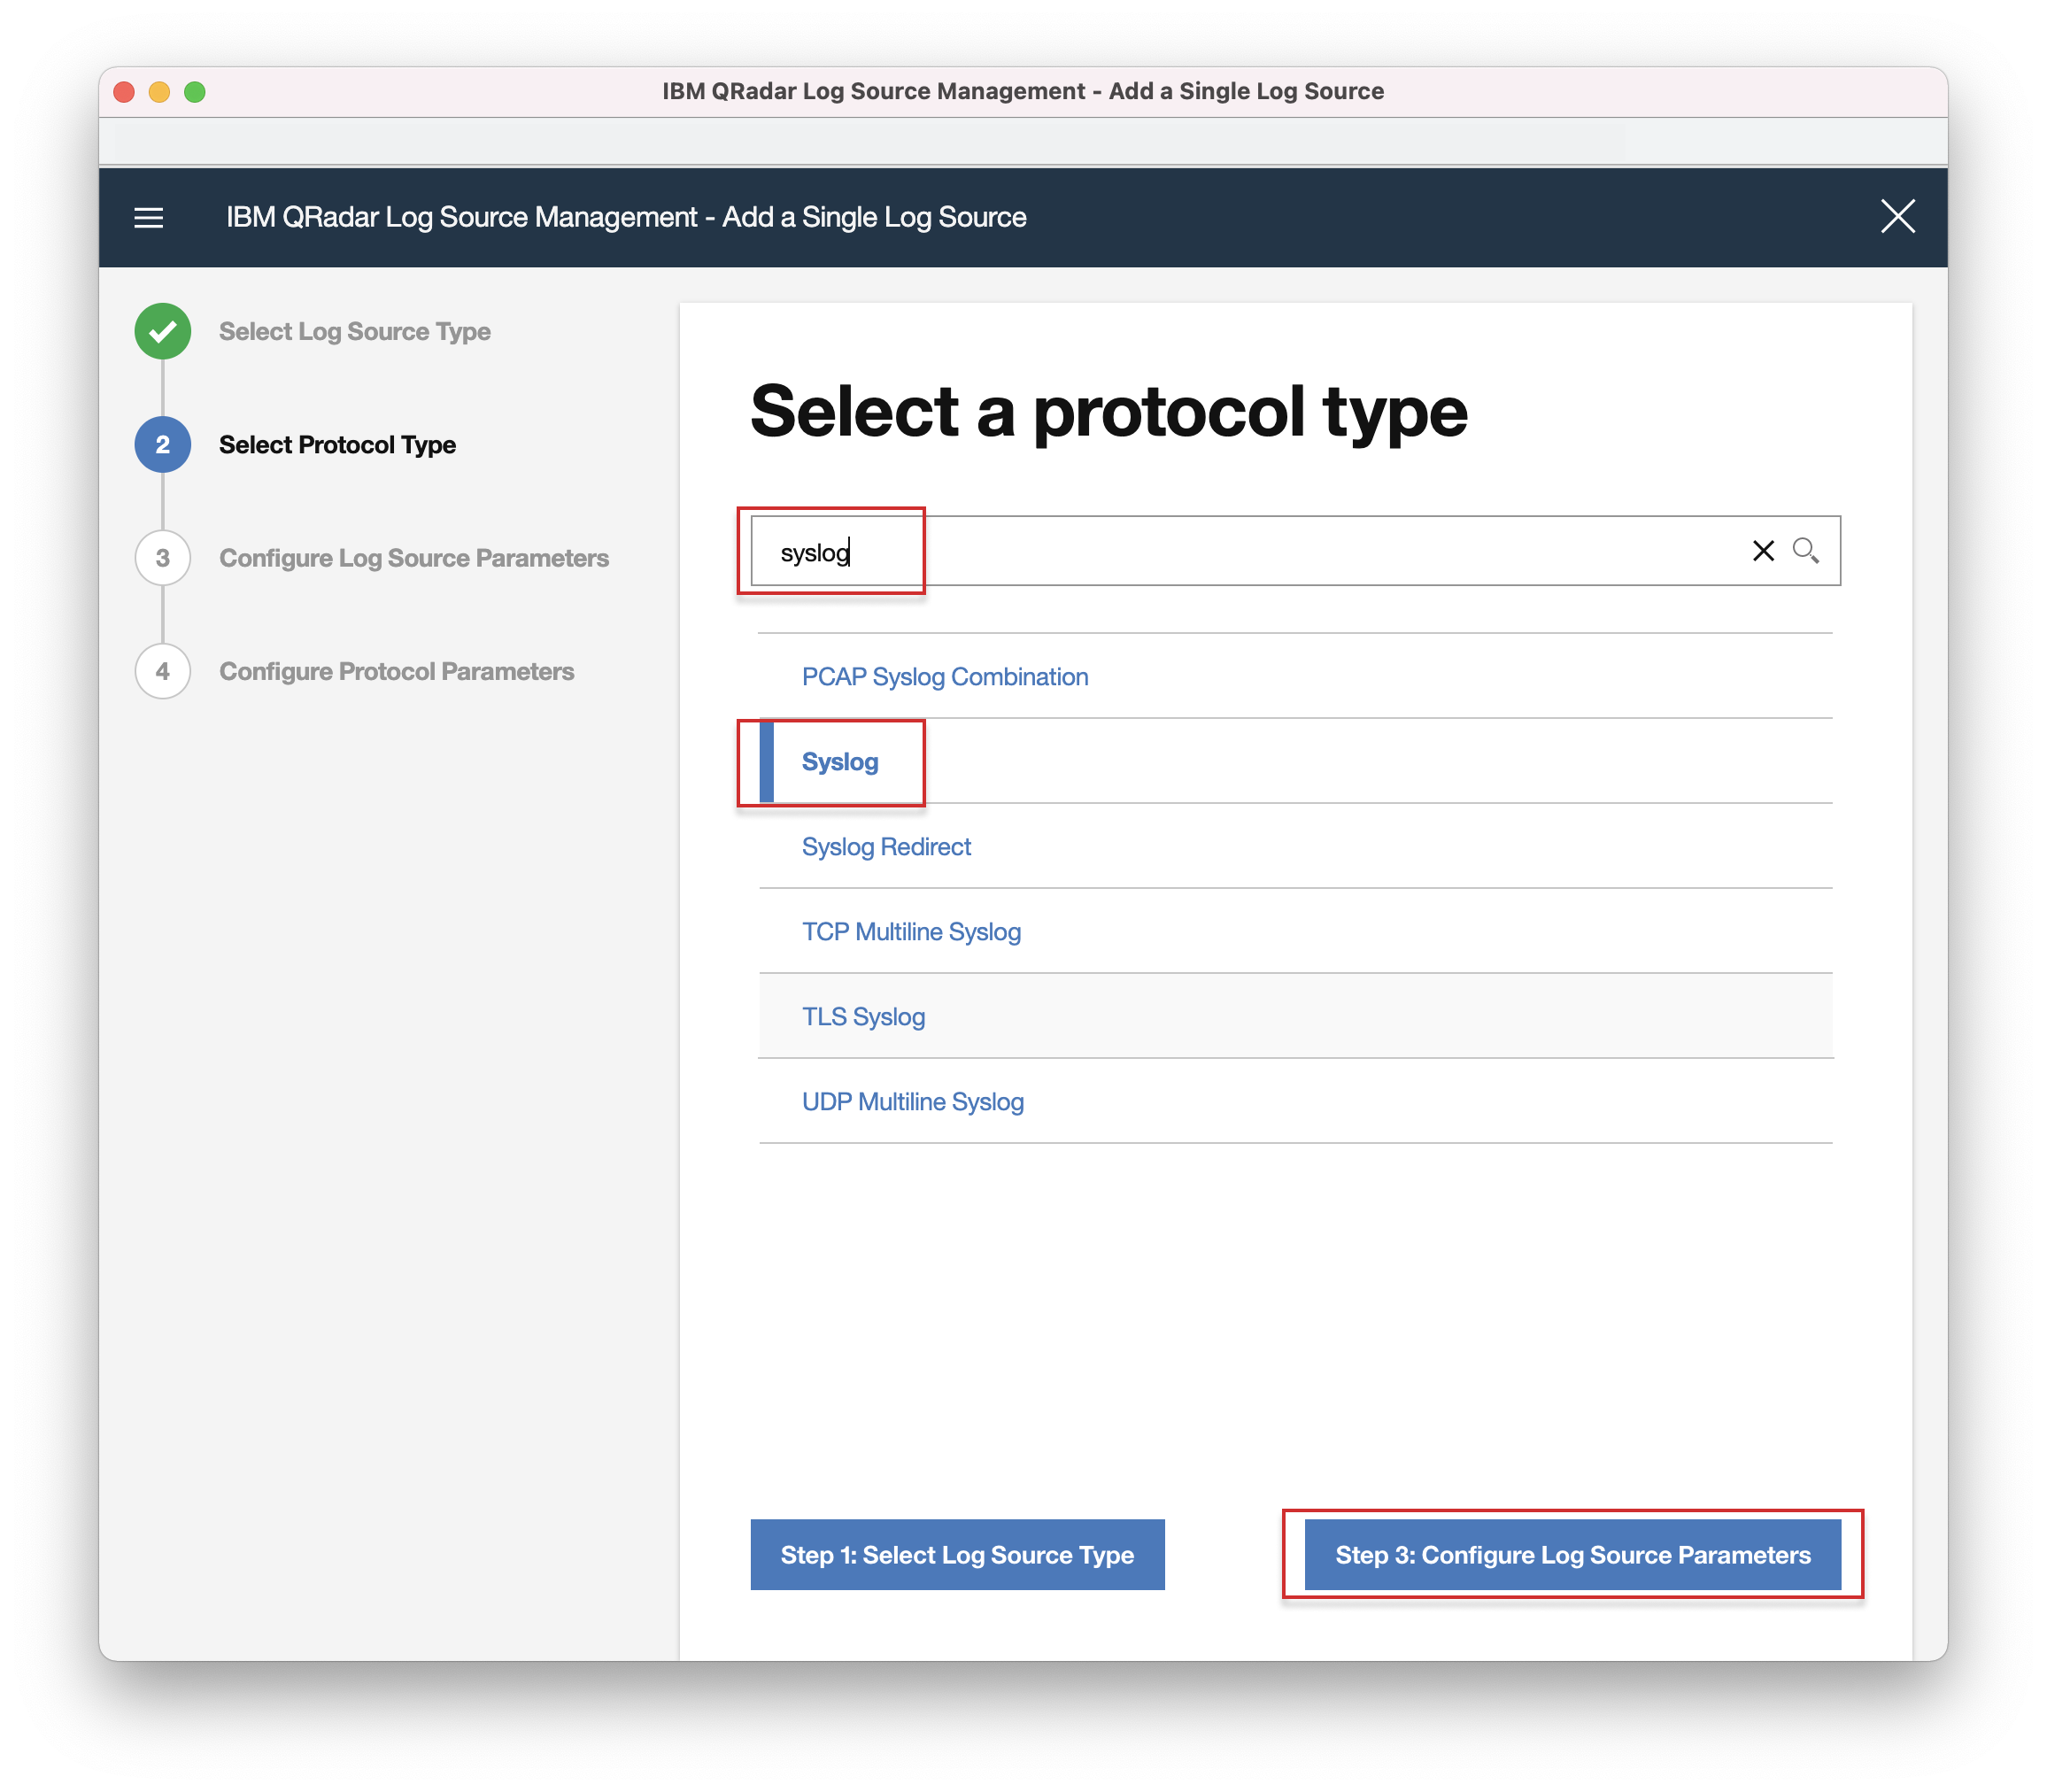
- 6. In the search field, enter "Syslog" and select it, then click "Step3: Configure Log Source Parameters".
- 7. Enter a unique "Name" and optionally you can change any of the predefined parameters per your needs. Click "Step4: Configure Protocol Parameters":
- Note: The default value for Coalescing Events is enabled. If this option is enabled, this means that when a log source emits multiple events which are very similar to one another in a short time span, they'll be coalesced together. The event count of the single event will reflect the number of events have been coalesced. This is good to be enabled to reduce storage cost of events. Disable if there are important fields contained in the event outside of the previous noted fields.
- 8. Enter a unique "Log Source Identifier" and click "Finish".
- 9. Click "Deploy Changes" in the notification pop-up under the Admin tab for the changes to take effect.
- 10. Enter the "Log Source Identifier" name from step 8. in Settings > App Configuration.
1.
2.
3.
4.
5.
 6.
6.
 7.
7.
 8.
9.
10.
8.
9.
10.
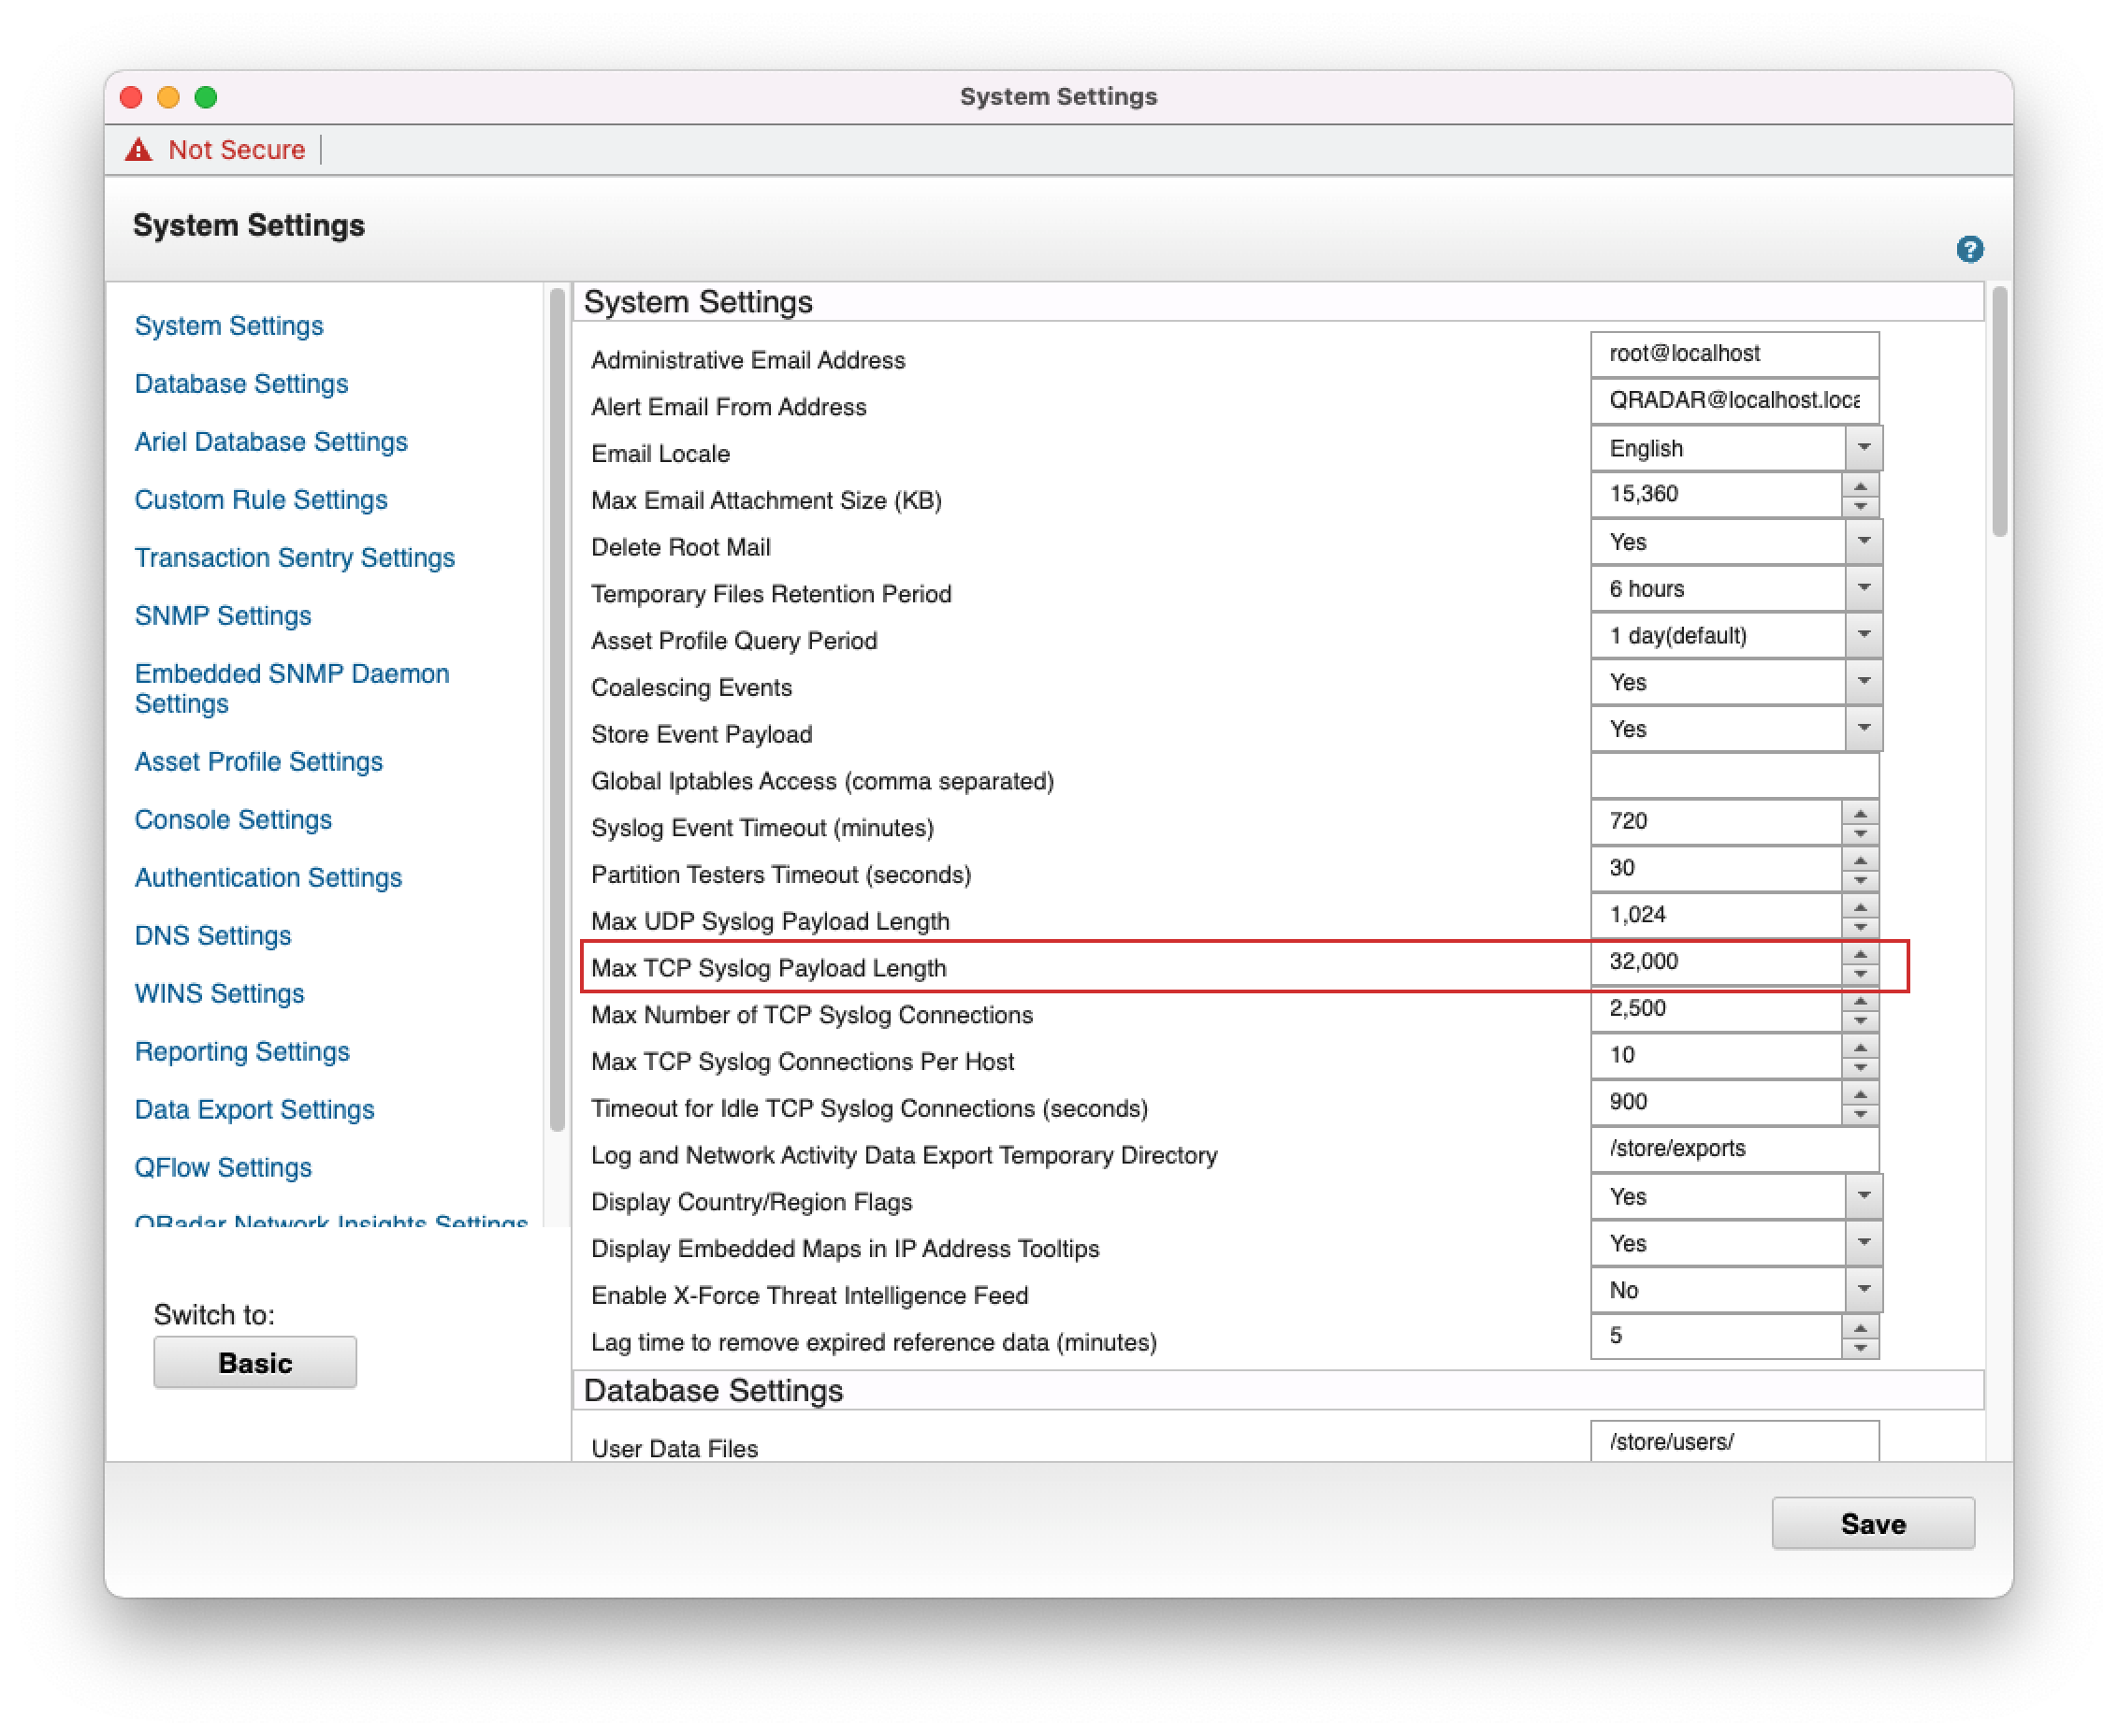
Increase TCP Syslog max payload size
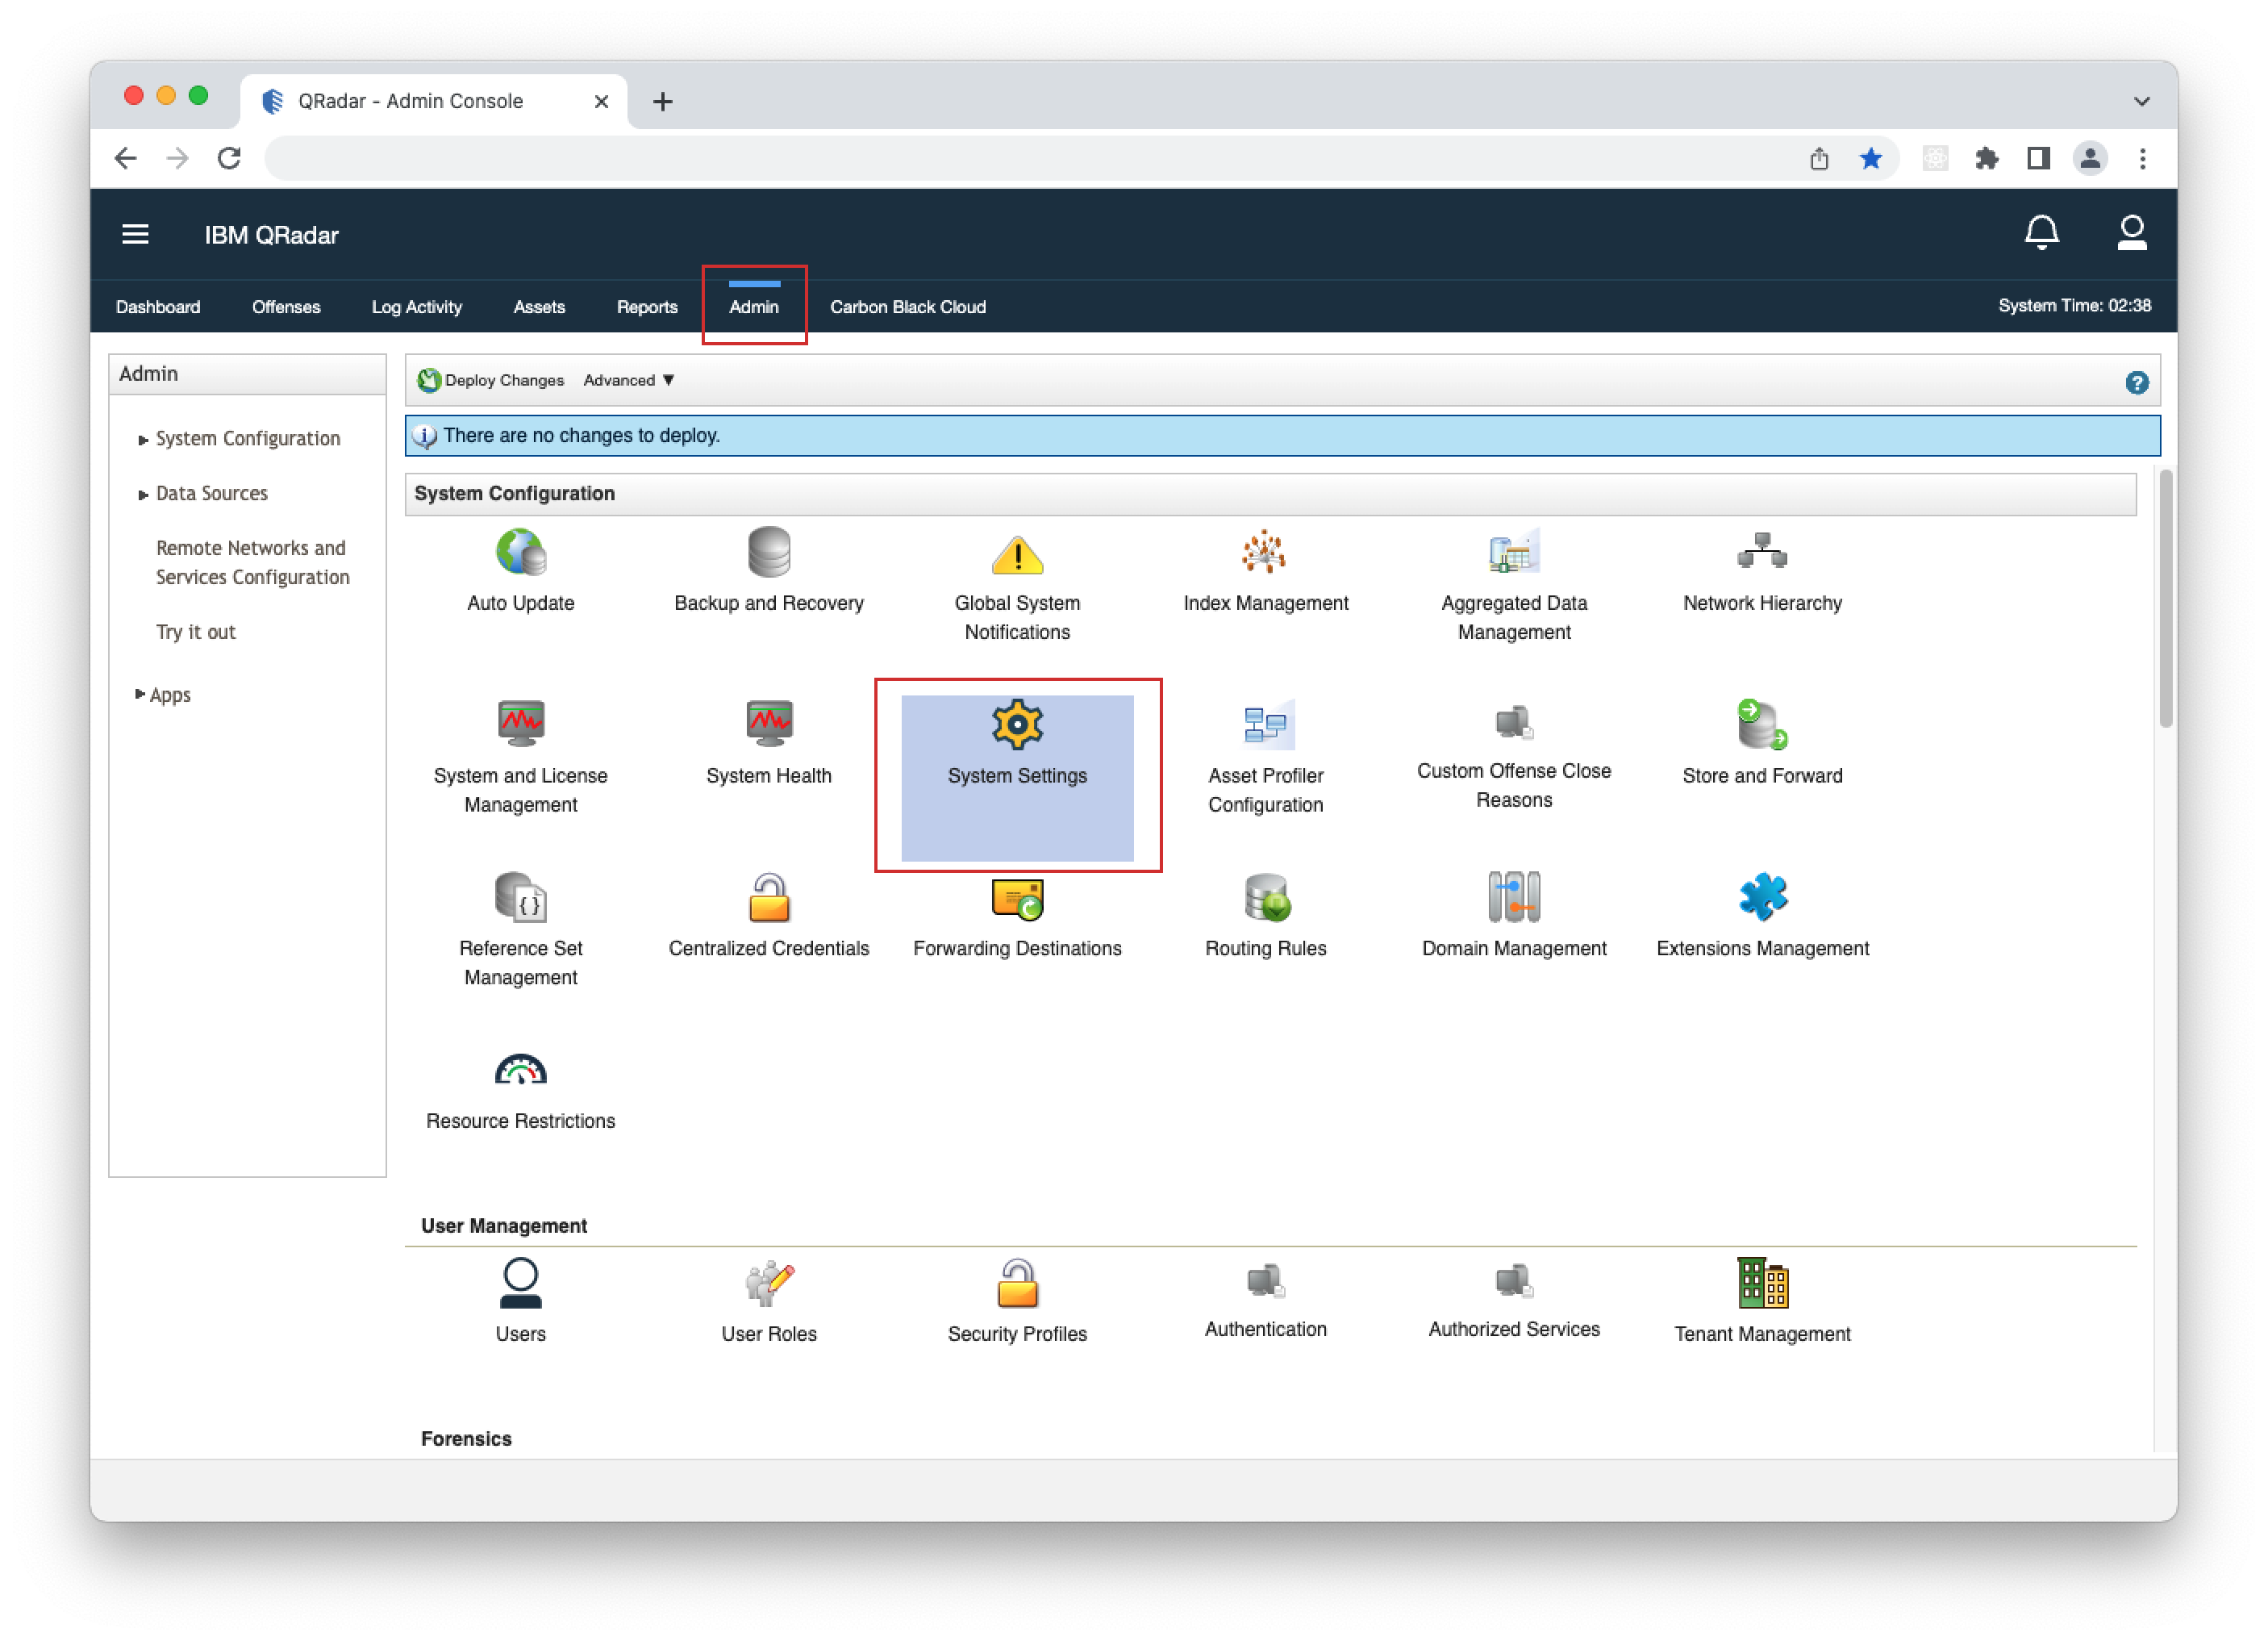
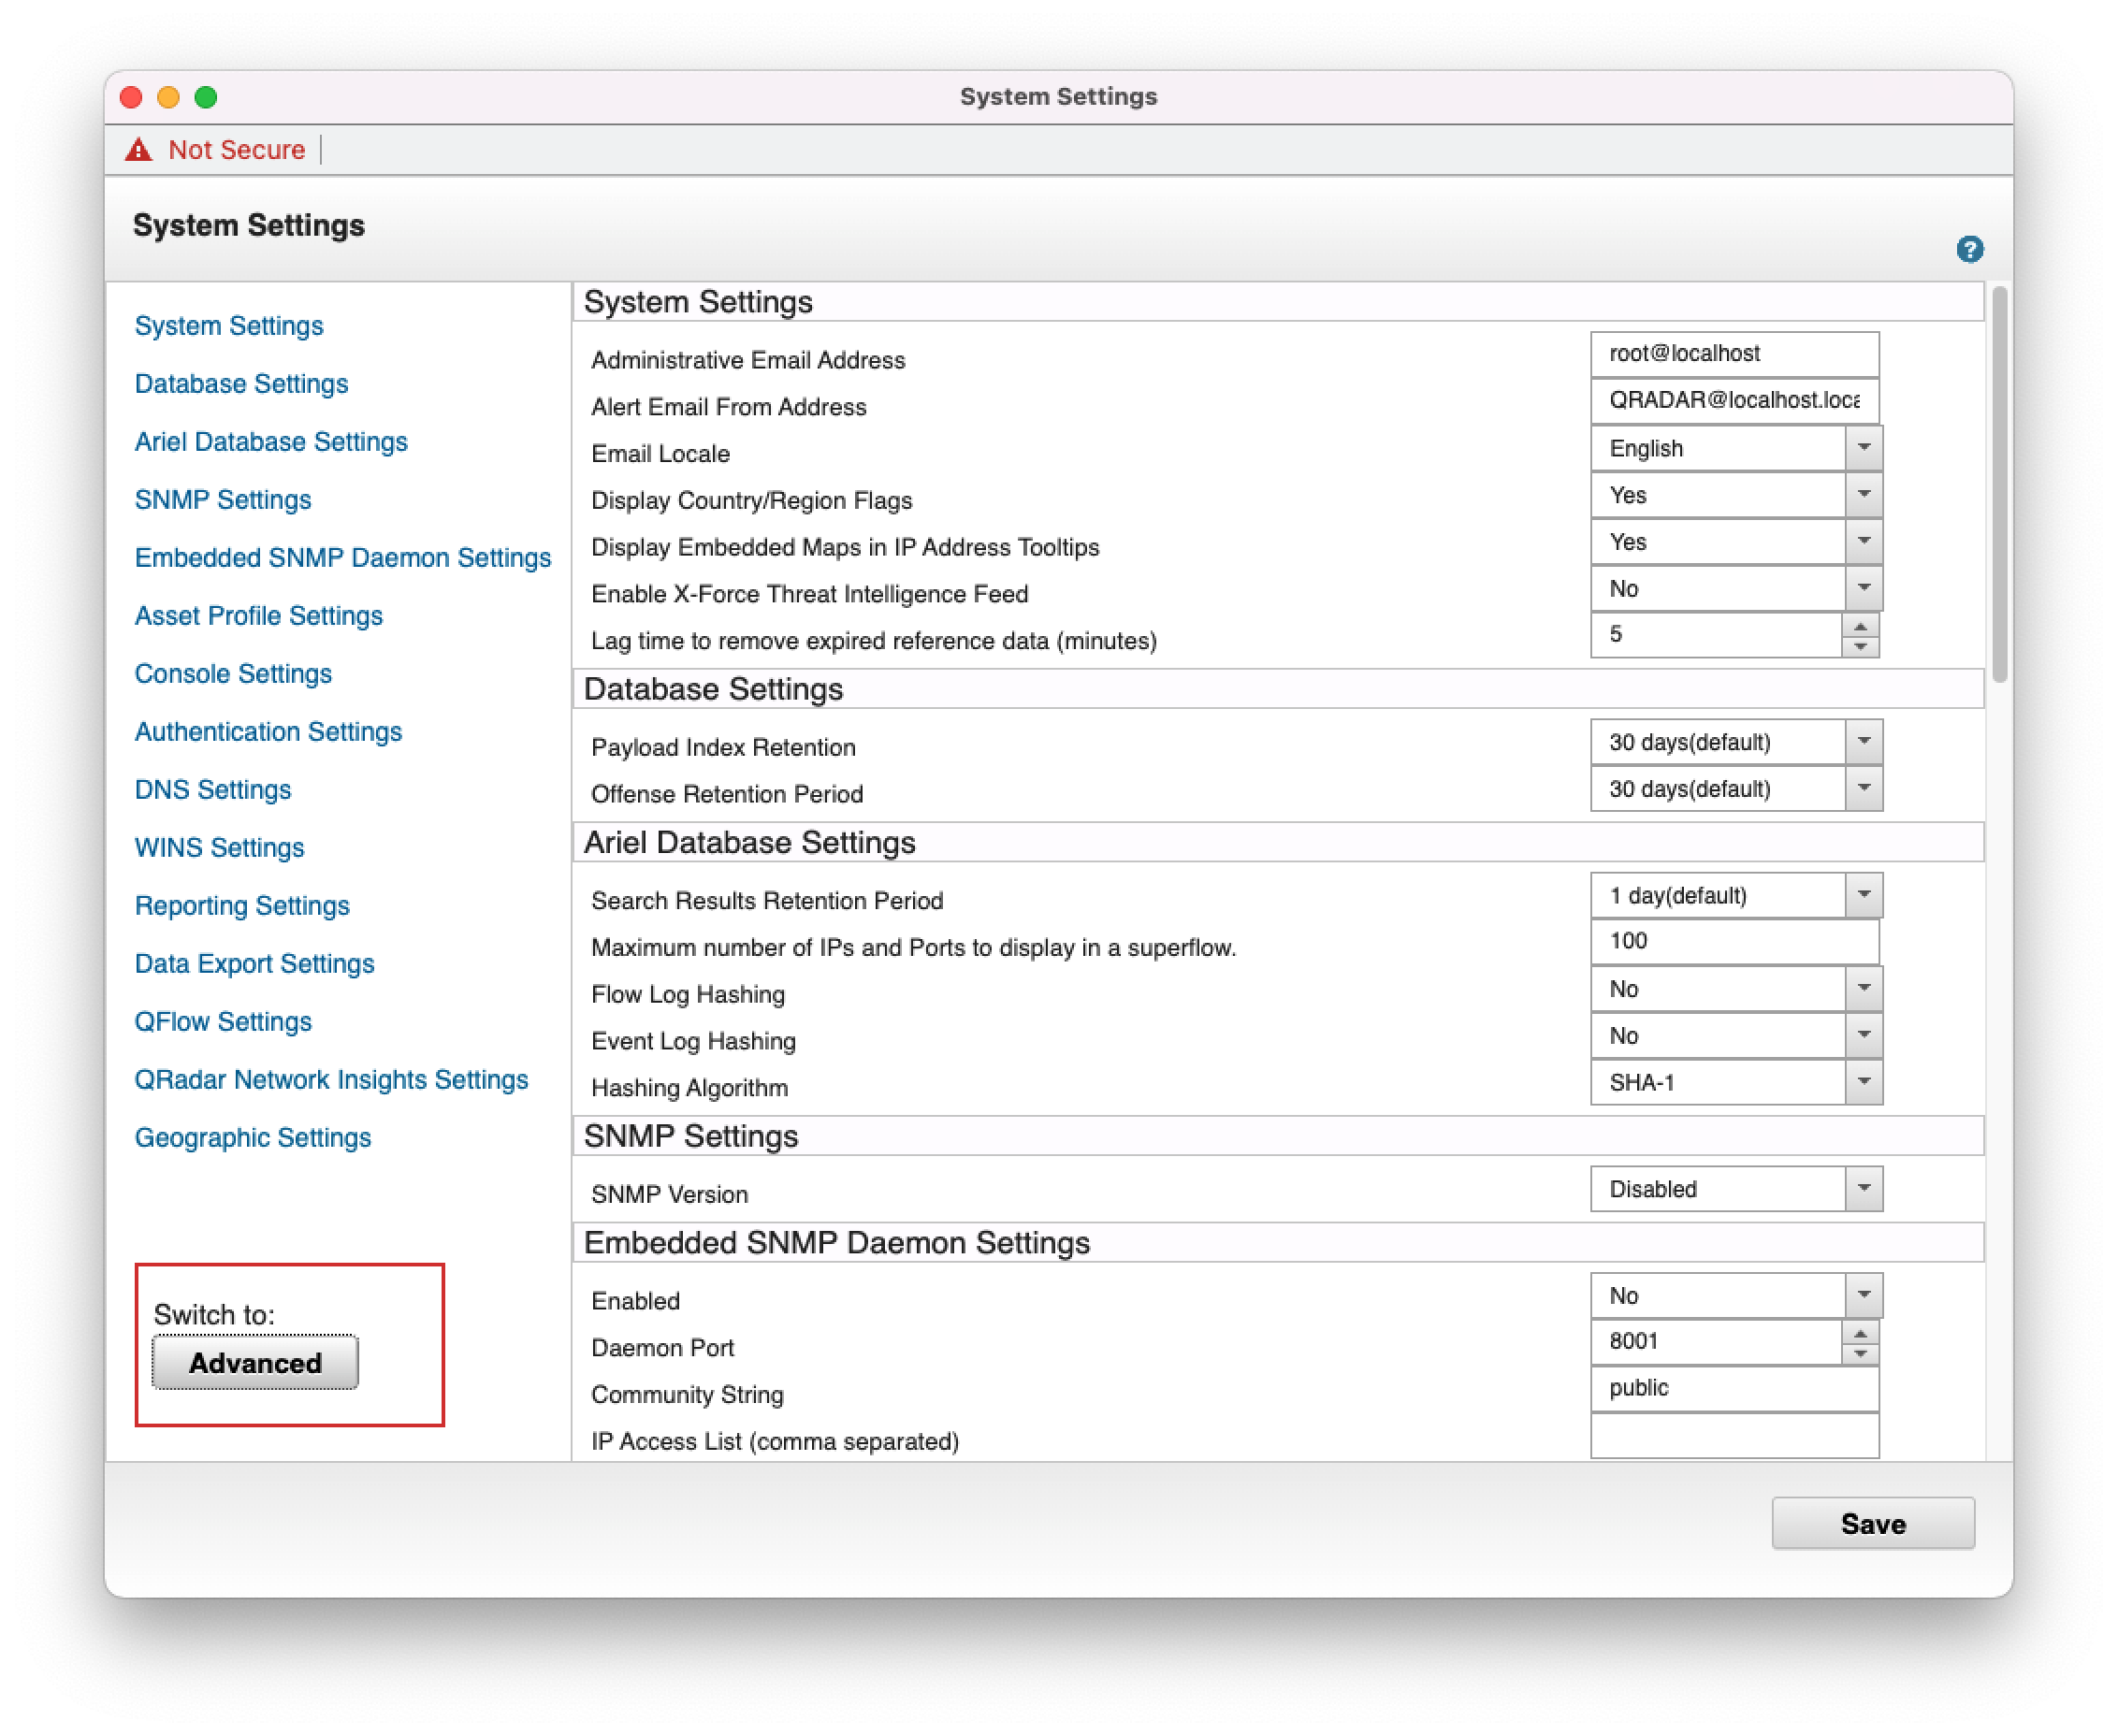
- 1. Open your QRadar console and navigate to Admin > System Settings.
- 2. Click "Switch to: Advanced" button.
- 3. Find "Max TCP Syslog Payload Length", increase its value to the recommended 32000, then click "Save".
 1.
1.
 2.
2.
 3.
3.
Multi-Tenancy
-
Multitenant environments allow Managed Security Service Providers (MSSPs) and multi-divisional organizations to provide security services to multiple client organizations from a single, shared IBM® QRadar® deployment. You don't have to deploy a unique QRadar instance for each customer.
In a multitenant deployment, you ensure that customers see only their data by creating domains based on their QRadar input sources. Then, use security profiles and user roles to manage privileges for large groups of users within the environment. Security profiles and user roles ensure that users have access to only the information they are authorized to see.
To learn how to set up your multitenant environment, follow IBM's Multitenant management.
App Upgrade
v2.0.0 to v2.1.0
Admin > Custom Event Properties search for Process GUID and delete all of the mapping manually.
If you are upgrading from v.2.0.0 of the app to v2.1.0, all your configuration settings will transfer to the new app.
-
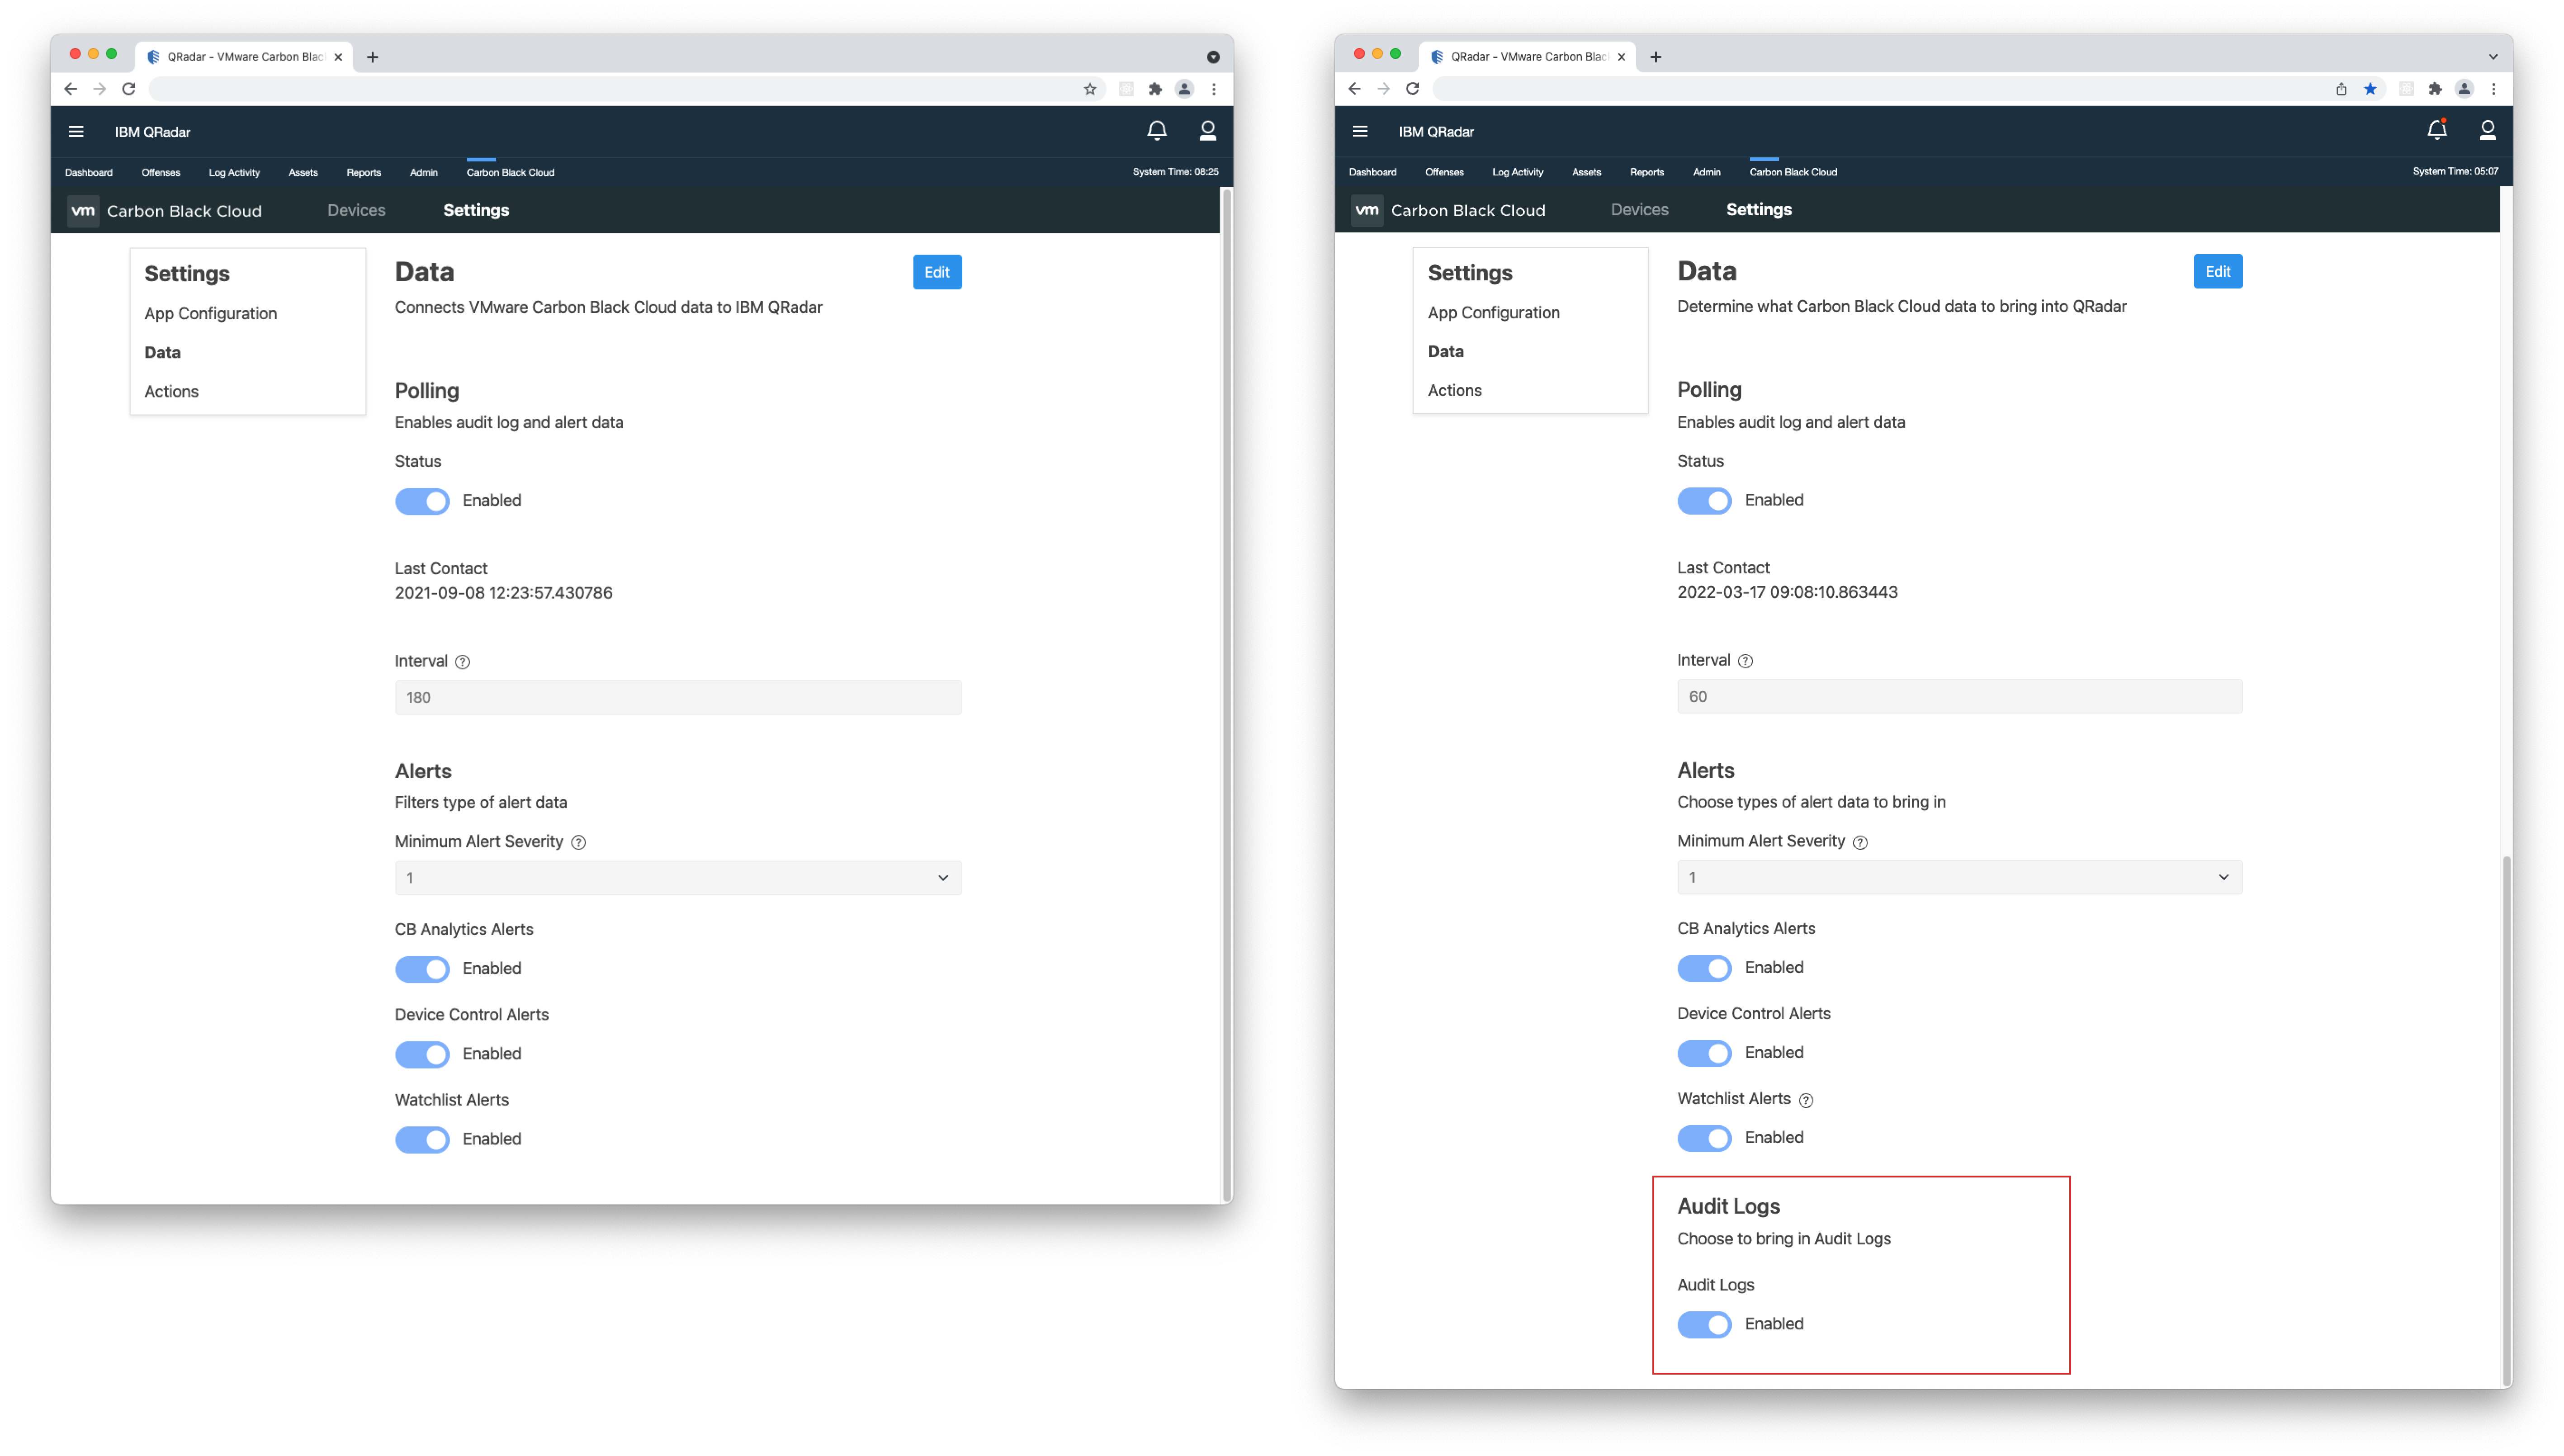
Configuration Changes
- • Added field for a custom "Log Source Identifier" under Settings > App Configuration. Default is "localhost".
- • Added toggle to enable or disable Audit Logs under Settings > Data. Default is "Enabled" after the upgrade.
v2.0.0 Settings > App Configuration
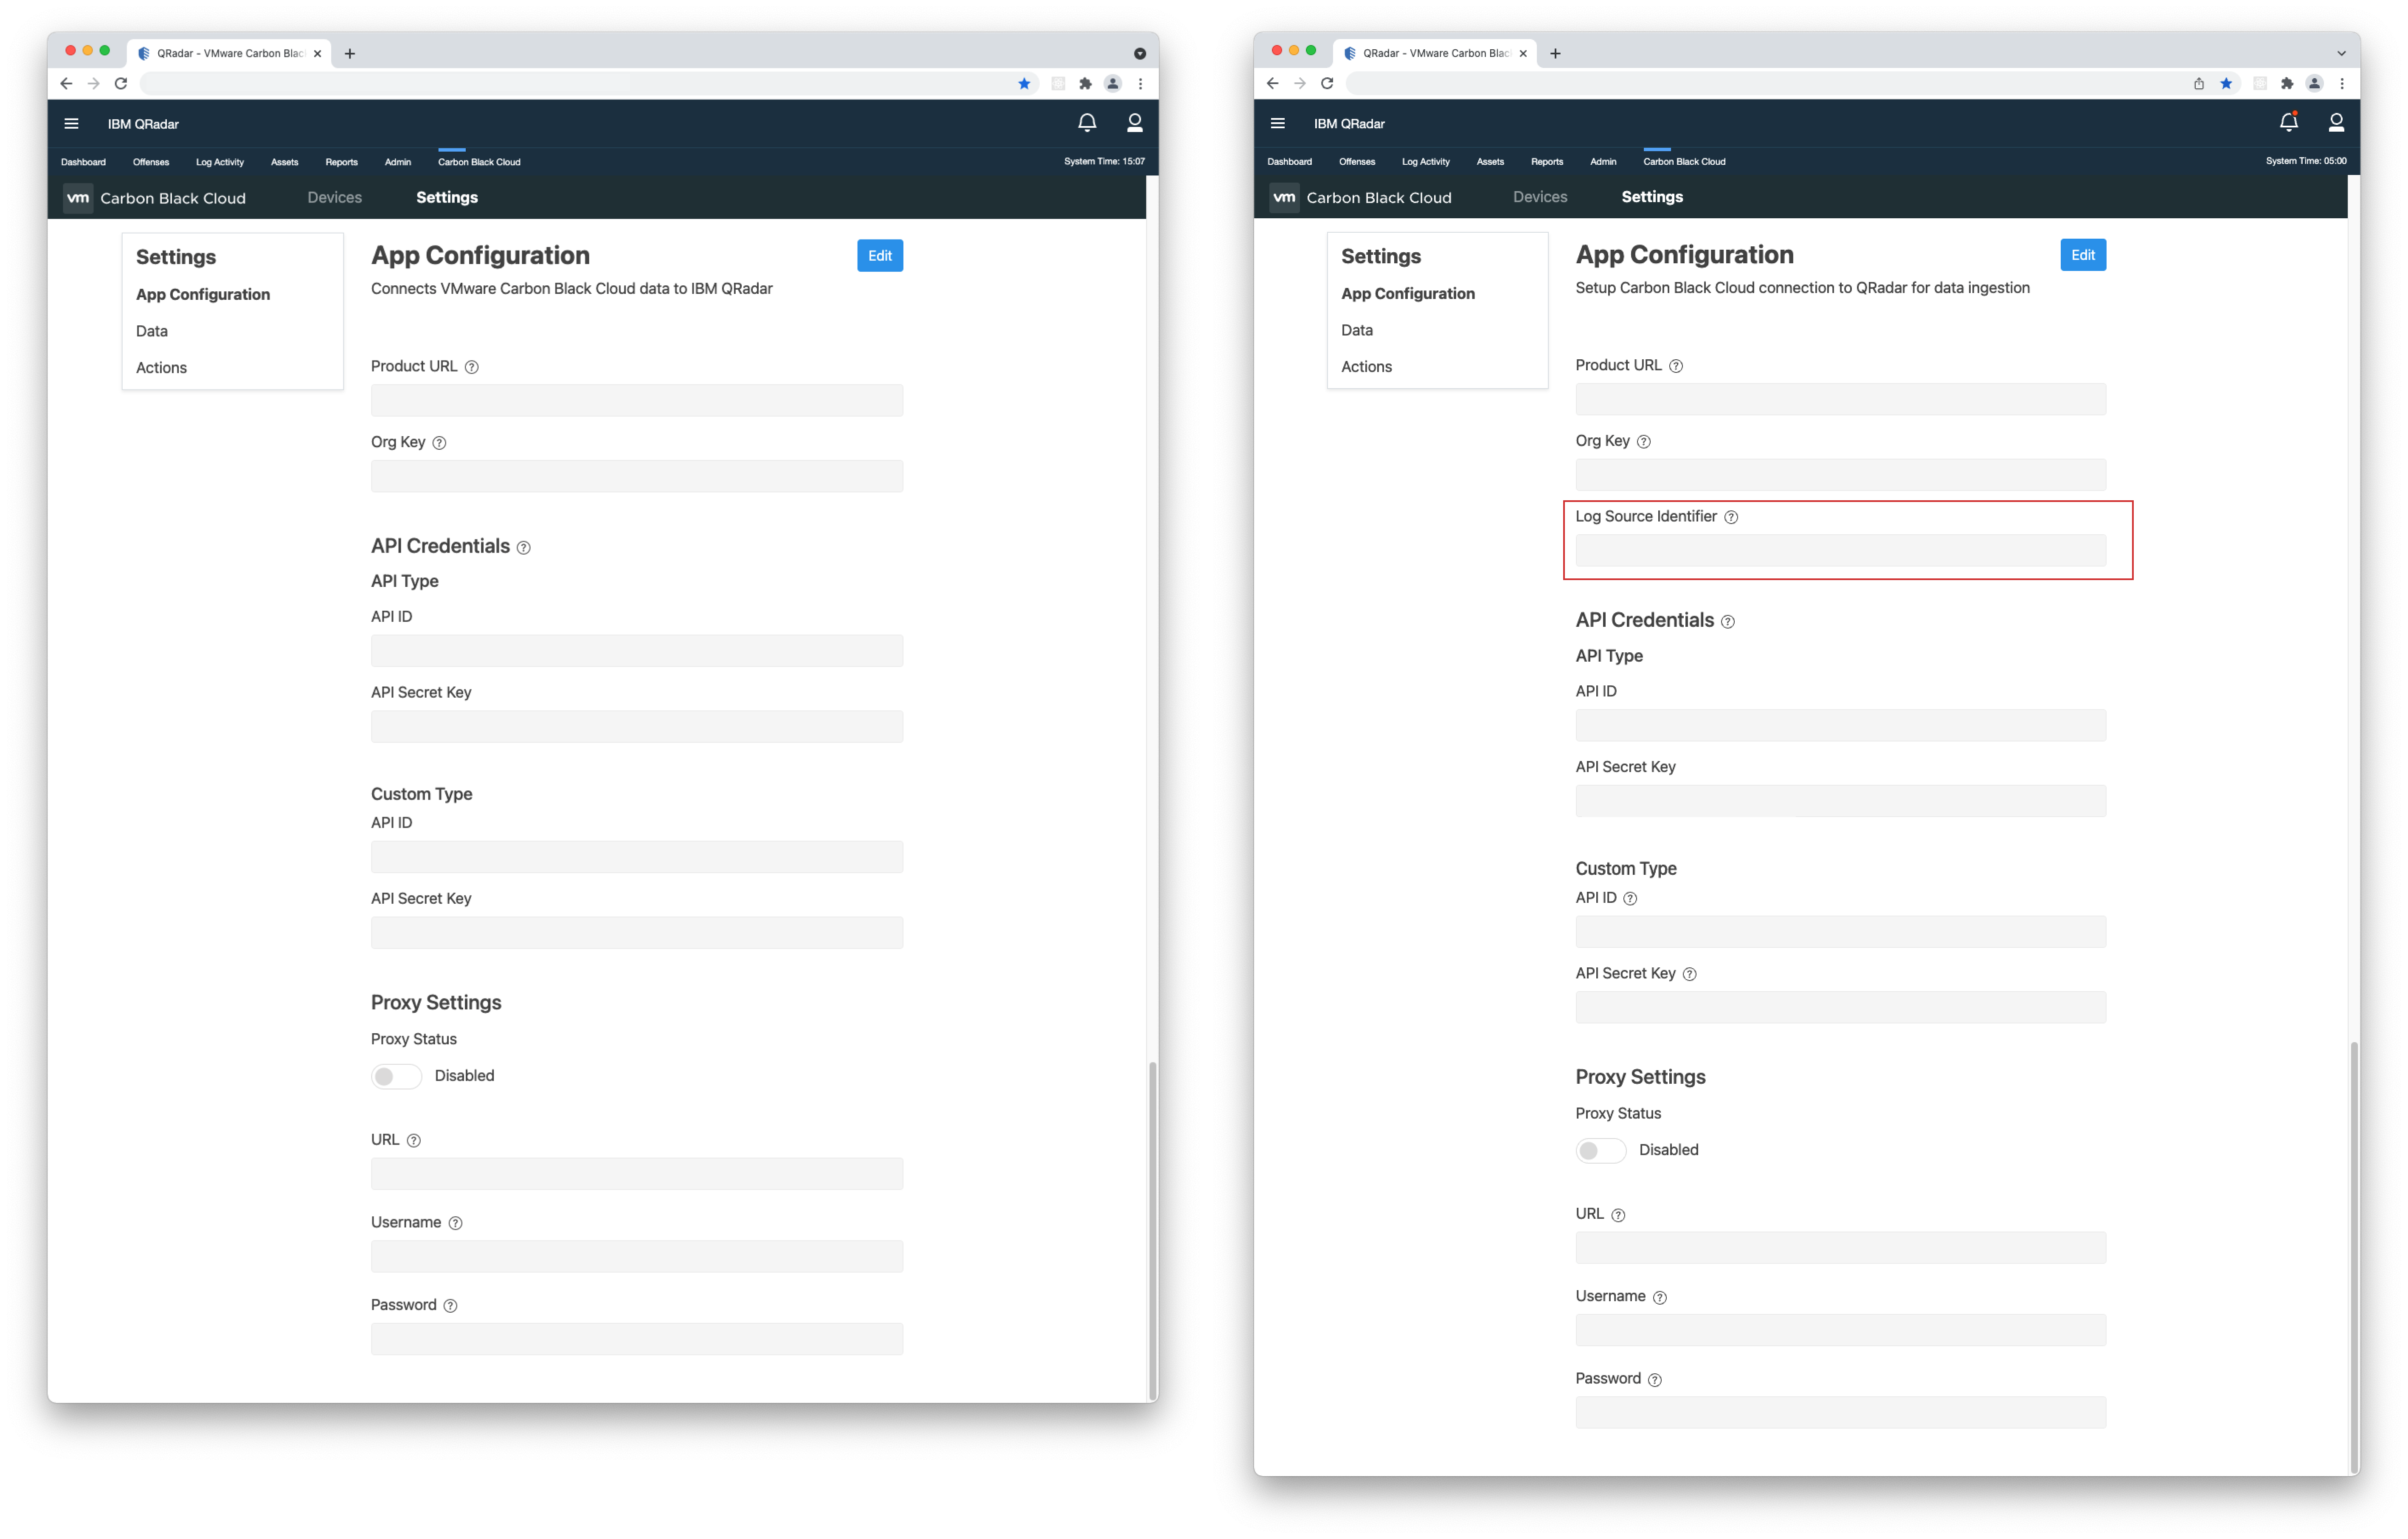
v2.1.0 Settings > App Configuration
v1.0.0 to v2.0.0
-
Breaking Changes
- • You can no longer use "SIEM" Type credentials. You will need to create "Custom" type credentials with the appropriate permissions or setup a Data Forwarder to continue using the full functionality of the app.
- • Device Information now requires "Custom" type credentials. Click here to learn how to create a "Custom" type key.
- • After the app upgrade from v1.0 to v2.0, the old log source will not pick up the new data (alerts, audit logs). Instead, a new log source needs to be created - either manually or via auto-detection.
-
Configuration Changes
- • If you are upgrading from v.1.0.0 of the app to v2.0.0, all your settings will transfer to the new app, except for the "SIEM" type credentials.
- • You can no longer ingest notifications using a "SIEM" type API key. The new app uses a "Custom" type API key to access Device information and, if configured, to ingest Alerts.
- • Using the new version of the App you can ingest Alerts and/or Events using the Data Forwarder.
- • You can continue to use the "API" type API key to ingest Audit Logs and perform Policy updates. This configuration, along with the other CBC configuration information such as URL, Org Key, and Proxy information, will transfer to the new app.
- • The "Enable Log Source Autodetection" in the Log Source Type configuration is possible to be disabled by default after the upgrade. To enable it, follow the "Log Source Type Configuration" steps from Setup Built-in Input.
-
App Upgrade Steps
- 1. Download the Carbon Black Cloud App for IBM QRadar via the IBM X-Force Security App Exchange.
- 2. Log in the QRadar console with a user with admin privileges, and install the downloaded zip package via the Extensions Management tool.
- 3. Refresh the web page once the installation is complete, as the interface might not get updated automatically.
- 4. Open your Carbon Black Cloud console, and copy the ORG KEY and the "Custom" Type Credentials. Detailed steps are available in the Keys and Permissions > "Custom" Type Credentials section.
- 5. In the QRadar console, go to Carbon Black Cloud > Settings > App Configuration, click "Edit", and paste the ORG KEY and the credentials in their respective fields, then click "Save".
- 6. In the QRadar console, go to Carbon Black Cloud > Settings > Data, click "Edit", and under "Alerts", depending on the data you want to pull, configure the parameters described below, and click "Save".
Minimum Alert Severity - control the severity of the alerts being pulled in. For example, choosing '4' will pull alerts with a severity of 4 or higher.
CB Analytics Alerts - change the switch to 'Enabled' to bring in CB_ANALYTICS alerts.
Device Control Alerts - change the switch to 'Enabled' to bring in DEVICE_CONTROL alerts.
Watchlist Alerts - change the switch to 'Enabled' to bring in WATCHLIST alerts. More details are available in the Installation and Configuration > Configure Alert Data section. - 7. To enable watchlist actions in the Log Activity page, follow the steps in the Installation and Configuration > Configure Actions section.
- 8. Configure the Log Source Type as described in the Setup Built-in Input > Log Source Type Configuration section.
- • New data ingestion method (Log Source) - Data Forwarder
v1.0.0 Admin > App Configuration
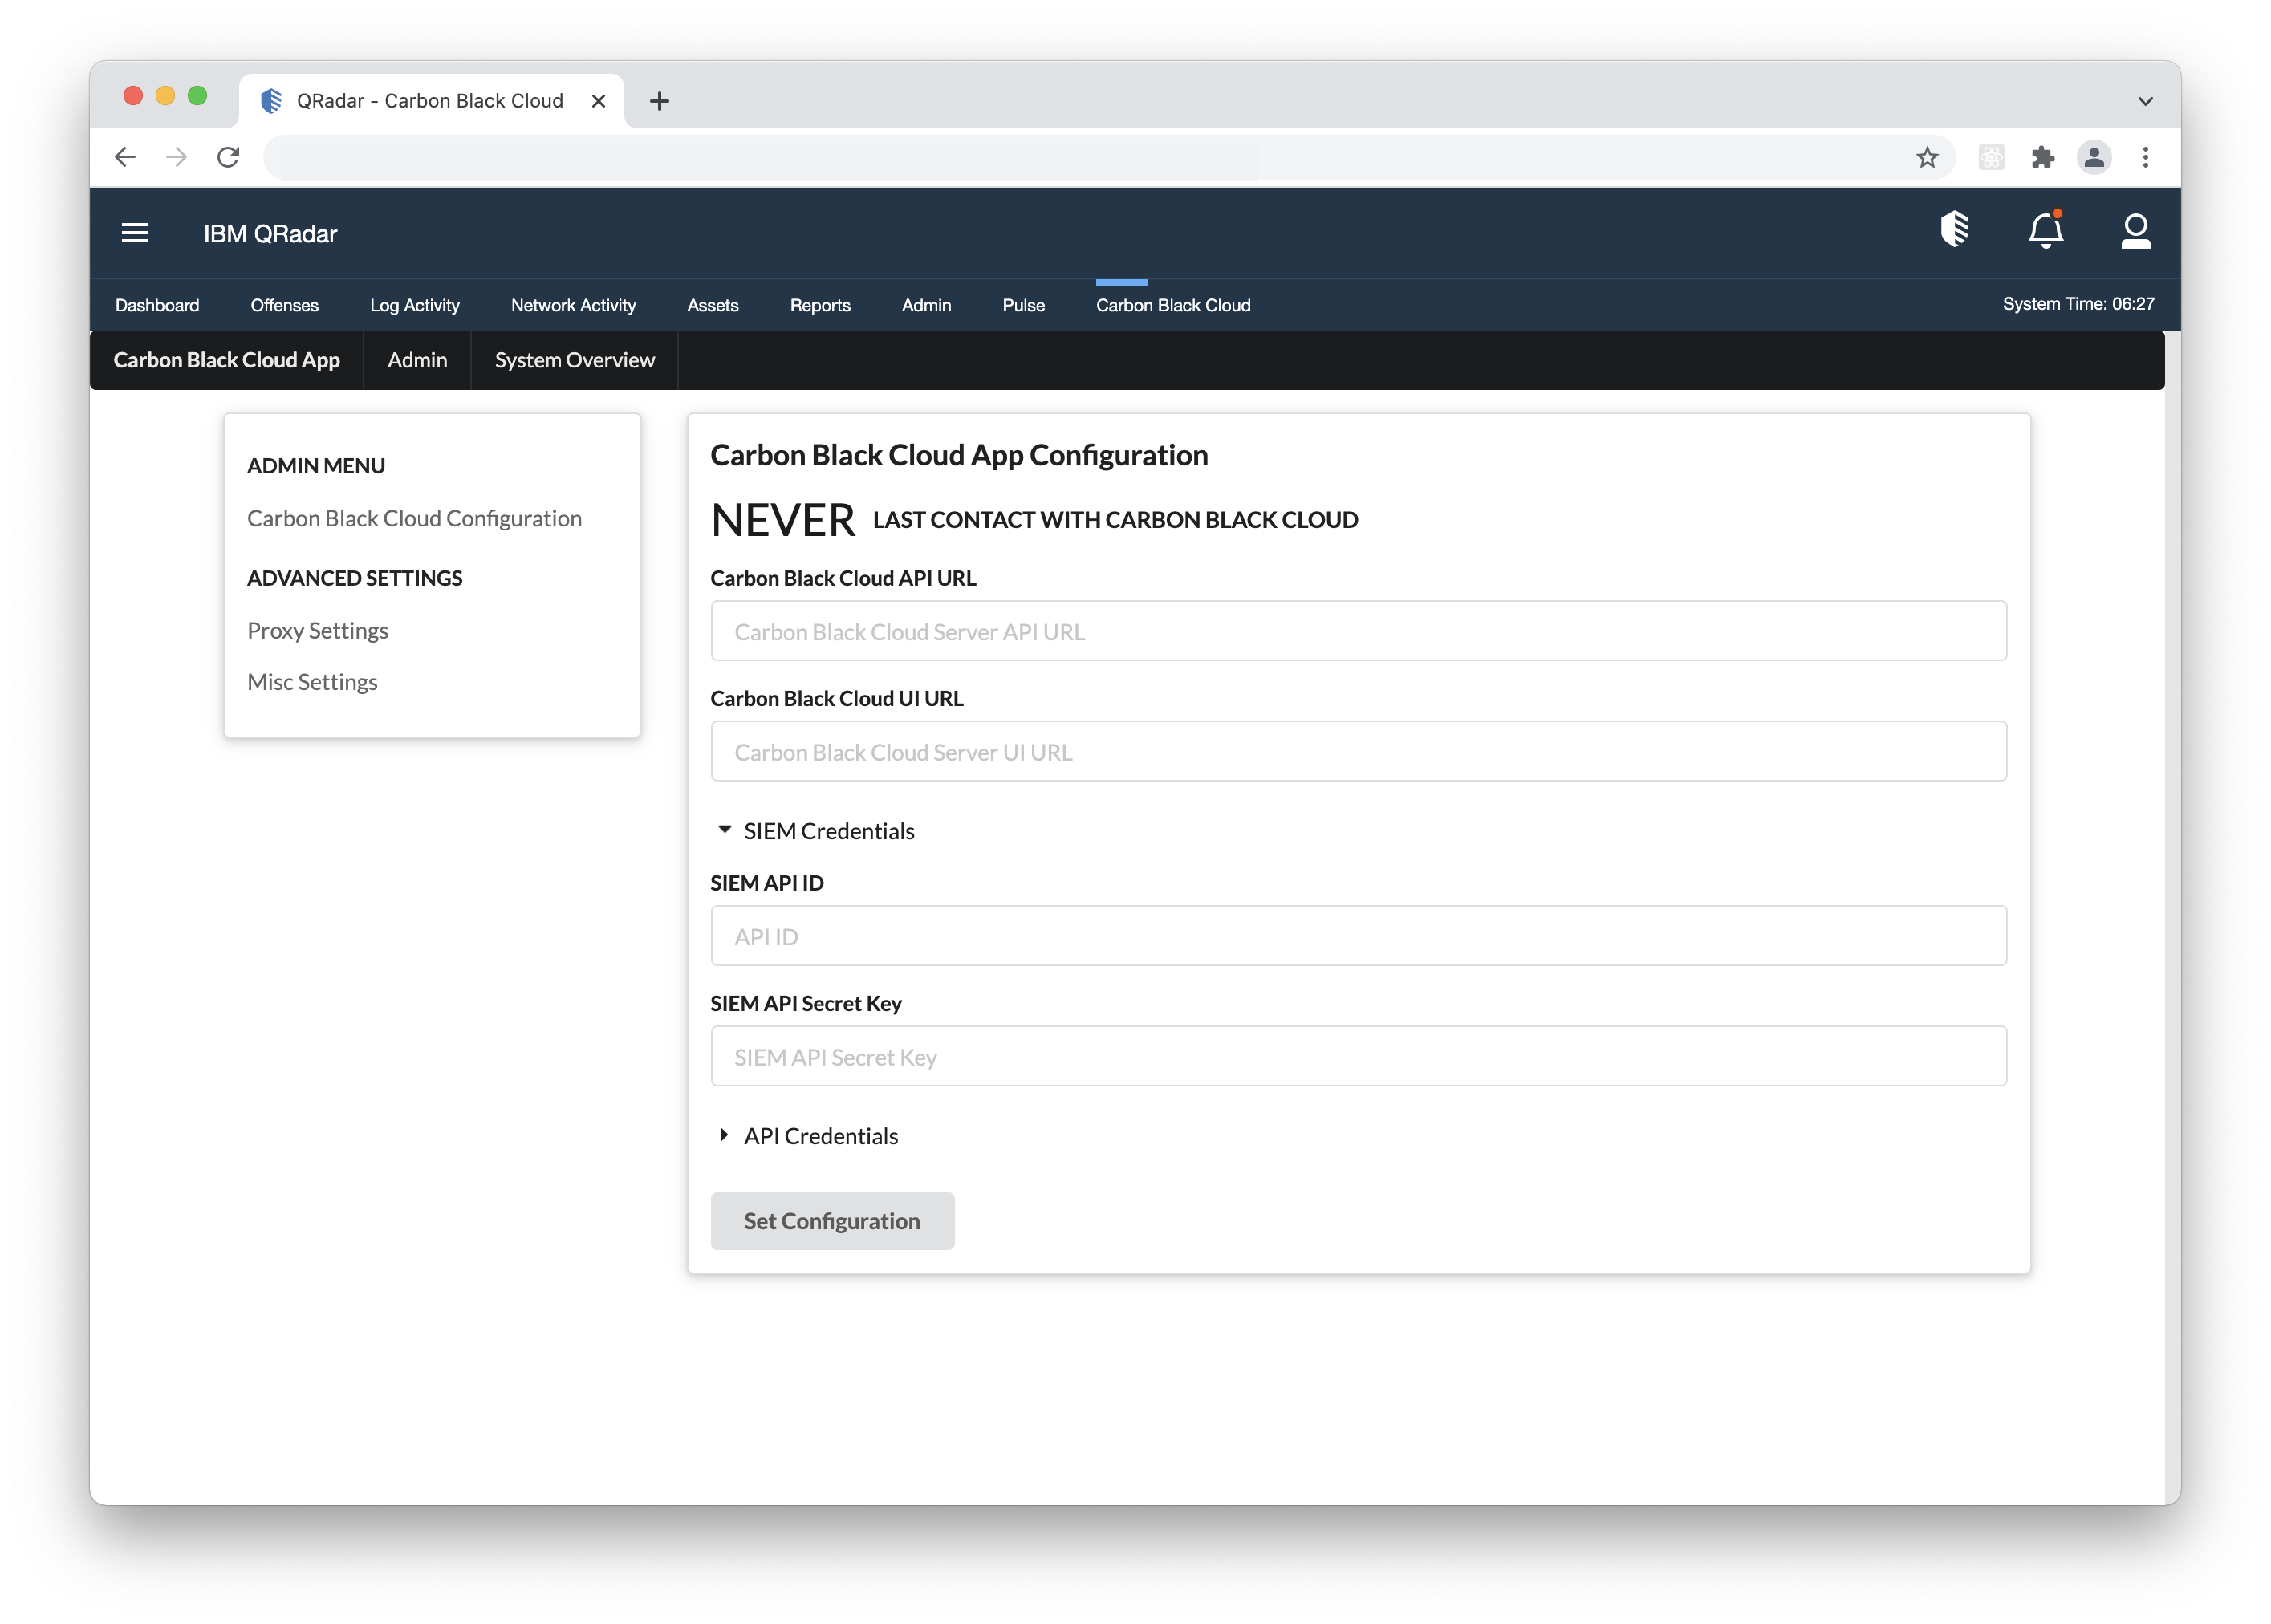

v2.0.0 Settings > App Configuration

Last modified on July 17, 2024