Workload Appliance Installation
You can secure VMware workloads in your data center using Carbon Black Cloud. To get started using Carbon Black Cloud Workload, you must set up an API key to establish a connection between the appliance and Carbon Black Cloud data.
Requirements
- Windows 3.6+ and Linux 2.9+ sensor versions only
- An operating Carbon Black Cloud Workload appliance (appliances must be online to receive a sensor)
- An API key with appropriate permissions (see Authentication below).
- A lightweight Carbon Black launcher for installing a sensor
- For Windows VMs, the Carbon Black launcher is packaged with VMware Tools. Install or upgrade VMware Tools to version 11.2.0 or later to obtain the launcher.
- For Linux VMs, manually install the launcher from VMware Tools Operating System Specific Packages (OSPs). Download and install Carbon Black launcher for your guest operating system from the package repository. For detailed instructions, see Prerequisite for Linux Systems.
Authentication
An API key enables a secure connection between the Carbon Black Cloud console and the Carbon Black Workload appliance that is deployed in the vCenter Server. This is like setting up a user name (API ID) and password (API Secret Key) for your Workload appliance so that it can create, read, edit, or delete data in the Carbon Black Cloud.
Create an Access Level for an Appliance
Before you can generate an API key from the Carbon Black Cloud console, you must create a custom API access level for your appliance. You must have the “Super Admin” role to create an access level. This is a one-time task.
- Sign in to the Carbon Black Cloud console.
- On the navigation bar, click Settings and then API Access.
- Select the Access Levels tab and then select Add Access Level.
- Enter an easily identifiable name and a description. Set Copy permissions from to None.
- Grant the following access:
- Appliances (send workload assets to CBC) — Create
- Appliances (appliance registration) — Create, Read, Update, Delete
- Device (sensor kits) — Execute
- Device (general information) — Read
- Live Query (manage queries) — Create, Read, Update, Delete
- Vulnerability (vulnerability assessment data) — Read, Execute
- Workload Management (view workloads without sensors) — Read
- Workload Management (install sensor on vCenter workload) — Execute
- Click Save.
Generate an API Key for an Appliance
Each appliance needs one API key. Using the same API key for multiple appliances will result in an error.
- Sign in to the Carbon Black Cloud console.
- Select Settings and then click API Access.
- Select the API Keys tab and then Add API Key.
- Enter a unique name for the appliance API key. The name must be unique for your organization.
- From the Access level type dropdown menu, select “Custom”.
- In the Custom Access Level dropdown menu, select the access level you created in the previous section
- Click Save. The API ID and API secret key are generated. You will use these in the next section (store the API Secret Key somewhere securely, because it cannot be retrieved after initial creation).
Connect an Appliance to the Carbon Black Cloud
Use the generated API key to register the appliance and complete the connection to the Carbon Black Cloud.
- Sign in to the VSphere web client.
- Verify that the appliance VM is powered-on. Open the VM console and note the appliance IP address.
- Open a web browser and go to
https:// {appliance-IP-address}. - Sign in to the appliance using administrator credentials.
- Select Appliance and then select the Registration tab.
- In the Carbon Black Cloud section, select Edit and enter the following information:
- The URL of the Carbon Black Cloud console
- A unique name for the appliance in your Carbon Black Cloud organization
- Paste the API ID and API secret key (see “Generate an API Key for an Appliance” on page) together with the Org Key
- Click Save. A green checkmark appears when connectivity is established.
- To verify the connection, sign in to the Carbon Black Console.
- On the navigation bar, click Settings and then click API Access.
- Select the API Keys tab and click the hyperlinked appliance name. You can view appliance health and connection status.
- On the navigation bar, click Inventory and then click Workloads.
- Click the Not Enabled tab to view your workloads inventory or VM data.
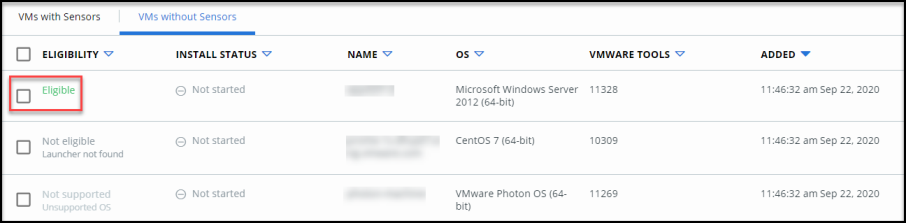
Install Sensors for Workloads
This section describes how to install sensors for workloads through the Carbon Black Cloud console. Workloads support Windows 3.6+ and Linux 2.9+ sensor versions only.
Note: If a workload is ineligible for sensor installation, contact your vCenter administrator.Optional: For prerequisites and for alternative instructions for installing sensors through vCenter Server, see the Carbon Black Cloud Workload Guide.
- Sign in to the Carbon Black console.
- On the navigation bar, click Inventory and then click Workloads.
- Click the Not Enabled tab and select eligible workloads.
- Click the Take Action menu and click Install sensors.
- Select the sensor version to install.
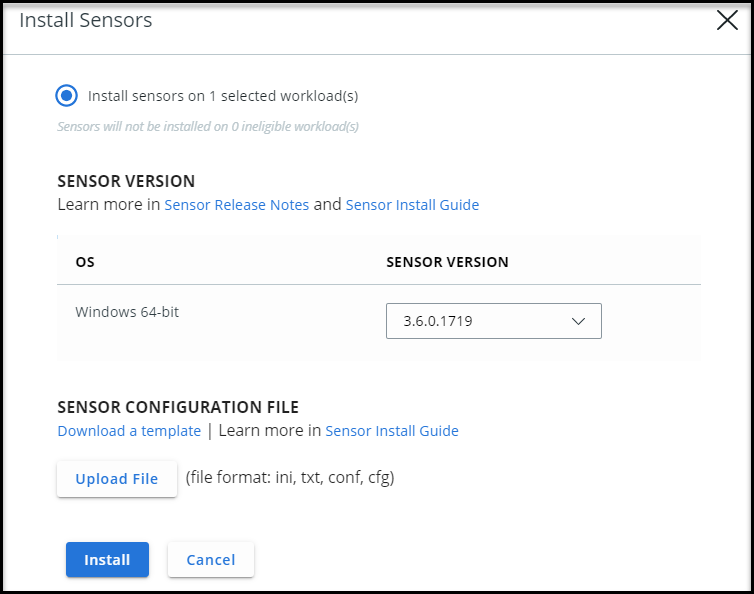
- You can optionally upload a sensor configuration file that contains command line installation options such as proxy configuration information. See Windows Sensor Supported Commands. Download a template to see an example configuration file. (The company registration code and Carbon Black Cloud URL are pre-populated in the template.)
- Click Install.
- After you install the sensors, click the Enabled tab for details about workloads and sensors.
Last modified on February 15, 2023