EDR REST API Quick Start
Carbon Black EDR (Endpoint Detection and Response) is the new name for the product formerly called CB Response.
Introduction
The CbResponse REST API provides a RESTful API for EDR, which means that it can be consumed by practically any language. The API sends a HTTPS request to a CbResponse server (authenticated via the API key) and retrieves a JSON response. This quick start guide will show you how to use the REST API to with EDR using curl or Postman. We strongly recommend going through this guide on a workstation or server that is separate from your Carbon Black server.
Requirements
- API key from your EDR instance.
- Workstation or Server with curl
https://www.mit.edu/afs.new/sipb/user/ssen/src/curl-7.11.1/docs/curl.htmlor Postman installed on your workstation.
API Payload Validation
Carbon Black EDR 7.7.0 supports validation of all payload tagged create (POST) and update (PUT) API requests against expected model schemas. The validation does not apply to requests from Carbon Black EDR UI as it is a trusted source, and thus does not on compromise user experience and response time. The feature is controlled by a cb.conf flag ValidateApiPayloadSchema, which is disabled by default. The feature is a great value addition to all customers requesting Carbon Black EDR APIs via custom scripts or CURL or any other client outside the scope of Carbon Black EDR. This ensures smooth client to server transaction as an API would not receive any unwanted fields/properties or their types and values as part of their payload.
Validations
The validation framework model is designed to capture payload attached to a POST or PUT method API request. The captured payload is then validated against pre-defined schemas which represents the expected model for the concerned API. The schema not only has information about the expected fields/properties but also has precise details about type of the field, its range, and its values. Here are some major validators for payload fields/properties:
Type: Expected type of the field; integer, string, array, object (dict, map) etc.Required: Whether the field is required or not.Max/Min Length: Maximum/Minimum length a string field can have.Maximum/Minimum: Maximum/Minimum value a number field can have.Pattern: A specific regex pattern a string field should match.Enum: Only list of values a field can have.Max/Min Items: Max/Min Items an array field can have.Unique Items: An array field can only have unique items.Max/Min Properties: Maximum/Minimum fields a payload object can have.Additional Properties: Whether a payload can have extra fields, other than the ones defined in the expected schema.
Response Error
The validation model generates an error response with 400 HTTP status code. The error object has two fields describing the type of validation failure.
validation_errors: Type: Object (Dict, Map) - Captures field specific validation errors; like type, max length, maximum, enum, pattern etc.schema_errors: Type: Array (List) - Captures schema related validation errors; like required, additional properties, max or min properties, etc.
Error object structure
{
    "validation_errors": {},
    "schema_errors": []
}
Sample error object(s)
{
    "validation_errors": {
        "email": "Email must be properly formatted to match the valid email syntax"
    },
    "schema_errors": [
        "Additional properties are not allowed ('BOGUS' was unexpected)"
    ]
}

{
    "validation_errors": {
        "banning_enabled": "123 is not of type 'boolean'",
        "process_filter_level": "-100 is not one of [0,1,2]"
    },
    "schema_errors": [
        "'name' is a required property"
    ]
}Get Your REST API token
To get started, you need to acquire a REST API token from the Carbon Black user interface. Log into your Carbon Black server and click your name on the black bar in the top right corner. A pop-up will appear; click Profile to jump to your user profile page. From there, on the left hand side, you will see a link for API Token. Click that link and a text box will appear populated with your user’s API token. Each user receives their own, unique API token. This token has the same power and privileges attached to your user and does not expire; so protect it like a password! If your API token is compromised, you can generate a new token by clicking the Reset API Token button; this will also revoke your old, compromised token so it can no longer be used to authenticate to the server.
Postman Example
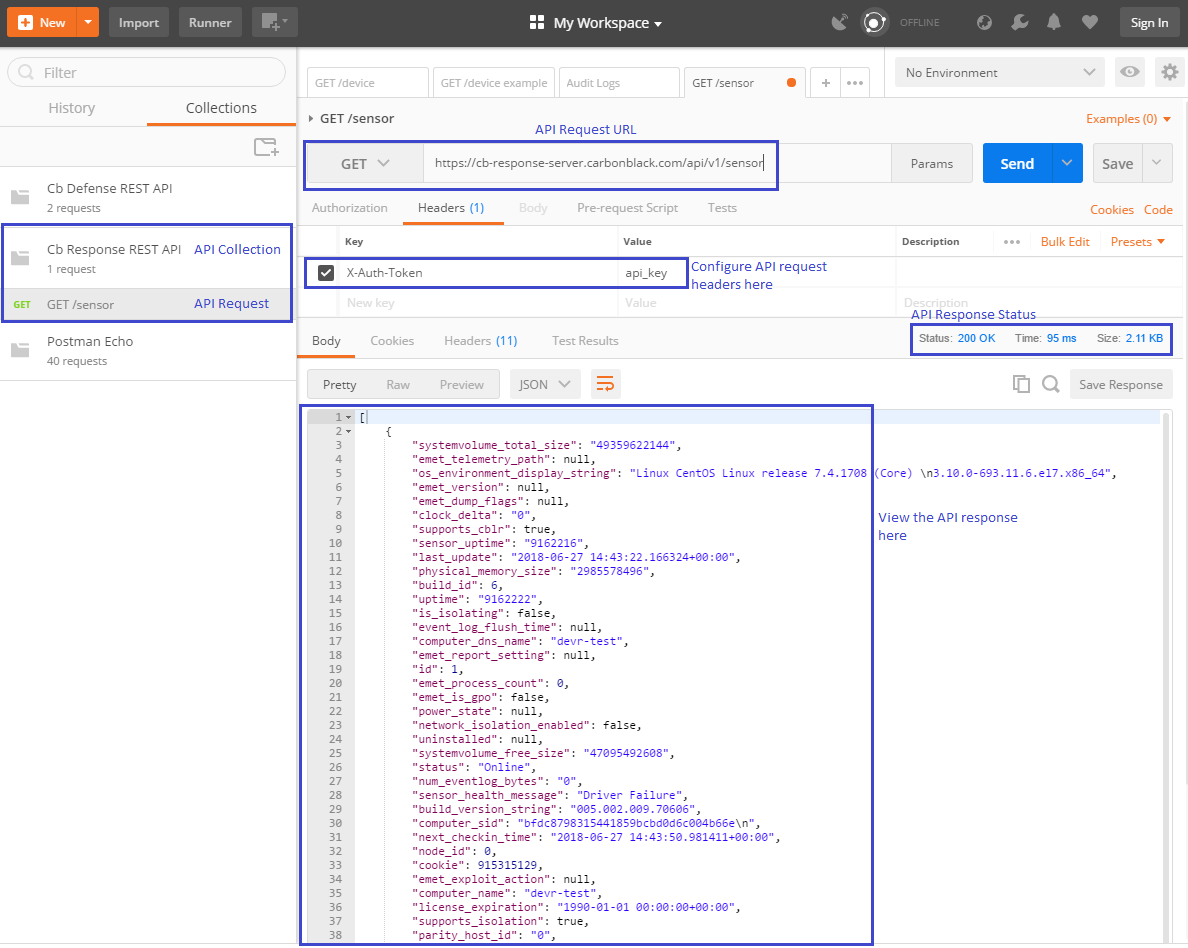
Let’s go through a quick setup of Postman. Note: You don't need to install Postman to use the REST API, the steps below can be done using 'curl' on your command line.
Steps to configure Postman:
- Launch Postman.
- Create a new collection (folder) for your API requests.
- Create a new request and add it to the collection created in step 2.
- Select the request type as
GET - Enter the request URL -
https://<CBRESPONSE-SERVER-URL>/api/v1/sensor- Example -
https://cb-response-server.carbonblack.com/api/v1/sensor
- Example -
- Under the API request, go to headers and add a new header:
- Header key:
X-Auth-Token - Header value:
<API_KEY>
- Header key:
- Click send!
- If all goes well, view the response.
Here’s a screenshot of my postman instance:

Curl Example
Request
The following GET request returns a list of sensor structures, one per registered sensor.
curl "https://cb-response-server.carbonblack.com/api/v1/sensor" -H "X-Auth-Token: API_KEY"
Response
[
    {
        "systemvolume_total_size": "49359622144",
        "emet_telemetry_path": null,
        "os_environment_display_string": "Linux CentOS Linux release 7.4.1708 (Core) \n3.10.0-693.11.6.el7.x86_64",
        "emet_version": null,
        "emet_dump_flags": null,
        "clock_delta": "0",
        "supports_cblr": true,
        "sensor_uptime": "9162216",
        "last_update": "2018-06-27 14:43:22.166324+00:00",
        "physical_memory_size": "2985578496",
        "build_id": 6,
        "uptime": "9162222",
        "is_isolating": false,
        "event_log_flush_time": null,
        "computer_dns_name": "devr-test",
        "emet_report_setting": null,
        "id": 1,
        "emet_process_count": 0,
        "emet_is_gpo": false,
        "power_state": null,
        "network_isolation_enabled": false,
        "uninstalled": null,
        "systemvolume_free_size": "47095492608",
        "status": "Online",
        "num_eventlog_bytes": "0",
        "sensor_health_message": "Driver Failure",
        "build_version_string": "005.002.009.70606",
        "computer_sid": "bfdc8798315441859bcbd0d6c004b66e\n",
        "next_checkin_time": "2018-06-27 14:43:50.981411+00:00",
        "node_id": 0,
        "cookie": 915315129,
        "emet_exploit_action": null,
        "computer_name": "devr-test",
        "license_expiration": "1990-01-01 00:00:00+00:00",
        "supports_isolation": true,
        "parity_host_id": "0",
        "supports_2nd_gen_modloads": false,
        "network_adapters": "127.0.0.1,000000000000|10.210.33.7,0050568f47b9|",
        "sensor_health_status": 50,
        "registration_time": "2017-09-07 13:03:35.858637+00:00",
        "restart_queued": false,
        "notes": null,
        "num_storefiles_bytes": "35776",
        "os_environment_id": 3,
        "shard_id": 0,
        "boot_id": "0",
        "last_checkin_time": "2018-06-27 14:43:19.988396+00:00",
        "os_type": 3,
        "group_id": 1,
        "display": true,
        "uninstall": false
    }
]
Resources
Last modified on February 15, 2023